What can we say about Chicken Nuggets? Perfectly delightful titbits, enjoyable as finger food or as part of a snack/meal with fries or potato wedges, or even enclosed in a wrap with some salad and sauce. Try this copycat Chicken Nuggets recipe at home, tastes just like store bought.They are tender and juicy on the inside and crispy on the outside. Give it a try!
Photo: Chicken Nuggets Recipe
Bismillah, let’s begin!
Check it out the Chicken Nuggets Recipe and printable version below.
Put your own spin on it. And lemme know how it turns out. Post a photo on Facebook (Recipestable) or on Twitter so I can see how lovely yours turn out.
Happy Cooking!!
Keep remember me in your Dua’s and Stay tuned for new content on the blog 🙂
If you like this post, Please Subscribe to my blog and let me know your feedback by commenting below.. I have lots more recipes to share with you.
Arrival of the holy month of Ramadan disrupts ones routine. From eating to sleeping to socializing, everything changes for Muslims. So In today’s Iftar, I made Pocket Bread Sandwich for my family. A great break from the usual toasted chicken veggie sandwich. Very Easy to make and yummy to eat. Do try it.
Photo: Pocket Bread Sandwich Recipe
You’ll never buy sandwiches from market again once you’ve learned how to make these quick and easy Pocket Bread Sandwich in your own kitchen.This Pocket Bread Sandwich recipe is ideal for Iftar parties, Picnics and Tea time chit chats.
Bismillah, let’s begin!
Check it out the Pocket Bread Sandwich Recipe and printable version below.
I have also posted Chicken Pita Pockets Recipewhich is another easiest & tastiest version of making sandwiches. Do check it out as well.
Put your own spin on it. And lemme know how it turns out. Post a photo on Facebook (Recipestable) or on Twitter so I can see how lovely yours turn out.
Happy Cooking!!
If you like this post, Please Subscribe to my blog and let me know your feedback by commenting below.. I have lots more recipes to share with you.
Who doesn’t love a hot, fried spring rolls? Making them yourself ensures a maximum freshness of flavour. This chicken vegetable rolls recipe is easy to follow and makes a perfect treat for your toddler.
Photo: Chicken Vegetable Rolls Recipe
Bismillah, let’s begin!
Check it out the Chicken Vegetable Rolls Recipe and printable version below.
Recipe Note’s:
Freeze remaining rolls in an airtight container between sheets of baking paper for up to 1 month.
I have also posted Rainbow Bread Rolls Recipewhich is another easiest & tastiest version of making rolls. Do check it out as well.
Put your own spin on it. And lemme know how it turns out. Post a photo on Facebook (Recipestable) or on Twitter so I can see how lovely yours turn out.
Happy Cooking!!
Keep remember me in your Dua’s and Stay tuned for new content on the blog 🙂
If you like this post, Please Subscribe to my blog and let me know your feedback by commenting below.. I have lots more recipes to share with you.
Are you looking for a healthy alternative for processed chicken nuggets? This Crunchy Vegetable Nuggets Recipe is sure to be a favorite for your kids.
Photo: Crunchy Vegetable Nuggets Recipe
These Vegetable Nuggets are crispy from the outside and soft from inside comprising of different flavours of many vegetables, cheese and herbs. This is the best way to turn vegetables into tiny kid-friendly nuggets. Making homemade veggie nuggets isn’t hard and beat the store-bought.
Photo: Crunchy Vegetable Nuggets Recipe
You can serve Vegetable Nuggets with tea in the evening or as a starter to your guests. Do try it!! Check it out the Crunchy Vegetable Nuggets Recipe and printable version below!!
Are you looking for a healthy alternative for processed chicken nuggets? This Crunchy Vegetable Nuggets Recipe is sure to be a favorite for your kids.
Prep Time 20 minutesminutes
Cook Time 10 minutesminutes
Total Time 30 minutesminutes
Servings 6
Author Bushrah | Recipestabale
Ingredients
2boiled potatoes
1/2cupgrated carrots
1/4cupsweet corn
1/4cupboiled green peas
1/4cupgreen beanstrimmed and boiled
1/4cupcheesegrated
1/2teaspoonmixed herbsbasil, parsley
2tablespoonchopped coriander leaves
1/2teaspoonblack pepper
Salt To Taste
1egglightly beaten
2tablespoonplain flour
2tablespooncornflour
1/2cupbread crumbs
Oil for deep frying
Instructions
Directions
In a large bowl, combine together the boiled potatoes, grated carrots, beans, green peas and sweet corns.
Season with herbs, salt and pepper.
Add corainder leaves and cheese. Mix until well combined.
Now add add plain flour,cornflour in it.
Shape into nuggets.
Place bread crumbs in a shallow bowl.
Dip vegetable nuggets in egg then coat with bread crumbs.
Heat oil in a deep pan over medium heat.
Deep fry nuggets for 2-3 minutes or until golden brown.
Remove from the oil and absorbent on kitchen paper.Crunchy Vegetable Nuggets are ready to serve. ENJOY!!
Notes
Serving Suggestions: Serve with tomato ketchup or your favorite dipping sauce.
Note: For a healthier version of these nuggets, you can bake them. After you bread them, lay them out on a baking sheet and drizzle with olive oil. They will probably need to bake at 350-400 degrees F. for 15-20 minutes to get nice and crispy.
I have also posted Chicken Nuggets Recipe which is another quick version of making Nuggets. Do check it out as well.
[divider]
If you like this Crunchy Vegetable Nuggets Recipe,Please Subscribe to my blog. I have lots more recipes to share with you. And If you make it then let me know your feedback by commenting below.
Samosa is an important meal of Iftar time. Reshmi Samosa _ Crisp, light and hot and bursting with flavour. This Reshmi Samosa recipe has a special taste of samosa with chicken, mayonnaise, cream and other seasonings. Do try it and make reshmi samosa on next Iftar to feed your friends & family. Goes great with ketchup or imli sauce.
Heat 2 tablespoon oil in a frying pan. Add ginger garlic paste and fry for few minutes.
When the aroma comes out, add chicken strips.
Cover with a lid and cook on low heat for 5-8 minutes or until chicken is no longer pink.
When all water dries up, take it out in a dish.
Allow to cool and shred the cooked chicken.
Now add green chilies, green onion, mint and coriander leaves.
Season with cumin powder, black pepper and salt .
Stir in the mayonnaise and fresh cream.
Place 1 teaspoon of filling onto a samosa sheet ( samosa patti).
Fold samosa sheet around filling into a triangular shape. Seal edges with egg yolks or cold water.
Repeat this method with remaining ingredients.
Heat oil in a deep pan over medium heat.
Fry Reshmi samosa’s in hot oil for 1-2 minutes or until they turn crispy and golden brown.
Drain on absorbent paper. Reshmi Samosa is ready to serve. ENJOY!!
Notes
Serve with imli ki chutney.
If you like Reshmi Samosa Recipe and make it then let me know your feedback by commenting below.And if you know more innovative ways in which we can utilize this mouth watering Reshmi Samosa, do share with us and we would be glad to give it a try.
Achari Aloo Samosa is a special appetizer to give you a combo taste of aloo samosa and achar(pickle).Very easy and quick Achari Aloo Samosa recipe. Don’t wait and must try my Achari Aloo Samosa recipe and don’t forget to share your experience with us!.
Add onion, fresh coriander, mint, green chilies, and lemon juice.
Season with achar masala, dry mango powder, red chili and salt. Mix until well combined.
Place a samosa wrap on a clean, dry surface and put a portion of the potato filling in one corner of the samosa patti and fold into a triangle.
Apply a little water at the edges and seal it.
Repeat with the remaining wraps and stuffing to make more samosas.
Heat the oil in a pan over medium heat.
Deep-fry the samosas in batches till they turn golden brown in colour from all sides.
Drain on absorbent paper. Achari Aloo Samosa is ready to serve. ENJOY!
Notes
Serve with mint chutney.
If you like Achari Aloo Samosa Recipe and make it then let me know your feedback by commenting below.And if you know more innovative ways in which we can utilize this mouth watering Achari Aloo Samosa, do share with us and we would be glad to give it a try.
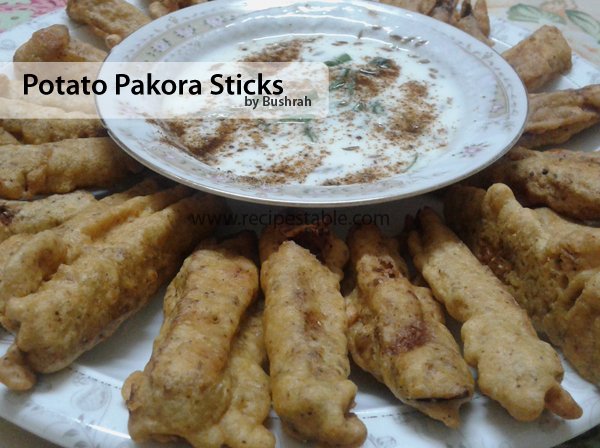
Pakoras are fried snack found all across Asia and are preferred most during Ramadan. As we all know Ramadan are just around the corner, and it is the time of the year when one can try something new Pakora recipes.
Below is an easy to make, very interesting Potato Pakora Sticks recipe, you can make these pakora sticks with any seasonal veggies of your choice.
Photo: Potato Pakora Sticks Recipe
Check it out the Potato Pakora Sticks Recipe here!!
Bread rolls is one of the favourite Ramadan recipes. There are several recipes of bread rolls different from each other. One recipe is listed below with a distinct taste made with chicken, green chutney and tomato ketchup filling.Thrice coloured Bread Rolls.
Photo: Rainbow Bread Rolls Recipe
All those who are new to cooking and desire to attempt something easy and unproblematic yet lip-smacking then they should go for this Rainbow Bread Rolls recipe. It can be a perfect addition to your Iftar meal and can be less expensive and better tasting than other bread rolls. Rainbow bread rolls take bit more time, but they add a special touch.
Photo: Rainbow Bread Rolls Recipe
Try these scrumptious Rainbow bread rolls, they are great, you can enjoy it as an evening snack or can be prepared on birthday parties, ramadan etc..
Photo: Rainbow Bread Rolls Recipe
Here is the Step by Step Rainbow Bread Rolls Recipe !!
For Rainbow Bread Rolls
6 bread slices
2 eggs, lightly beaten
3 tbsp tomato ketchup
3 tsp butter
3 tsp green chutney
1/2 cup bread crumbs
oil for deep frying
For Chicken Filling
1 cup boiled shredded chicken
2 tbsp mayonnaise
1 tbsp chili garlic sauce
1 tbsp soy sauce
1/2 tsp black pepper
salt to taste
To Make Chicken Filling: In a large bowl, combine together the chicken, mayonnaise, soy sauce, chili garlic, salt and pepper. Set aside.
Step 1 ~ Rainbow Bread Rolls
Step 2
Remove crust from the bread slices.
Step 2 ~ Rainbow Bread Rolls
Step 3
Slightly roll bread slices with a rolling pin.
Step 3 ~ Rainbow Bread Rolls
Step 4
Spread half teaspoon butter on the each bread slices. Place 1 tbsp chicken mixture at the one corner of bread slices.
Step 4 ~ Rainbow Bread Rolls
Step 5
Put 1/2 teaspoon green chutney over it.
Step 5 ~ Rainbow Bread Rolls
Step 6
Apply tomato ketchup on the second corner as shown in the picture.
Step 6 ~ Rainbow Bread Rolls
Step 7
Roll Like Swiss rolls. Carefully seal edges with wet hands. Dip bread rolls in egg.
Step 7 ~ Rainbow Bread Rolls
Step 8
Then coat with breadcrumbs.
Step 8~ Rainbow Bread Rolls
Step 9
Repeat this method with remaining ingredients.
Step 9~ Rainbow Bread Rolls
Step 10
Heat oil in a deep pan over medium heat. Fry bread rolls on each side for 2-3 minutes or until golden.
Step 10 ~ Rainbow Bread Rolls
Step 11
Remove from the oil and drain on an absorbent paper. Rainbow Bread Rolls are ready to serve. ENJOY!!
In a large bowl, combine together the chicken, mayonnaise, soy sauce, chili garlic, salt and pepper. Set aside.
To Make Rainbow Bread Rolls:
Remove crust from the bread slices. Slightly roll bread slices with a rolling pin.
Put 1/2 teaspoon green chutney over it. Spread half teaspoon butter on the each bread slices. Place 1 tbsp chicken mixture at the one corner of bread slices.
Apply tomato ketchup on the second corner as shown in the picture.
Roll Like Swiss rolls. Carefully seal edges with wet hands. Dip bread rolls in egg. Then coat with breadcrumbs.
Repeat this method with remaining ingredients.
Heat oil in a deep pan over medium heat. Fry bread rolls on each side for 2-3 minutes or until golden.
Remove from the oil and drain on an absorbent paper. Rainbow Bread Rolls are ready to serve. ENJOY!!
If you like Rainbow Bread Rolls Recipe and make it then let me know your feedback by commenting below.
Very easy to make, nutritious, and delicious _ Moist inside and crunchy outside, these are great with oven fries or roasted veggies and low-fat homemade tartar sauce. You can make these fish sticks in about the same amount of time it takes to bake a box of the frozen kind. DO try it!!
Besan Aloo Tikki with crisp outside soft inside is a real treat to taste buds at anytime. Serve this delicious Besan Aloo Tikki as a starter or can be serve at tea-time with the sauce or chutney of your choice.
Add green chilies, green onion, cumin powder, red chili and salt. Mix until well combined.
Make thick batter with besan and lil water in a separate bowl.
Divide the potato mixture into equal portions.
Shape each portion into round thick cutlet (tikki).
Heat the oil in a deep pan over medium heat.
Dip each cutlet (tikki) in the batter then fry for 5-8 minutes or until it turns to golden brown in colour from both the side.
Remove from the oil and absorbent on kitchen paper. Besan Aloo Tikki is ready to serve. ENJOY!!
Notes
Serve with your favorite chutney.
If you like Besan Aloo Tikki Recipe and make it then let me know your feedback by commenting below.And if you know more innovative ways in which we can utilize this mouth watering Besan Aloo Tikki, do share with us and we would be glad to give it a try.
Are you a Spicy snacks lover? Today I am sharing Stuffed Mirch Pakora Recipe, all time favorites and very easy to make. Start off your meal with this crunchy starter.
Photo: Stuffed Mirch Pakora
You can make these stuffed Mirch Pakoras as a Iftar time snacks in Ramadan, they hardly take around half an hour to prepare and serve .
Photo: Stuffed Mirch Pakora
It is also goes great with hot cup of tea on rainy days. Serve hot with tamarind chutney and green chilli chutney or tomato chutney , or tomato sauces .
Check it out the Stuffed Mirch Pakora Recipe and printable version below!!
Today I am sharing Stuffed Mirch Pakora Recipe, all time favorites and very easy to make. Start off your meal with this crunchy starter.
Prep Time 5 minutesminutes
Cook Time 10 minutesminutes
Total Time 15 minutesminutes
Servings 4
Author Bushrah | Recipestable
Ingredients
8large size green chiliesslit vertically and deseeded.
For Stuffing
2tablespoonmint chutney
2tablespoontamarind pulp
2tablespoonpomegranate seedsAnardana, crushed
1/2teaspoonred chili
1/2teaspooncumin powder
salt to taste
For The Batter
1/2cupchickpea flourbesan
1/2cuprice flour
1/2teaspoonred pepper
1/4teaspooncarom seedsajwain, optional
salt to taste
Other Ingredients
oil for frying
Instructions
Directions
To Make Stuffing
In a bowl, mix together the mint chutney, tamaring pulp, pomegranate seeds, red chili, cumin powder and salt.
Set aside.
To Make Batter
In another small bowl, combine the chickpea flour,rice flour, red pepper, carom seeds and salt.
Add enough water to make a thick batter and set aside.
To Proceed
Divide stuffing into 8 equal portions.
Stuff each chilli with a portion of the stuffing.
Heat oil in a large pan over medium heat.
Dip the stuffed chillies in the flour batter.
Deep fry pakoras in hot oil for 4-5 minutes or until they turn golden brown in colour from all sides.
Drain on absorbent paper. Stuffed Mirch Pakora is ready to serve.
Notes
Serving Suggestions: I served them with mango Chutney to mild the taste.
I have also posted Chips Pakora Recipe which is another easiest version of making tea time snack or lunch box item . Do check it out as well.
[divider]
If you like Stuffed Mirch Pakora Recipe , Please Subscribe to my blog. I have lots more recipes to share with you. And If you make it then let me know your feedback by commenting below.
Making Smiley Face Fries at home is not a big deal. You can easily make smiley faces with a knife or a teaspoon or other sharp instrument on them.Do try this Smiley Face Fries Recipe and put a smile on your kid’s face with these fun-shaped potatoes that have a crispy crunchy flavor.
Photo: Smiley Face Fries Recipe
Bismillah, let’s get started!
Check it out the Smiley Face Fries Recipe and printable version below!
Do try this smiley face fries recipe and put a smile on your kid’s face with these fun-shaped potatoes that have a crispy crunchy flavor.
Prep Time 10 minutesminutes
Cook Time 15 minutesminutes
Total Time 25 minutesminutes
Servings 6
Author Bushrah @ Recipestable
Ingredients
6round potatoes
1teaspoonherb seasoning
1teaspoonsalt
1/4teaspoongarlic powder
oil for frying
chaat masala for sprinklingoptional
Instructions
Method
Wash and peel potatoes.
Cut the potatoes in circles, with each circle measuring about 1/4 cm thick.
Make smiles on the potatoes by using the edge of a teaspoon.
Using an ice-pick, bore two holes in the potatoes for the eyes.
Sprinkle the herb seasoning, garlic powder and salt over the potato slices.
Stir to coat evenly.
Leave it for few minutes to blend flavors.
Now heat oil in a pan over medium high heat.
Add potatoes and fry for 10-12 minutes or until crispy and golden brown.
Remove from the oil and drain on kitchen paper.
Sprinkle Chaat masala over it. Smiley Face Fries are ready to serve. ENJOY!!
Notes
Serving Suggestions: Serve with your favorite dipping sauce.
I have also posted Curly Fries Recipewhich is another easiest & tastiest version of making Crispy Fries at home. Do check it out as well. It’s finger lickin’ good. You’ll be coming back for more.
Put your own spin on it. And lemme know how it turns out. Post a photo on Facebook (Recipestable) or on Twitter so I can see how lovely yours turn out.
This modern and Buffalo Chicken Cheese Balls Recipe is full of buffalo chicken, Hot Sauce, mozzarella, and cheddar cheese! Great as an appetizer or light lunch.
Among all the chicken favorites Chicken Cheese Balls are not only very easy to cook but also flavorful, moist, cheesy and crunchy at the same time. Be it a casual lunch idea for family or a small home party; Buffalo Chicken Cheese Balls are sure to please your family and guests alike. It also makes a delicious lunch box item for the children. Buffalo chicken cheese balls tastes better if served with Garlic Sauce or Tomato ketchup.
Photo: Buffalo Chicken Cheese Balls Recipe
These Buffalo Chicken Cheese Balls are one of the best foods ever created. They are incredibly easy to make and they taste out of this world delicious! Not to mention my picky eatin.
I didn’t get a very good shot of the buffalo chicken cheese balls.. I was too eager to get on with it and eat them! Some day I’ll learn to be more patient. (InshaAllah) 🙂
Photo: Buffalo Chicken Cheese Balls Recipe
Here is a really simple, quick yet a better recipe to try this weekend.
So let us start!! Ready ??
Check it out the Buffalo Chicken Cheese Balls Recipe and printable version below!!
This modern and Buffalo Chicken Cheese Balls Recipe is full of buffalo chicken, Hot Sauce, mozzarella, and cheddar cheese! Great as an appetizer or light lunch.
Prep Time 15 minutesminutes
Cook Time 5 minutesminutes
Total Time 20 minutesminutes
Servings 9
Author Bushrah | Recipestable
Ingredients
3cupsboiled & shredded chicken
2green onionsfinely chopped
1/2cuphot pepper sauce
1cupCheddar cheesegrated
1cupMozzarella cheese
1cupall-purpose flour
3eggslightly beaten
1cupplain bread crumbs
oil for frying
Instructions
Directions
In a large bowl, mix together the chicken, green onions, Cheddar cheese, Mozarella cheese and hot sauce.
Now shape the mixture into 1.5 inch balls.
Put the flour, eggs and bread crumbs in three separate dishes.
Dip and coat each ball in flour, then egg then bread crumbs.
Place the breaded chicken balls onto a plate while breading the rest; do not stack.
Heat oil in a deep pan over medium heat.
Fry the breaded balls in the hot oil for 1-2 minutes or until lightly browned.
Remove from the oil and drain on kitchen paper.Buffalo Chicken Cheese Balls are ready to serve. ENJOY!!
Notes
Serving Suggestions: Serve with Your Favorite Dipping Sauce.
If you like this Buffalo Chicken Cheese Balls Recipe, Please Subscribe to my blog. I have lots more recipes to share with you. And If you make it then let me know your feedback by commenting below.
This delicious Chicken Finger Sandwiches recipe is always a favorite sandwich. So easy to make and so delicious. With ketchup and [highlight]herbs seasoning[/highlight] for color and tang, this dressed-up chicken salad is wonderful on bread fingers or served on a lettuce leaf.
Finger sandwiches are the easiest and most requested party food. It’s a lovely way to serve sandwiches and a great way to use up leftover chicken, or great to take as lunch as a normal sandwich. Perfect for afternoon tea.
Photo: Chicken Finger Sandwiches Recipe
The weekend was full of foodie experiences. A few days ago, I decided to do a tea party with a my childhood friend and her child’s and made these as one of the finger foods. They were a HUGE hit with her little girls. They are just so dainty and are perfect for little tea parties (or family gathering, birthdays, .. etc..) plus, they are SUPER easy to make.
The secret of this recipe is fresh herbs. You can make a variety of sandwiches as well, using egg salad, chicken salad, or tuna as layers– just make sure you chop or process the ingredients up enough so it spreads easily.
Photo: Chicken Finger Sandwiches Recipe
Note: These can be served immediately but in my opinion they taste best when refrigerated at least 2 hours– they will easily keep if made a day ahead of time.
Check it out the Chicken Finger Sandwiches Recipe and printable version below!!
This delicious Chicken Finger Sandwiches recipe is always a favorite sandwich. It’s a lovely way to serve sandwiches and a great way to use up leftover chicken, or great to take as lunch as a normal sandwich.
Prep Time 15 minutesminutes
Cook Time 5 minutesminutes
Total Time 20 minutesminutes
Servings 6
Author Bushrah | Recipestable
Ingredients
2cupsboiled chickenshredded
1/2cupmayonnaise
1tablespooncream cheese
1tablespoontomato ketchup
1teaspoonfresh herbschopped
1/2teaspoonfreshly ground black pepper
salt according to taste
12sliceswhite breadcrusts removed
butter as required
Instructions
Directions
In a mixing bowl, Combine together the mayonnaise, and cream cheese.
Add shredded chicken and mix well.
Season with herbs, salt and pepper.
Toast bread slices with butter.
Spoon the mixture over half the bread slices and cover with the remaining slices.
Slice each sandwich into thirds to make three fingers.
Transfer into a serving platter. Garnish with lettuce leaves. Chicken Finger Sandwiches are ready to serve. ENJOY!!
Notes
Serving Suggestions: Serve with French Fries, Ketchup and Coleslaw.
If you likethis Chicken Finger Sandwiches Recipe, Please Subscribe to my blog. I have lots more recipes to share with you. And If you make it then let me know your feedback by commenting below.
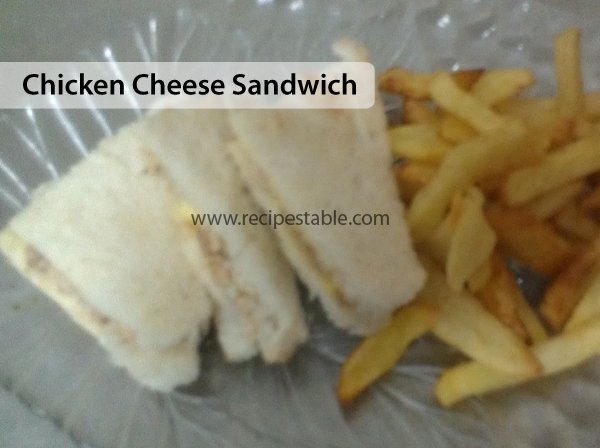
Chicken Cheese Sandwich is a light meal or snack in slight appetite. Leftover chicken and cream cheese are turned into a hot and spicy chicken sandwich. When you pack lunch boxes or in game party these super fantastic sandwiches are a great solution of your huger.
Photo: Chicken Cheese Sandwich Recipe
Check it out the Chicken Cheese Sandwich Recipe here!!
In a bowl, mix together the chicken, cheese, cream cheese and mayonnaise.
Season with salt and pepper.
Add shredded lettuce and mix well.
Remove the edges of bread slices.
Spread butter and toast on a hot griddle or pan.
Spread ketchup on one side of six bread slices.
Put some chicken cheese mixture over them. Cover with remaining bread slices and cut into triangles. Secure with wooden pick.
Transfer into a serving platter. Garnish with lettuce leaves.
Delicious Chicken Cheese Sandwich is ready to serve. ENJOY!!
Notes
Serve with French Fries.
If you like Chicken Cheese Sandwich Recipe and make it then let me know your feedback by commenting below.And if you know more innovative ways in which we can utilize this mouth watering Chicken Cheese Sandwich , do share with us and we would be glad to give it a try.
Nothing feels better than sitting by the window on a cold rainy day, munching on piping hot pakoras and sipping on Tea.Try this Chips Pakora Recipe and enjoy the chips and Pakora’s together.
Photo: Chips Pakora Recipe
Crispy Chips Pakora looks soo good and it can impress every one if fried perfectly.
In a large bowl, mix together the chickpea flour, red pepper, chaat masala, cumin , coriander powder, salt and lemon juice.
Now add potato slices and a litlle water.
Toss to coat evenly.
Heat oil in a deep pan over medium heat.
Now fry chips for 10 minutes or until crispy and golden brown.
Remove from the oil and drain on kitchen paper.Chips Pakora is ready to serve. ENJOY
Notes
Serve with your favorite dipping sauce.
If you like Chips Pakora recipe and make it then let me know your feedback by commenting below.And if you know more innovative ways in which we can utilize this crispy and mouth watering Chips Pakora , do share with us and we would be glad to give it a try.