Bread rolls is one of the favourite Ramadan recipes. There are several recipes of bread rolls different from each other. One recipe is listed below with a distinct taste made with chicken, green chutney and tomato ketchup filling.Thrice coloured Bread Rolls.
Photo: Rainbow Bread Rolls Recipe
All those who are new to cooking and desire to attempt something easy and unproblematic yet lip-smacking then they should go for this Rainbow Bread Rolls recipe. It can be a perfect addition to your Iftar meal and can be less expensive and better tasting than other bread rolls. Rainbow bread rolls take bit more time, but they add a special touch.
Photo: Rainbow Bread Rolls Recipe
Try these scrumptious Rainbow bread rolls, they are great, you can enjoy it as an evening snack or can be prepared on birthday parties, ramadan etc..
Photo: Rainbow Bread Rolls Recipe
Here is the Step by Step Rainbow Bread Rolls Recipe !!
For Rainbow Bread Rolls
6 bread slices
2 eggs, lightly beaten
3 tbsp tomato ketchup
3 tsp butter
3 tsp green chutney
1/2 cup bread crumbs
oil for deep frying
For Chicken Filling
1 cup boiled shredded chicken
2 tbsp mayonnaise
1 tbsp chili garlic sauce
1 tbsp soy sauce
1/2 tsp black pepper
salt to taste
To Make Chicken Filling: In a large bowl, combine together the chicken, mayonnaise, soy sauce, chili garlic, salt and pepper. Set aside.
Step 1 ~ Rainbow Bread Rolls
Step 2
Remove crust from the bread slices.
Step 2 ~ Rainbow Bread Rolls
Step 3
Slightly roll bread slices with a rolling pin.
Step 3 ~ Rainbow Bread Rolls
Step 4
Spread half teaspoon butter on the each bread slices. Place 1 tbsp chicken mixture at the one corner of bread slices.
Step 4 ~ Rainbow Bread Rolls
Step 5
Put 1/2 teaspoon green chutney over it.
Step 5 ~ Rainbow Bread Rolls
Step 6
Apply tomato ketchup on the second corner as shown in the picture.
Step 6 ~ Rainbow Bread Rolls
Step 7
Roll Like Swiss rolls. Carefully seal edges with wet hands. Dip bread rolls in egg.
Step 7 ~ Rainbow Bread Rolls
Step 8
Then coat with breadcrumbs.
Step 8~ Rainbow Bread Rolls
Step 9
Repeat this method with remaining ingredients.
Step 9~ Rainbow Bread Rolls
Step 10
Heat oil in a deep pan over medium heat. Fry bread rolls on each side for 2-3 minutes or until golden.
Step 10 ~ Rainbow Bread Rolls
Step 11
Remove from the oil and drain on an absorbent paper. Rainbow Bread Rolls are ready to serve. ENJOY!!
In a large bowl, combine together the chicken, mayonnaise, soy sauce, chili garlic, salt and pepper. Set aside.
To Make Rainbow Bread Rolls:
Remove crust from the bread slices. Slightly roll bread slices with a rolling pin.
Put 1/2 teaspoon green chutney over it. Spread half teaspoon butter on the each bread slices. Place 1 tbsp chicken mixture at the one corner of bread slices.
Apply tomato ketchup on the second corner as shown in the picture.
Roll Like Swiss rolls. Carefully seal edges with wet hands. Dip bread rolls in egg. Then coat with breadcrumbs.
Repeat this method with remaining ingredients.
Heat oil in a deep pan over medium heat. Fry bread rolls on each side for 2-3 minutes or until golden.
Remove from the oil and drain on an absorbent paper. Rainbow Bread Rolls are ready to serve. ENJOY!!
If you like Rainbow Bread Rolls Recipe and make it then let me know your feedback by commenting below.
Whip up this Easy Spicy Mango Chutney Recipe in no time! This sweet and spicy condiment is the perfect summer companion for grilling, adding a burst of flavor to any dish.
When you want to throw together a meal in just a few minutes, this can seem like an impossible task but Bhuna Keema is quick meal but taste just as good as anything you’ve spent hours to create.
So do try my Bhuna Keema recipe and put a hearty smile on your family’s face. Once you have tried it, you will be sure to make it a regular addition to your dining.
Bhuna Keema (Minced Meat With Whole Spices) Recipe
Prep Time 10 minutesminutes
Cook Time 35 minutesminutes
Total Time 45 minutesminutes
Servings 4
Author Bushrah | Recipestable
Ingredients
500gm mincekeema
1/4cupoil
2tspcumin seeds
4onionsgrated
1tbspginger paste
1tbspgarlic paste
1cuptomato puree
1tbspchili powder
1tbspcoriander powder
1tspgaram masala powder
1/4tspturmeric powder
salt to taste
For Garnishing
2-3green chiliesthinly sliced
4tbspfresh coriander leavesfinely chopped
Instructions
Method
Heat oil in a pan over medium heat.
Saute onion in hot oil until translucent.
Now add ginger garlic paste and mince. Cook, uncovered, on high heat for 10 minutes, stirring thrice.
Now stir in the tomato puree, salt, chilli, coriander powder, turmeric powder.
Cook at high heat for 25 minutes or until cooked is thorough.
Transfer into a serving dish.
Sprinkle Garam Masala over it.
Garnish with coriander leaves and green chilies. Bhuna Keema is ready to serve. ENJOY!!
Notes
Serving Suggestions: Serve with boiled rice or roti.
I have also posted Aloo Keema which is another easiest & tastiest version of making dinner. Do check it out as well.
Put your own spin on it. And lemme know how it turns out. Post a photo on Facebook (Recipestable) or on Twitter so I can see how lovely yours turn out.
Happy Cooking!!
Keep remember me in your Dua’s and Stay tuned for new content on the blog 🙂
If you like this post, Please Subscribe to my blog and let me know your feedback by commenting below.. I have lots more recipes to share with you.
Today we have a very special guest, a house wife, an active Gardener and a horticulturist,Seema Khuled. She’s a really down to earth person, responsible and a very talented lady, living in Lahore, Pakistan.
Meet Seema Khuled _ A stunning lady 😉
She grows vegetables, herbs, Mushrooms, Fruits and flowers. Her goal is that each and every household grow food , however small amount it may be .
Seema Giving Lecture at Horticulture Society of Pakistan
She is my Kitchen Gardening teacher. She always give me useful tips on choosing the right seed, preparing the containers, sowing the seed and after care. She loves to sharing her gardening skills and knowledge with people. I am so happy to have this energetic & talented lady in my life.
Seema In Kitchen Gardening with Tofiq Pasha
Meet the Food Gardener: Seema Khuled _ A Stunning Lady !
Bushrah: First Tell my readers a little about yourself.
Seema:I would define myself as a Food Gardener.
Bushrah: Has kitchen Gardening been always a passion of yours, Seema ? Did you always intend to become a Gardener?
Seema: Honestly speaking. No, I was not into gardening at all. We had a well maintained lawn at my father’s place and I just enjoyed sitting there, not more than that.
Bushrah: When did you discover the passion for Gardening?
Seema: I am still learning to be one who knows a bit about gardening.I was fond of going to the nurseries ,getting some ornamentals and evergreens and that was it. It was few years back when I started it on my own once we moved to our new house.
Bushrah: Why do you Garden?
Seema: As I told you earlier that basically I am a food gardener. The realization of the importance of chemical free vegetables lead me to be one..
So I might say its a journey from denial to realization.
Bushrah: Did you do some preparation like reading the books, tips and tricks about kitchen gardening ?
Seema: I do not have any formal education in agriculture or gardening as such. I did my Masters in International Relations and worked at different places but never in any gardening related field. So I read whatever I could lay my hands on through internet. The treasure of information which it carries now is huge and being an avid reader I was able to grasp some basics of kitchen gardening.
Bushrah: I’m sure your family would be very proud seeing how long you’ve come, both with your cooking and gardening skills and as a person.
Seema: I have been lucky to have a family who enjoys and appreciates the things that I grow. Me and my husband are equally excited and happy to see each new growth in the garden.
Bushrah: What would you say is the best thing about kitchen gardening and the hardest thing ?
Seema: The joy of picking fresh and organic vegetables for my family is the best thing.I know what I am doing is all worth it. The hardest part of kitchen gardening is to have good quality seeds..but now we have many choices for that also. Where there is a will there is a way.
Bushrah: So when did you decide to start a blog and why?
Seema: Infact I am still working on My Blog and will start soon. This is off the record.:-)) But yes the group of Our Gardens was created with the thought of bringing like minded people together and sharing the joy and info about gardening and helping each other with the knowledge and first hand experiences.
Bushrah: What is in your opinion are the most important factors when you sowing new plants?
Seema: In my opinion the most important factors are the timings , knowing about the plant’s sunlight and watering requirements. All the rest follows.
Bushrah: What do you think is behind the boom in urban agriculture and community gardens? Is there room for more innovation?
Seema: It is the awareness of the common people like me. The awareness about the harmful effects of the pesticides on our food and the havoc its causing to our general health. Seemingly healthy people are so often heard of being fatigued or depressed .One of the major reasons is the chemical imbalance created by the unhealthy food.
Bushrah: This is what one calls a 100 % dedication i guess!! I See you posting new tips and pictures almost every day. Where do you get inspiration from?
Its a big part of my life now. I have so many friends from whom I learn a lot and want to share a lot also.The first hand experience surely tell us what to do and not to do.Sharing my experiences is my way of relaxing I guess.
Bushrah: I hope your family understands how lucky they are to have a personal home gardener or expert for them every day.
Seema: That is a thing which only my family can answer :-)) They are indeed very supportive in all my activities.
Bushrah: very right Hahaha 😀
Bushrah: What was the idea behind “Our Gardens” Group? Did you have a vision of what you wanted or did the idea develop over time?
Seema: When I started planning for a garden for our new house I felt a dire need for someone at some place to guide me with what I can plant and take care of here right now.That triggered the idea of an online group where me and my few friends can share their personal experiences and guide. Now that we have more than 9000 friends from around the globe , the focus remains the same i.e. sharing of personal efforts , gardens and all the information..Just putting up pics from internet aimlessly is discouraged.
Bushrah: A message for all those new comers who want to learn Kitchen Gardening but don’t know actually what it means?
Seema: I am no expert in it but would say a few words. Grow things that you can take to your kitchen and enjoy eating. Start small and simple.You don’t need fancy pots and fancy techniques to grow your food. Look for all the things around you which you can utilise. Just don’t compromise on the quality of seeds and soil. Talk to others , take advice and share with others what you know.
Bushrah: What is your top tip for “newbies” like me.
Seema: Start growing. Tomorrow always comes as today. So start today.
Happy Gardening !!
Bushrah: Are you able to take the next step to the actual ‘Frozen Food’ business already?
Seema: Yes..Of Course. Very soon InshaAllah I will be bringing my range of healthy frozen food of UMAMI that would be tastefully different.
The first and foremost thought behind all UMAMIproducts is that these should be healthy to the core. All the seasonings are thoughtfully made to enhance the flavour and health as well…The Aloevera oil ..namely Sesaloe and Cocaloe are made from organically home grown aloe vera…The compound butters or the flavoured butters like the Parsley butter and the Roasted chilli & garlic butter have all the flavour and energy required for a healthy start of the day.
Here is the List of Umami Food Products.
Sesame Salt
Sesaloe
Parsley Butter
Cocaloe
Oyster Mushrooms
Mushrooms
If you are interesting to buy her organic products you can contact her here=>>UMAMI
Thank you Seema for taking time out of your busy schedule. I am genuinely happy to interview you, and I am honored by your presence on my blog. 🙂
Many Thanks and Stay blessed
And Thank you my readers for spending time with me. I hope, you enjoy her interview and now Check out her kitchen garden video’s.
Seema Khuled On Home Gardening _ Watch Her Video here !
Seema Khuled In Kitchen Garden With Tofiq Pasha Mooraj Masala TV Show
Dear Reader’s!! Now What Are You Waiting For ?
Go and Grow your own delicious, healthful organic food.There are so many good reasons to begin growing your own food and really no reason not to.
So plant your own garden and decorate your own soul.
[divide icon=”circle”]
Dont forget to give me your feedback. I would love to hear from you.Feel free to contact me with any questions or comments regarding Kitchen Gardening.
A simple fish tikka sandwich that can be made with any white fish fillets. Served on toasted bread slices with boiled egg, lettuce leaves and cabbage coleslaw. YUM YUM YUMMY Treat!!
Photo: Fish Tikka Sandwich Recipe
It was a lazy weekend and I was making plan to go out for Lunch….Italian, Mexican, Chinese were the options that came up…..Ehhh Not really!! Nothing fared in front of the idea of having a Spicy Fish Tikka sandwich…made to perfection at HOME!!
Today, I am so excited to share this Fish Tikka Sandwich Recipe with you guys. I love to eat fish because it’s a key component of a healthy diet and a best source of protein and minerals. And I can get lot of energy with eating fish.
Photo: Fish Tikka Sandwich Recipe
The juicy tender fish marinated in yogurt, lemon juice and tikka spices and the cabbage coleslaw on a crusty bread….a sandwich at its best!!Not only is Fish Tikka delicious the day you make it, if you’re lucky to have some left over the next day, make it into a sandwich.
Photo: Fish Tikka Sandwich Recipe
I love fish sandwiches, but you can always broil or grill the fish if you prefer.A must try recipe!
Check it out the Fish Tikka Sandwich Recipe and printable version below!!
A simple fish tikka sandwich that can be made with any white fish fillets. Served on toasted bread slices with boiled egg, lettuce leaves and cabbage coleslaw. YUM YUM YUMMY!!
Prep Time 20 minutesminutes
Cook Time 15 minutesminutes
Total Time 35 minutesminutes
Servings 6
Author Bushrah | Recipestable
Ingredients
Ingredients
For Fish Tikka
500gm boneless fish fillets
2tablespoonplain yogurt
2tablespoonlemon juice
1teaspoonginger garlic paste
1teaspooncrushed red chili
1/4teaspoongaram masala powder
salt to taste
a pinch of chat masala
few drops of oil
For Fish Tikka Sandwich
fish tikka
12bread slices
1cupcabbage coleslaw
3lettuce leaves
3boiled eggssliced
3teaspoonchili sauce
butter as required
few wooden picks
Instructions
Directions
Wash and clean the fish.
Cut into cubes.Apply salt, red pepper and lemon juice and keep aside.
Now add remaining fish tikka ingredients.
Cover and marinate for at least 20 minutes to blend flavors.
Heat little oil in a grill pan.
Grill fish for 5-8 minutes or until fish flakes easily with a fork.
Toast bread slices with butter.
Divide cabbage coleslaw into three slices.
Cover the second slice of bread and put fish tikka on it.
Cover again and put lettuce leaves and egg slices.
Cover with the 4th slice of bread.
Cut into four triangular pieces.
Secure with wooden picks. Delicious Fish Tikka Sandwich is ready to serve. ENJOY!!
Notes
Serving Suggestions: Serve with creamy veggie salad.
I have also posted Chicken Finger Sandwiches Recipewhich is another easiest & tastiest version of making sandwiches. Do check it out as well.
Put your own spin on it. And lemme know how it turns out. Post a photo on Facebook (Recipestable) or on Twitter so I can see how lovely yours turn out.
Happy Cooking!!
If you like this post, Please Subscribe to my blog and let me know your feedback by commenting below.. I have lots more recipes to share with you.
Start your Suhoor meal with my Shami Kabab Paratha Rolls Recipe with freshly made raita or a cup of Chai.
Photo: Shami Kabab Paratha Rolls
This Shami Kabab Paratha Rolls Recipe is one of those meals of which most of the components can be prepared in advance and then put together quickly to serve as and when needed. It is always a hit with people of all ages, and perfect for those lazy afternoons when you cannot be bothered to cook something from scratch but want a warm and filling snack to comfort you. I always have a batch of parathas and shami kababs in my freezer specifically for such instances.
Photo: Shami Kabab Paratha Rolls
Its an economical fast food meal that goes well as an appetizer or side dish. Here’s a perfect Shami Kabab Paratha Rolls that you can make these easily at home, no doubt that in half an hour, you can serve your family these delicious paratha rolls in a unique and imaginative way. Do try it!!
Photo: Shami Kabab Paratha Rolls
Check it out the Shami Kabab Paratha Rolls Recipe and printable version below!!
This Shami Kabab Paratha Rolls Recipe is one of those meals of which most of the components can be prepared in advance and then put together quickly to serve as and when needed. It is always a hit with people of all ages, and perfect for those lazy afternoons when you cannot be bothered to cook something from scratch but want a warm and filling snack to comfort you.
Prep Time 10 minutesminutes
Cook Time 15 minutesminutes
Total Time 25 minutesminutes
Servings 2
Author Bushrah | Recipestable
Ingredients
2Whole Wheat Parathayou can use ready made Frozen Paratha
I have also posted Hot and Spicy Kebab Paratha Rollwhich is another easiest & tastiest version of making dinner. Do check it out as well.
Put your own spin on it. And lemme know how it turns out. Post a photo on Facebook (Recipestable) or on Twitter so I can see how lovely yours turn out.
Happy Cooking!!
If you like this post, Please Subscribe to my blog and let me know your feedback by commenting below.. I have lots more recipes to share with you.
Ramadan is a delicious time of the year in the Muslim world: Since people fast from sunrise to sunset, meals take on a special meaning. This month is associated with many delicacies with which the day long fast is broken. Spicy Mutton Pulao is one such dish.
Photo: Spicy Mutton Pulao Recipe
Spicy Mutton Pulao is a filling rice dish that can provide you with a heavy dinner after an entire day of fasting. That is why it is great Ramadan Recipes.
Photo: Spicy Mutton Pulao
Spicy mutton pulao is made out of red meat which is very popular for most Ramadan recipes. You need the proteins and energy from red meat when you are fasting. This Spicy Mutton Pulao recipe is quite similar to the biryani with minor differences in the cooking style. All the spices used in Mughlai mutton pulao make it a rich food item. Do try it!!
Photo: Spicy Mutton Pulao
Check it out the Spicy Mutton Pulao Recipe and printable version below!!
This Spicy Mutton Pulao recipe is quite similar to the biryani with minor differences in the cooking style. All the spices used in Mughlai mutton pulao make it a rich food item. Do try it!!
Prep Time 30 minutesminutes
Cook Time 1 hourhour30 minutesminutes
Total Time 2 hourshours
Servings 5
Author Bushrah | Recipestable
Ingredients
500gm mutton
2cupsbasmati rice
3-1/2cupmutton stockyakhni
2onionsthinly sliced
4tablespoondesi ghee
1/2cupplain yogurt
2tablespoonginger garlic paste
4green chiliesthinly sliced
1teaspoonred chilli powder
1teaspooncumin seedsroasted
1inchpiece of Cinnamon stick
6Peppercorns
4cloves
4cardamom
1bay leaf
a pinch of saffronsoaked in milk
salt according to taste
Instructions
Marinate the mutton pieces with salt, red chilli, cumin, and ginger garlic paste for 40 minutes.
Heat desi ghee in a heavy bottom skillet over medium heat.
Saute the onions in it for 5 minutes on a low flame until lightly browned.
Now add green chillies and cook for a minute on a low flame.
Add the marinated mutton. Stir for 2 minutes until the spices are mixed uniformly.
Add 2 cup water and Cover the skillet. Cook on a low flame for 40 minutes or meat is almost tender.
Now add bay leaf, peppercorns, cinnamon, cardamom and cloves. Let the flavours bleed for 1 minute.
Add yogurt and cook meat on high flame for few minutes or until oil comes on top.
Add rice and yakhni. Lightly stir to mix.
Adjust the seasoning.Cover and cook for 18-20 minutes on low flame.
When the rice is cooked, pour the saffron on top the pulao.
Put on dum for 10 minutes or until full done.
Fluff rice with a fork and transfer into a dish. Spicy Mutton Pulao is ready to serve.
Notes
Serving Suggestions: Serve with raita and onion rings.
I have also posted Champ Pulao which is another easiest & tastiest version of making pulaoat home. Do check it out as well. It’s finger lickin’ good. You’ll be coming back for more.
Put your own spin on it. And lemme know how it turns out. Post a photo on Facebook (Recipestable) or on Twitter so I can see how lovely yours turn out.
Happy Lunch Making!!
If you like this post, Please Subscribe to my blog and let me know your feedback by commenting below.. I have lots more recipes to share with you.
A quick Tawa Fish recipe that requires little effort and tastes wonderful. Fish fillets cooked on a tawa (iron griddle) and does really impact on the flavor, with simple spices. A must try recipe!
Photo: Tawa Fish Recipe
Check it out the Tawa Fish Recipe and printable version below!!
Leave aside for 10 minutes then wash and strain excess water.
Now pour vinegar and lemon juice in a bowl.Add turmeric, chilli powder, coriander powder, garam masala, black pepper, cumin powder, garlic paste and salt in it.
Mix well.
Put this mixture on the fish fillets. Cover and marinate for at least 30 minutes.
Heat oil in a shallow pan for frying fish.
Fry fish for 4-5 minutes on each side or until fish flakes easily with a fork.
Transfer into a platter. Sprinkle chaat masala over it.
Garnish with salad leaves and lemon wedges. Tawa Fish is ready to serve. ENJOY!!
Notes
Serving Suggestions: Serve with date chutney.
I have also posted Crumb Fried Fish which is another easiest & tastiest version of making pulaoat home. Do check it out as well. It’s finger lickin’ good. You’ll be coming back for more.
Put your own spin on it. And lemme know how it turns out. Post a photo on Facebook (Recipestable) or on Twitter so I can see how lovely yours turn out.
Happy Lunch Making!!
If you like this post, Please Subscribe to my blog and let me know your feedback by commenting below.. I have lots more recipes to share with you.
Very easy to make, nutritious, and delicious _ Moist inside and crunchy outside, these are great with oven fries or roasted veggies and low-fat homemade tartar sauce. You can make these fish sticks in about the same amount of time it takes to bake a box of the frozen kind. DO try it!!
So Ramadan is coming up and we are all gearing up for it. Not only spiritually but also deliciously!! After a couple of random posts I will be posting over all the dishes that are very popular during Ramadan in our household and will share the recipes and other stories with you all.. so look forward to this space!!!
My Mom made some Shami Kababs for a dinner party few weeks ago and had some left, so during one of the weekdays, I made these shami kabab burgers which weren’t just filing but very delicious as well. My Brother kept asking for more but I only had a few shami kababs left. This is a very simple and filling snack that is worth trying!
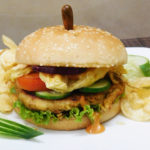
Shami Kabab Burger Recipe
Shami Kabab Burger Recipe
Shami Kabab Burger Recipe
If you want something astonishing but healthy for your your family then this do try this Shami Kabab Burger Recipe. It contains lentil and meat which is high in vitamins, protein and minerals.
Check it out the Shami Kabab Burger Recipe and printable version below!!
If you want something astonishing but healthy for your your family then this do try this Shami Kabab Burger Recipe. It contains lentil and meat which is high in vitamins, protein and minerals.
Toast burger buns and spread mayonnaise over them.
Place shami kababs, lettuce and onion over the buns.
Drizzle with ketchup and green chutney.
Place some cheese on one side of the bun and toast till cheese melts away.
Place the cheesed bun on the top.
Cut into halves. Shami Kabab Burger is ready to serve. ENJOY!!
Notes
Serving Suggestions: Serve with chips and ketchup.
Pin It For Later
If you like this Shami Kabab Burger Recipe, Please Subscribe to my blog. I have lots more recipes to share with you. And If you make it then let me know your feedback by commenting below.
A delicious and simple Chicken Keema Handi Recipe to follow in week days. Chicken Keema Handi is a distinct taste then normal mince cooking.Goes great with Garlic Rice or Chapati.
Photo: Chicken Keema Handi
Check it out the Chicken Keema Handi Recipe here!!
Saute onion in hot oil until they turn to light pink in color.
Add ginger garlic paste and cook for 30 seconds. Now add tomatoes, red chili, coriander powder, cumin powder, turmeric powder and salt.
Cook for 4-5 minutes or until all water dries up.
Now add chicken mince (keema) and cook well for 15-20 minutes or until chicken is no longer pink.
Now add lemon juice and put on dum for 5 minutes or until well done.
Garnish with coriander leaves and green chilies. Chicken Keema Handi is ready to serve. ENJOY!!
Notes
Serve with Garlic Rice or Chapati.
If you like Chicken Keema Handi recipe and make it then let me know your feedback by commenting below.And if you know more innovative ways in which we can utilize this mouth watering Chicken Keema Handi, do share with us and we would be glad to give it a try.
This Jam Filled Butter Cookies Recipe is an easy thumbprint cookie with a fruit jam center. Whip up these simple jam drops in just a few minutes, they make wonderful any-time treats.
Photo: Jam Filled Butter Cookies Recipe
Check it out the Jam Filled Butter Cookies Recipe here!!
Take a bowl, cream together the butter, white sugar and egg yolks.
Stir in the flour a little bit at a time until a soft dough forms.
Roll dough into 1 inch balls or cut with a cookie cutter.
If dough is too soft, refrigerate for 15 to 20 minutes.
Place balls 2 inches apart onto ungreased cookie tray.
Use your finger or an instrument of similar size to make a well in the center of each cookie.
Fill the hole with 1/2 teaspoon of preserves.
Bake in the preheated oven for 8-10 minutes or until golden brown on the bottom.
Remove from cookie sheets to cool on wire racks.
Store in an airtight jar or container. Jam Filled Butter Cookies are ready to serve. ENJOY!
Notes
Serving Suggestions: Serve with Tea.
I have also posted Nankhatai recipewhich are another easiest & tastiest version of making cookies at home. Do check it out as well. It’s finger lickin’ good. You’ll be coming back for more.
Put your own spin on it. And lemme know how it turns out. Post a photo on Facebook (Recipestable) or on Twitter so I can see how lovely yours turn out.
Besan Aloo Tikki with crisp outside soft inside is a real treat to taste buds at anytime. Serve this delicious Besan Aloo Tikki as a starter or can be serve at tea-time with the sauce or chutney of your choice.
Add green chilies, green onion, cumin powder, red chili and salt. Mix until well combined.
Make thick batter with besan and lil water in a separate bowl.
Divide the potato mixture into equal portions.
Shape each portion into round thick cutlet (tikki).
Heat the oil in a deep pan over medium heat.
Dip each cutlet (tikki) in the batter then fry for 5-8 minutes or until it turns to golden brown in colour from both the side.
Remove from the oil and absorbent on kitchen paper. Besan Aloo Tikki is ready to serve. ENJOY!!
Notes
Serve with your favorite chutney.
If you like Besan Aloo Tikki Recipe and make it then let me know your feedback by commenting below.And if you know more innovative ways in which we can utilize this mouth watering Besan Aloo Tikki, do share with us and we would be glad to give it a try.
Are you a Spicy snacks lover? Today I am sharing Stuffed Mirch Pakora Recipe, all time favorites and very easy to make. Start off your meal with this crunchy starter.
Photo: Stuffed Mirch Pakora
You can make these stuffed Mirch Pakoras as a Iftar time snacks in Ramadan, they hardly take around half an hour to prepare and serve .
Photo: Stuffed Mirch Pakora
It is also goes great with hot cup of tea on rainy days. Serve hot with tamarind chutney and green chilli chutney or tomato chutney , or tomato sauces .
Check it out the Stuffed Mirch Pakora Recipe and printable version below!!
Today I am sharing Stuffed Mirch Pakora Recipe, all time favorites and very easy to make. Start off your meal with this crunchy starter.
Prep Time 5 minutesminutes
Cook Time 10 minutesminutes
Total Time 15 minutesminutes
Servings 4
Author Bushrah | Recipestable
Ingredients
8large size green chiliesslit vertically and deseeded.
For Stuffing
2tablespoonmint chutney
2tablespoontamarind pulp
2tablespoonpomegranate seedsAnardana, crushed
1/2teaspoonred chili
1/2teaspooncumin powder
salt to taste
For The Batter
1/2cupchickpea flourbesan
1/2cuprice flour
1/2teaspoonred pepper
1/4teaspooncarom seedsajwain, optional
salt to taste
Other Ingredients
oil for frying
Instructions
Directions
To Make Stuffing
In a bowl, mix together the mint chutney, tamaring pulp, pomegranate seeds, red chili, cumin powder and salt.
Set aside.
To Make Batter
In another small bowl, combine the chickpea flour,rice flour, red pepper, carom seeds and salt.
Add enough water to make a thick batter and set aside.
To Proceed
Divide stuffing into 8 equal portions.
Stuff each chilli with a portion of the stuffing.
Heat oil in a large pan over medium heat.
Dip the stuffed chillies in the flour batter.
Deep fry pakoras in hot oil for 4-5 minutes or until they turn golden brown in colour from all sides.
Drain on absorbent paper. Stuffed Mirch Pakora is ready to serve.
Notes
Serving Suggestions: I served them with mango Chutney to mild the taste.
I have also posted Chips Pakora Recipe which is another easiest version of making tea time snack or lunch box item . Do check it out as well.
[divider]
If you like Stuffed Mirch Pakora Recipe , Please Subscribe to my blog. I have lots more recipes to share with you. And If you make it then let me know your feedback by commenting below.
Cabbage is one of my favorite vegetables because it’s super versatile and it will keep for a long time in my crisper. Although cabbage may be good for weight loss because of its high water content, it has many other (more important) advantages, too.
Photo: Cabbage Dry Curry[/caption]
Today, I present to you a Weight watcher’s Recipe with a simple list of ingredients. An easy to make Cabbage Dry Curry recipe, that will not only nourish your body but will also please your palette. Do try it!!
Now add rai, tomatoes, red pepper, cumin powder and salt.
Add a little water and cook for a while.
Now add cabbage. Cover the lid and cook for 10 minutes.
Remove the lid and cook on full heat to dry out the water.
Dish it out. Garnish with green chilies and coriander leaves. Cabbage Dry Curry is ready to serve. ENJOY!!
Notes
The left overs can be used as a filling for a grilled sandwich that will make for a quick lunch box or after school snack for your kid.
Serving Suggestions:Serve with Oats chapati or brown rice.
If you like Cabbage Dry Curry Recipe and make it then let me know your feedback by commenting below.
An quick and easy fruit cake recipe for tea time. Best eaten fresh. Enjoy this yummy fruit cake flavored with orange zest, vanilla essence and black currant.