So Ramadan is coming up and we are all gearing up for it. Not only spiritually but also deliciously!! After a couple of random posts I will be posting over all the dishes that are very popular during Ramadan in our household and will share the recipes and other stories with you all.. so look forward to this space!!!
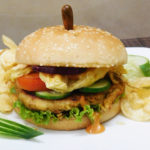
My Mom made some Shami Kababs for a dinner party few weeks ago and had some left, so during one of the weekdays, I made these shami kabab burgers which weren’t just filing but very delicious as well. My Brother kept asking for more but I only had a few shami kababs left. This is a very simple and filling snack that is worth trying!
Shami Kabab Burger Recipe
Shami Kabab Burger Recipe
Shami Kabab Burger Recipe
If you want something astonishing but healthy for your your family then this do try this Shami Kabab Burger Recipe. It contains lentil and meat which is high in vitamins, protein and minerals.
Check it out the Shami Kabab Burger Recipe and printable version below!!
If you want something astonishing but healthy for your your family then this do try this Shami Kabab Burger Recipe. It contains lentil and meat which is high in vitamins, protein and minerals.
Toast burger buns and spread mayonnaise over them.
Place shami kababs, lettuce and onion over the buns.
Drizzle with ketchup and green chutney.
Place some cheese on one side of the bun and toast till cheese melts away.
Place the cheesed bun on the top.
Cut into halves. Shami Kabab Burger is ready to serve. ENJOY!!
Notes
Serving Suggestions: Serve with chips and ketchup.
Pin It For Later
If you like this Shami Kabab Burger Recipe, Please Subscribe to my blog. I have lots more recipes to share with you. And If you make it then let me know your feedback by commenting below.
A delicious and simple Chicken Keema Handi Recipe to follow in week days. Chicken Keema Handi is a distinct taste then normal mince cooking.Goes great with Garlic Rice or Chapati.
Photo: Chicken Keema Handi
Check it out the Chicken Keema Handi Recipe here!!
Saute onion in hot oil until they turn to light pink in color.
Add ginger garlic paste and cook for 30 seconds. Now add tomatoes, red chili, coriander powder, cumin powder, turmeric powder and salt.
Cook for 4-5 minutes or until all water dries up.
Now add chicken mince (keema) and cook well for 15-20 minutes or until chicken is no longer pink.
Now add lemon juice and put on dum for 5 minutes or until well done.
Garnish with coriander leaves and green chilies. Chicken Keema Handi is ready to serve. ENJOY!!
Notes
Serve with Garlic Rice or Chapati.
If you like Chicken Keema Handi recipe and make it then let me know your feedback by commenting below.And if you know more innovative ways in which we can utilize this mouth watering Chicken Keema Handi, do share with us and we would be glad to give it a try.
Besan Aloo Tikki with crisp outside soft inside is a real treat to taste buds at anytime. Serve this delicious Besan Aloo Tikki as a starter or can be serve at tea-time with the sauce or chutney of your choice.
Add green chilies, green onion, cumin powder, red chili and salt. Mix until well combined.
Make thick batter with besan and lil water in a separate bowl.
Divide the potato mixture into equal portions.
Shape each portion into round thick cutlet (tikki).
Heat the oil in a deep pan over medium heat.
Dip each cutlet (tikki) in the batter then fry for 5-8 minutes or until it turns to golden brown in colour from both the side.
Remove from the oil and absorbent on kitchen paper. Besan Aloo Tikki is ready to serve. ENJOY!!
Notes
Serve with your favorite chutney.
If you like Besan Aloo Tikki Recipe and make it then let me know your feedback by commenting below.And if you know more innovative ways in which we can utilize this mouth watering Besan Aloo Tikki, do share with us and we would be glad to give it a try.
Are you a Spicy snacks lover? Today I am sharing Stuffed Mirch Pakora Recipe, all time favorites and very easy to make. Start off your meal with this crunchy starter.
Photo: Stuffed Mirch Pakora
You can make these stuffed Mirch Pakoras as a Iftar time snacks in Ramadan, they hardly take around half an hour to prepare and serve .
Photo: Stuffed Mirch Pakora
It is also goes great with hot cup of tea on rainy days. Serve hot with tamarind chutney and green chilli chutney or tomato chutney , or tomato sauces .
Check it out the Stuffed Mirch Pakora Recipe and printable version below!!
Today I am sharing Stuffed Mirch Pakora Recipe, all time favorites and very easy to make. Start off your meal with this crunchy starter.
Prep Time 5 minutesminutes
Cook Time 10 minutesminutes
Total Time 15 minutesminutes
Servings 4
Author Bushrah | Recipestable
Ingredients
8large size green chiliesslit vertically and deseeded.
For Stuffing
2tablespoonmint chutney
2tablespoontamarind pulp
2tablespoonpomegranate seedsAnardana, crushed
1/2teaspoonred chili
1/2teaspooncumin powder
salt to taste
For The Batter
1/2cupchickpea flourbesan
1/2cuprice flour
1/2teaspoonred pepper
1/4teaspooncarom seedsajwain, optional
salt to taste
Other Ingredients
oil for frying
Instructions
Directions
To Make Stuffing
In a bowl, mix together the mint chutney, tamaring pulp, pomegranate seeds, red chili, cumin powder and salt.
Set aside.
To Make Batter
In another small bowl, combine the chickpea flour,rice flour, red pepper, carom seeds and salt.
Add enough water to make a thick batter and set aside.
To Proceed
Divide stuffing into 8 equal portions.
Stuff each chilli with a portion of the stuffing.
Heat oil in a large pan over medium heat.
Dip the stuffed chillies in the flour batter.
Deep fry pakoras in hot oil for 4-5 minutes or until they turn golden brown in colour from all sides.
Drain on absorbent paper. Stuffed Mirch Pakora is ready to serve.
Notes
Serving Suggestions: I served them with mango Chutney to mild the taste.
I have also posted Chips Pakora Recipe which is another easiest version of making tea time snack or lunch box item . Do check it out as well.
[divider]
If you like Stuffed Mirch Pakora Recipe , Please Subscribe to my blog. I have lots more recipes to share with you. And If you make it then let me know your feedback by commenting below.
Cabbage is one of my favorite vegetables because it’s super versatile and it will keep for a long time in my crisper. Although cabbage may be good for weight loss because of its high water content, it has many other (more important) advantages, too.
Photo: Cabbage Dry Curry[/caption]
Today, I present to you a Weight watcher’s Recipe with a simple list of ingredients. An easy to make Cabbage Dry Curry recipe, that will not only nourish your body but will also please your palette. Do try it!!
Now add rai, tomatoes, red pepper, cumin powder and salt.
Add a little water and cook for a while.
Now add cabbage. Cover the lid and cook for 10 minutes.
Remove the lid and cook on full heat to dry out the water.
Dish it out. Garnish with green chilies and coriander leaves. Cabbage Dry Curry is ready to serve. ENJOY!!
Notes
The left overs can be used as a filling for a grilled sandwich that will make for a quick lunch box or after school snack for your kid.
Serving Suggestions:Serve with Oats chapati or brown rice.
If you like Cabbage Dry Curry Recipe and make it then let me know your feedback by commenting below.
It’s fun to prepare traditional methai at home. Jalebi needs little practice for a perfect thin shaped. It must be thin if you like crispy jalebi. Try out this Jalebi Recipe and amaze your family and yourself.
In a bowl, mix together the plain flour, cardamom powder, instant yeast and cornflour.
Add yogurt, oil, and Water to the dry ingredients.
Mix well until there are no lumps.
When done, cover the jalebi batter.
Place it in a warm place for 24 hours or overnight, till it is fermented (the batter will rise on fermentation).
Once the batter is fermented stir the batter in a cut and fold motion to combine it once again.
To Make Sugar Syrup:
Take a saucepan, add Water, sugar and saffron. Cook for 15 minutes on medium heat.
Reduce flame to a low simmer and add Cardamom Powder and Lemon Juice.
Stir well.
When the sugar becomes thick and stringy of one string consistency.Turn off the heat and keep aside.
To Make The Jalebi:
Preheat oil for frying the jalebi’s.
Mix the fermented jalebi batter well and put it in a ketchup or mustard bottle with a spout (zipper bag or piping bag can be used).
Squeeze out the batter into the hot oil in approximately 8 small circular motions.
Jalebi should about 2-3 inches in diameter.
Fry until the bottom side looks golden and flip once to cook the other side.
With tongs, remove jalebi, shake off excess oil and place directly into sugar syrup.
Allow jalebi to remain in the syrup for just a minute (flipping to coat both sides), shake off excess sugar syrup and place onto a plate. Jalebi is ready to serve. ENJOY!!
Notes
The consistency of the batter should be thick and not watery, similar to the butter cream batter. You should be able to make a shape when piped in a piping bag.
Don’t over stir you want the air pockets in the batter to remain. This will help in the jalebi being crisp and also in turn help it absorb the sugar syrup.
The oil for frying should be medium hot. If it is too hot, the jalebis will end up burnt.
Also make sure you keep the heat on low when you pipe the jalebis into the oil, this will ensure you can see the circles you are piping and also the jalebis will rise up slowly.
You can store in an air-tight container. They will remain fresh for 4-5 days un refrigerated.
Serve as a dessert after any meal or as a tea time snack.
If you like Jalebi Recipe and make it then let me know your feedback by commenting below.And if you know more innovative ways in which we can utilize this sweet and mouth watering Jalebi, do share with us and we would be glad to give it a try.
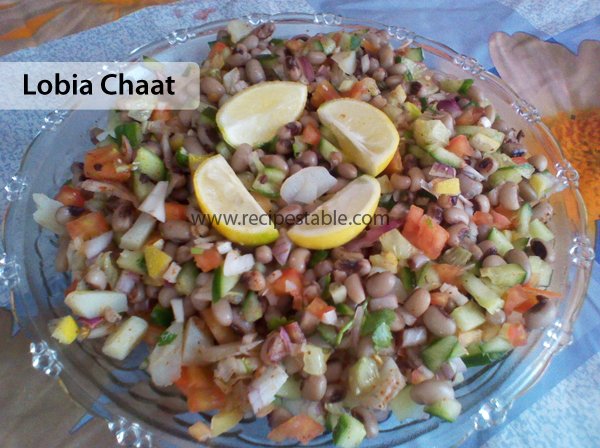
Beans and spices has a perfect mix in shape of chaat.A relatively different Lobia chaat recipe to enjoy. Give it a try and make something different and healthy for your family.
Keyword black eyed peas, lobia, lobia chaat, salad, spicy
Prep Time 10 minutesminutes
Total Time 10 minutesminutes
Servings 4
Author Bushra Waheed
Ingredients
2cupsboiled lobiablacked eye peas
1small onionfinely copped
1 tomatochopped
1cucumberchopped
1/2cuptamarind pulpwithout sugar
1tablespoonlemon juice
1teaspoonmint chutneyoptional
1teaspoonchaat masala powder
1teaspoonroasted cumin powder
For Garnishing:
few coriander leaves
lemon wedges
Instructions
Place lobia (black eyed peas) in a large mixing bowl.
Add onion, tomato, cucumber. Stir in the lemon juice, tamarind pulp and mint chutney.
Season with chaat masala and cumin seeds. Mix well.
Transfer into a serving platter.
Garnish with few coriander leaves and lemon wedges. Lobia Chaat is ready to serve.
Notes
Serve with imli ki chutney.
If you like Lobia Chaat Recipe and make it then let me know your feedback by commenting below.And if you know more innovative ways in which we can utilize this mouth watering Lobia Chaat, do share with us and we would be glad to give it a try.
Nan Khatai is an Persian /Indo-Pakistani butter cookie that is made with ghee(clarified butter), sugar, all-purpose flour, gram flour, cardamom, and roasted almonds and pistachios. Do try it.
Add sugar and cardamom powder.Beat until light and fluffy.
Now take a separate bowl, sift flour, baking powder,gram flour and baking soda.
Now fold into ghee mixture.
Stir in the roasted almonds and pistachios.
Now roll out the dough, cut into rounds with a cookie cutter.
Put nan khatai on a greased baking tray.
Brush them with egg yolks.
Place baking tray in the preheated oven for 12-15 minutes or until done.
Remove from the oven and let it cool completely. Lahori Nan Khatai is ready to serve.
Notes
Serve with Tea.
If you like Lahori Nan Khatai Recipe and make it then let me know your feedback by commenting below.And if you know more innovative ways in which we can utilize this sweet and mouth watering Lahori Nan Khatai, do share with us and we would be glad to give it a try.
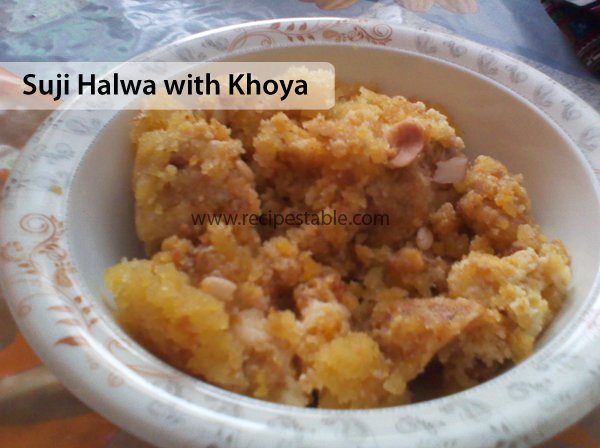
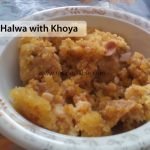
You don’t need to wait for an occasion to savor the sweet and creamy Suji halwa with Khoya as it can be prepared at home in just few minutes and does not require any expert cooking skills. This Suji Halwa with Khoya Recipe takes its taste and texture to next level as use of khoya and generous amount of dry fruits provide nice creamy texture while ghee and cardamom provides irresistible aroma.
If you don’t have khoya, then don’t worry, read tips and variations given below to make equally tempting Suji halwa with khoya (mawa). Do try it!!
Photo: Suji Halwa with Khoya Recipe
Check it out the Suji Halwa with Khoya Recipe here!!
Add cardamom and semolina (suji) and roast it well.
Add sugar and water. Stir continuously till sugar is dissolved.
Leave it on low flame for 10 minutes to cook perfectly.
When ghee comes on top add khoya.Stir well.
Dish it out. Garnish with nuts. Suji Halwa with Khoya is ready to eat. ENJOY!!
Notes
Replace khoya with 4 tablespoons of dry milk powder and increase amount of sugar.
It can be served as a dessert or as a sweet accompaniment to main dish.
Serve it along with puri’s to entertain the guests.
If you like Suji Halwa with Khoya Recipe and make it then let me know your feedback by commenting below.And if you know more innovative ways in which we can utilize this sweet and mouth watering Suji Halwa with Khoya, do share with us and we would be glad to give it a try.
Nothing feels better than sitting by the window on a cold rainy day, munching on piping hot pakoras and sipping on Tea.Try this Chips Pakora Recipe and enjoy the chips and Pakora’s together.
Photo: Chips Pakora Recipe
Crispy Chips Pakora looks soo good and it can impress every one if fried perfectly.
In a large bowl, mix together the chickpea flour, red pepper, chaat masala, cumin , coriander powder, salt and lemon juice.
Now add potato slices and a litlle water.
Toss to coat evenly.
Heat oil in a deep pan over medium heat.
Now fry chips for 10 minutes or until crispy and golden brown.
Remove from the oil and drain on kitchen paper.Chips Pakora is ready to serve. ENJOY
Notes
Serve with your favorite dipping sauce.
If you like Chips Pakora recipe and make it then let me know your feedback by commenting below.And if you know more innovative ways in which we can utilize this crispy and mouth watering Chips Pakora , do share with us and we would be glad to give it a try.
Today marks the start of spring. Traditional rites and festivals of spring revolved around its importance in growing food. Plants start to grow and animals come out of hibernation and begin reproducing. People come out of hibernation too!
I’m really excited to be back with another Traditional Pakistani recipe (if you didn’t see my Kachnar Gosht and Karela Gosht then I’d really recommend you give those a try too).
So let’s celebrate spring with another Traditional Pakistani food (Kachnar Keema).
Photo: Kachnar Keema
A Lil Bit About Kachnar:
Kachnar/Orchid is a species of flowering plant in the family Fabaceae, native to southeastern Asia, from southern China west to Pakistan and India.
Kachnar tree, Bauhinia variegate, is also known as Orchid tree or Butterfly tree because of the way it’s flowers look. This is a very popular ornamental tree in subtropical and tropical climates, grown for its scented flowers and also used as food item in South Asian cuisine.
Varieties of Kachnar:
Kachnar has three varieties (red, white and mauve) depending upon the colour of its flowers.
Photo: Kachnar Keema Recipe
Kachnar Keema
In Pakistan, its buds are considered a delicacy. They are available for a short season only and are difficult and expensive to buy. Eating Kachnar ( Orchid)is very beneficial for our health as this vegetable is blessed with advantages and it taste is really good when cooked with addition of any mince meat(keema).
Photo: Kachnar Keema Recipe
One thing I love about cooking is discovering new flavours that go together, especially when it’s flavours that you wouldn’t necessarily think to put together and today’s Kachnar Keema recipe is one of those creations.
Photo: Kachnar Keema Recipe
My take on a traditional Pakistani Kachnar Keema with lamb mince, kachnar buds, and served hot chapatai and Raita.
I’ve been trying to perfect Kachnar Keema for a while, but I’ve always found that it was lacking a little something – it had meatiness from the lamb, bitterness from the kachnar buds and saltiness from the spices but it needed just a hint of creaminess. A few weeks ago on a whim (figuring that mince meat and yogurt go well) I decided to add some yogurt to my Kachnar Keema and the problem was solved – it is delicious.
Photo: Kachnar Keema Recipe
If you’re reading this and thinking “hmmmm, what would be the taste, or would I like this recipe?” then stop!! Whilst you can taste the flavour of the kachnar, it compliments the mince rather than overpowering it.
Soooooooo…. convinced? 😉
Kachnar Keema Recipe
Extra-Bonus Tips :
Before serving sprinkle lemon juice if this is to your taste. (I think it improves the flavour.) It’s good with naan, chapattis, or any other kind of bread, and Zeera Raita (Cumin Yogurt Sauce).
This has Taste and is a Treat.
Photo: Kachnar Keema Recipe
Here is an easy to cook Kachnar Keema recipe to try out!
One thing I love about cooking is discovering new flavours that go together, especially when it’s flavours that you wouldn’t necessarily think to put together and today’s Kachnar Keema recipe is one of those creations.
Prep Time 15 minutesminutes
Cook Time 1 hourhour15 minutesminutes
Total Time 1 hourhour30 minutesminutes
Servings 6
Author Bushrah | Recipestable
Ingredients
1kgmutton or lamb mincekeema
1/2kgkachnar
1/2cupoil or ghee
3onionsfinely chopped
2large tomatoesfinely chopped
1teaspoonginger paste
1teaspoongarlic paste
1/2cupplain yogurt
2teaspoonred chili powder
1teaspooncoriander powder
1teaspooncumin powder
1/2teaspoongaram masala powder
1/4teaspoonturmeric powder
salt to taste
Instructions
Wash kachnar properly with water.
Now heat oil in a skillet or wok over medium high heat.
Saute onion in hot oil until transculant.
Now add ginger garlic paste and cook for 30 seconds.
Then add tomatoes, and mince.
Cook on high flame for few minutes or until meat is no longer pink.
Season with red chili, salt, cumin powder, coriander powder and turmeric powder.
Add 1 cup water and cover with the lid.
Let it simmer for 40 minutes or until mince is cooked thoroughly.
Remove the lid and cook mince on high heat for 5-8 minutes or until oil comes on top.
Now add kachnar and yogurt.
Cook and stir for 10 minutes or until done.
Now put on dum for few minutes then dish it out. Kachnar keema is ready to serve. ENJOY!!
Notes
Serving Suggestion: Serve Kachnar Keema with hot Chapati, Zeera Raita and Salad
If you make this recipe, be sure to snap a photo and hashtag it #Recipestable. I’d love to see what you cook!
Coconut Rice Pudding (Nariyal Kheer) is a nutty twist to the favorite Pakistani dessert Kheer. Coconut and rice are main ingredients for this sweet dish. It’s the best rice pudding (kheer)I’ve ever had, and very easy to make! Must try it!!
Photo: Coconut Rice Pudding Recipe
Check it out the Coconut Rice Pudding Recipe here!!
Wash the rice thoroughly with few changes of water.
Soak in water for 20 minutes.
Put rice in a deep pot.
Pour milk in it.
Bring water to a boil then reduce heat to the low and gently boiling for 1 hour or until the rice is thoroughly cooked and the milk has thickened to a pudding consistency.
Now stir in the condensed milk, sugar, cardamom and coconut. Cook 5 minutes longer or until thickened.
Dish it out or distribute into 12 serving dishes.
Garnish with raisins, coconut and almonds.
Let it cool completely then put in the refrigerator for 4 hours to chill. Coconut Rice Pudding is ready to serve.ENJOY!!
Notes
Serve as a dessert after any meal.
If you like Coconut Rice Pudding Recipe and make it then let me know your feedback by commenting below.And if you know more innovative ways in which we can utilize this sweet and mouth watering Coconut Rice Pudding, do share with us and we would be glad to give it a try.
Today I’m bringing one of my favorite recipes _ “Bakery Style Chicken Patties”. A buttery, flaky pastry crust with warm, creamy chicken filling. I don’t know about you, but just typing this is making me hungry.
Photo: Chicken Patties Recipe
This Chicken Patties recipe is super-friendly. It starts with cooked, shredded chicken. Traditional Pakistani chicken puff pastry has shredded chicken, onion that are cooked in the butter and flour mixture. And you can definitely add those in if you’d like.
But I makes it without them and I don’t see a reason to fix things that are already perfect.
Photo: Chicken Patties Recipe
Flakey goodness, at your service!
Check it out the Chicken Patties Recipe and printable version here!
Now add the sour cream, mayonnaise, black pepper, salt and tomato ketchup.
Sour cream and mayonnaise will release water, but if the mixture is dry add about a 1/4 cup water so the flavors get a chance to blend.
Cover the lid and cook for 10 minutes or until all water dries up.
Preheat oven at 350 degree F or 170 degree C.
Roll the puff pastry and cut into rounds by using a round cookie cutter.
Sandwich chicken filling between two round pieces of puff pastry.
To seal the edges use water. and press with fork around the edges.
Brush the tops of the patties with egg wash.
Bake in the preheated oven for 15-18 minutes or until the pastry is puffed and the tops are golden brown.
Remove from the oven. Chicken Patties are ready to serve. ENJOY!
Notes
Recipe Note’s: To prepare, just place on a baking sheet for 5 minutes prior to placing in the oven. Brush with a lightly beaten egg. The most beautiful part of the recipe is that they can be made ahead and frozen!Serving Suggestions: Serve with Chili Garlic Sauce or Tomato Ketchup.
If you like Chicken Patties Recipe and make it then let me know your feedback by commenting below.
Aloo Shimla Mirch is a tasty vegetarian dish, cooked with capsicum, potato, onion and other ingredients. Try out this very healthy for your family and kids.
Cook for 3-4 minutes or until you get the nice fragrant from them.
Step 4
Then add tomatoes. And sauté them till they are translucent and soft. It will take about 15 minutes.
Step 5
Now add red chili, coriander powder, cumin powder, turmeric powder and salt.
Step 6
Cook for 2-3 minutes then add potatoes.
Step 7
Add 1 cup water and cook for 10 minutes or until potatoes are tender.
Step 8
Add green pepper (shimla mirch) and onion. Mix well.
Step 9
Now Cover the pan and cook it till potatoes are done.
Step 10
It will take about 10 minutes and all the water will absorbed.
Step 11
Sprinkle garam masala over it and stir well. Aloo Shimla Mirch is ready to serve.
[/tab] [tab]
Keep the size of onion, potato and green bell pepper same while cutting.
[/tab][tab]
Serve with chapati or paratha.
[/tab] [/tabs]
If you like Aloo Shimla Mirch Recipe and make it then let me know your feedback by commenting below.And if you know more innovative ways in which we can utilize this mouth watering Aloo Shimla Mirch, do share with us and we would be glad to give it a try.
Wash chicken properly and cut into bite size pieces.
Step 2
Take a large bowl, add yogurt, lemon juice, oil, garlic-ginger paste, cumin powder, coriander powder, food color, salt, pepper and cayenne pepper in it.
Step 3
Mix until well combined.
Step 4
Add chicken to the marinade. Turn to coat evenly.
Step 5
Cover and refrigerate for 4 hours to blend flavours.
Step 6
Preheat an outside charcoal grill to medium.
Step 7
Brush grill grate with oil or cooking spray.
Step 8
Thread chicken pieces on metal skewers.
Step 9
Place skewers on the preheated grill. Cook for 20 minutes or until chicken is no longer pink inside and juices run clear when chicken is pierced.
Step 10
To Make Onion Relish:
Meanwhile, in a small bowl, combine together the onion, coriander, lemon juice, salt and pepper. Let stand for 30 minutes.
Step 11
Remove from the skewers and transfer into a serving platter. Delicious Chicken Tikka is ready to serve. ENJOY!!
[/tab] [tab]
Serve along with naan and onion relish.
[/tab] [/tabs]
If you like Chicken Tikka Recipe and make it then let me know your feedback by commenting below.And if you know more innovative ways in which we can utilize this mouth watering Chicken Tikka, do share with us and we would be glad to give it a try.
Pizza is a popular and delicious dish of Italian origin, that has become extremely popular all over the world.
Today i am bringing you guys an amazing fusion dish. Fusion cooking is a delight!It creates magic and is fairly easy to do. When we combine a number of cuisines in one meal, we get a delicious combination of new tastes and flavors.
If you love pizza and you love BBQ aroma – then this is totally your kind of Pizza.It sounded AH-mazing!…and it sure was! It was “love at first bite”!
Photo: Chicken Tikka Pizza
Chicken tikka is Asian style of barbecued chicken and it tastes fabulous as a topping on pizza. It has become widely popular in Pakistan.
Photo: Chicken Tikka Pizza Marination
I made it yesterday for my family and especially for my brother. He is a true pizza lover. He was sad when it got over and even though he knew there was no more pizza left he was talking about how he felt like having this pizza the next day. He still talks about it. And while writing this post, I wish I had some pizza dough so that I could make this again now.
If you ask me what makes a good pizza, i would definitely say that it is the sauce. I will overlook a ‘meh’ crust if the sauce is good. Yeah, but of course, i would prefer when both the crust and sauce are amazing, but the highlight of a pizza for me is definitely its sauce. And this sauce is just ‘magical perfection’. Talking about the crust, i prefer thin crust pizza over a thick chewy one. And this recipe gives you the perfect crust. The best part is that it is super easy. Hope you guys give this recipe a try and be fall illustrious among your friends and relatives for making finest an admirable Chicken pizza.
So let the fun begin
1st Prepare Chicken Tikka:
Marinate the chicken with the lemon juice, yogurt, ginger garlic paste, roasted cumin powder, garam masala, red chilli powder, tikka masala powder and salt.Marinate for atleast 4 hours ( perferably marinate overnight).
Photo: Chicken Tikka Pizza Marination
Now broil on high for 8-10 minutes, turning over once. Or grill till cooked.
Transfer into a bowl and keep side.
Note:Sorry I din’t get grilling process pictures as I was on in a hurry to assemble the pizza. 😛
Now Make Pizza Dough :
In a large mixing bowl, mix 2 cups flour, yeast, sugar, milk powder and salt.
Combine warm water, egg and butter in a small bowl.
Photo: Pizza Dough Ingredients
Add this in the flour mixture and beat with an electric mixer on High for 3 minutes.
Using a wooden spoon, stir in as much of the remaining flour as you can. or knead with hand.
Turn dough out onto a lightly floured surface. Knead in enough of the remaining flour to make a moderately stiff dough that is smooth and elastic ( 3 to 5 minutes ).
Shape dough into a ball. Place in a lightly greased bowl, turning once to grease dough surface.
Photo: Pizza Dough
Cover bowl and let the dough rise in a warm place until double in size ( 50 to 60 minutes ).
Punch dough down. Turn dough out onto a lightly floured surface.
Cover and let rest for 10 minutes.
To Make Pizza Sauce :
Blend tomato paste, tomato sauce, oregano in a blender.
Heat 1 teaspoon butter in a pan, add garlic paste & fry for 1 minute.
Add blended tomato mixture & paprika.
Cook on medium heat until sauce is thick. Keep aside and let it cool competely.
To Assemble The Pizza
Preheat oven to the highest setting on your oven. Mine goes to 250 C degree.
If you have a pizza stone, place it in the oven. I do not have one, and I use the back of my sheet pan.
You do not have to preheat your sheet pan. Dust your sheet pan.
Roll out your pizza dough.
Drizzle some melted butter on top of your rolled out pizza.
Prick with fork and let it rest for 10 minutes.
Spread pizza sauce over it.
Top generously with the chicken tikka and capsicum.
Sprinkle cheddar cheese and mozzarella cheese.
Sprinkle parsley and oregano on top the pizza.
Bake for 20 minutes or until cheese has melted and crust has cooked.
Sprinkle some extra parsley. Let cool a little. Cut into slices and serve.
Lets go to weekend Programming class with this fabulous pizza. I’m sure my class-fellow’s will enjoy this pizza. 🙂
Recipe Notes:
.FOR PIZZA DOUGH: If you want to store the extra pizza dough for future use, just oil the dough ball all around and put each ball into separate zippered freezer bag. You can freeze this way for about 2-3 days.The day before you plan on using them, just transfer the dough to the refrigerator. And on the day of usage, remove from fridge, place on a floured counter and gently press the ball into 1/2 inch thickness and let rise for 2 hours.
Photo: Pizza Dough
FOR PIZZA CRUST: The crust cooks really fast. Mine actually took just 12 minutes. Do not over cook or your crust will become hard. By the time the cheese melts, the crust will get cooked. Even then just check before taking out.
Photo: Chicken Tikka Pizza Crust
FOR PIZZA SAUCE: This recipe makes about 1-1/2 cups of pizza sauce, I often have a bit leftover for during the week if I want to make bread pizza pinwheels or homemade pizza rolls. Sometimes, I place the extra sauce in sterilized jars and freeze it until i need it next. I just let it thaw in the refrigerator when I know I am going to need it.
FOR TIME SAVING: You wont require much time in the kitchen if you prepare the dough and marinate the chicken the night before. The next day, you will just have to grill the chicken, and thaw the dough for 2 hours and assemble the pizza.