Tag: Kids Friendly

  • Leftover Mashed Potato Pancakes Recipe

    Leftover Mashed Potato Pancakes Recipe

    An essential part of the culinary heritage of Pakistan is the celebration of food with family and friends embedded in the concept of ‘dawat’ (feast). And anyone who hosts a ‘dawat’ (feast) knows that there’s always leftovers to deal with. As delicious as Pakistani Dawats (feast) are, you can only have so much roasted meat and stuffing for a meal. Instead of having the same food for the next day, transform the dishes into new ones!

    Leftover Mashed Potato Pancakes

    Last week, we hosted a ‘Family Dinner’ and made the ‘Roasted Chicken with Mashed Potatoes. We usually use leftover roasted meat for a sandwich or rolls with the apricot or mint chutney (sauce), gravy and stuffing, but what about the mashed potatoes? Add some flour, egg and cheese and turn them into mashed potato pancakes! Great for breakfast, lunch, or as a side dish or light dinner . A Perfect way to enjoy leftover potatoes and the flavor combinations are endless!

    Leftover Mashed Potato Pancakes recipe
    A Perfect way to enjoy leftover potatoes and the flavor combinations are endless!

    I love making these Potato Pancakes whenever I have leftover mashed potatoes so I don’t feel like I’m eating the same thing the next day. Serving size will change depending on how much mashed potatoes you have leftover. This works best with cold mashed potatoes.

    Leftover Mashed Potato Pancakes recipe
    Photo: Leftover Mashed Potato Pancakes

    These are as easy to make as normal pancakes – just mix together the mashed potatoes, flour, eggs, cheese, green onions and seasoning. Then cook the batter in a large pan until golden brown.

    Leftover Mashed Potato Pancakes
    Leftover Mashed Potato Pancakes

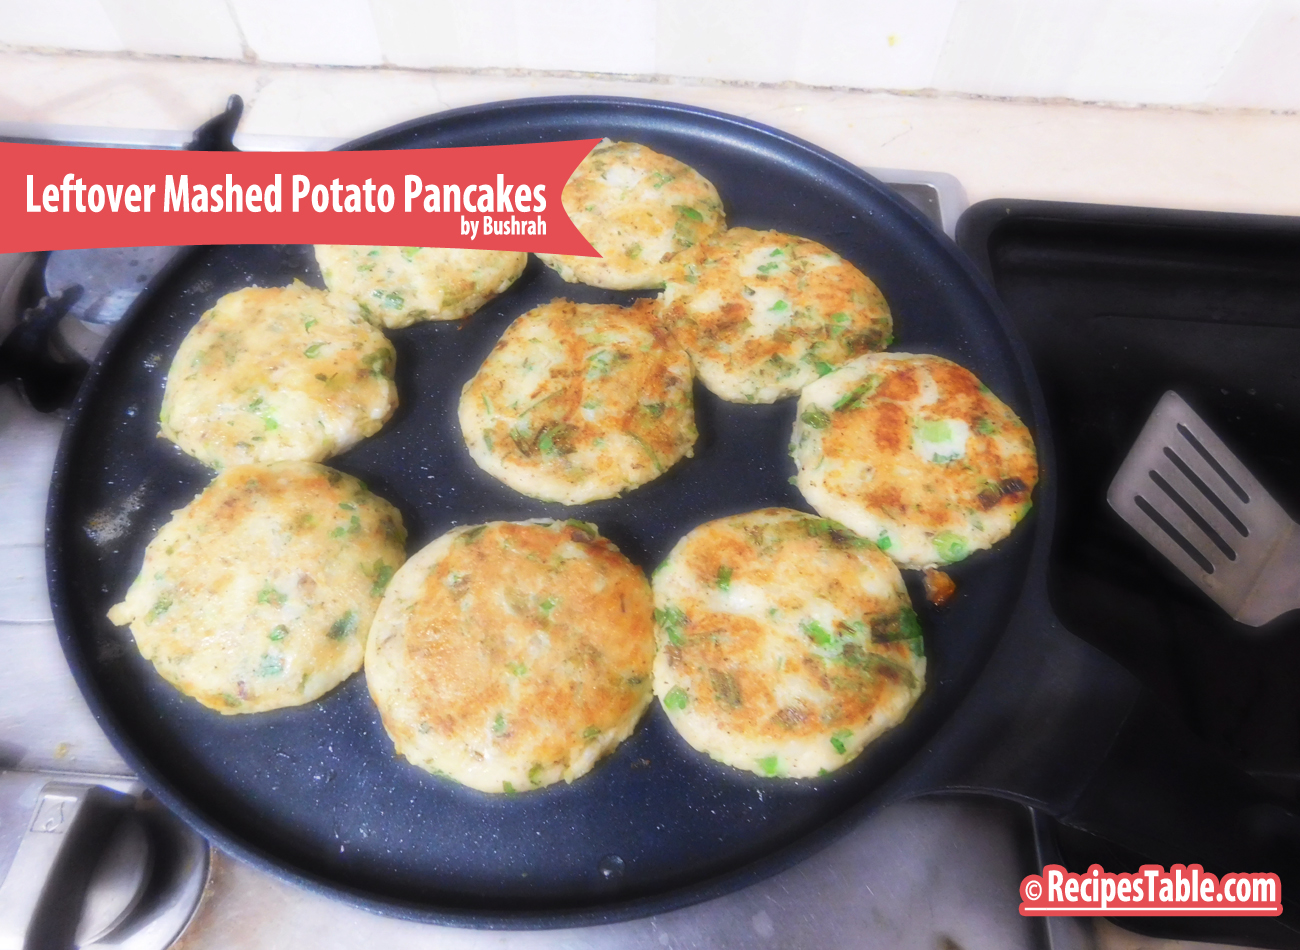
    With their crispy exterior and creamy, cheesy center, there’s not much to dislike here. I recommend topping these with a sour cream or garlic mayo. 

    Leftover Mashed Potato Pancakes recipe
    Leftover Mashed Potato Pancakes

    You can really get creative with the seasonings and add ins in this easy recipe!  Pretty much anything in your fridge is game… add some spices & herbs, a little bit of meat/protein and whatever veggies you have on hand!

    Remember to revel in your own amazingness for reducing food waste, saving time and making the best breakfast ever 🙂

    Check it out the Leftover Mashed Potato Pancakes recipe and printable version here!!

    Leftover Mashed Potato Pancakes Recipe

    Use your leftover mashed potatoes to make mashed potato pancakes! Soft and fluffy with a crispy outside.

    • 2 cups leftover mashed Potatoes
    • 2 eggs
    • 2 green onion (chopped)
    • 1/2 cup cheddar cheese (optional)
    • 1/4 cup plain flour
    • 1/2 teaspoon black pepper
    • 1/2 teaspoon herb seasoning
    • salt to taste
    • 2 tablespoon cooking oil

    For Garnishing

    • green onion (thinly sliced)
    • sour cream or garlic mayo
    1. In a mixing bowl, combine together the mashed potatoes, eggs, cheese, flour and green onions.
    2. Season with salt, pepper and herb seasoning.
    3. Mix well.
    4. Heat a large nonstick pan over medium high heat with a drizzle of oil.
    5. Drop 1/4 cup of the batter onto the hot pan in 6 mounds and cook until golden brown on the first side, about 3-4 minutes.
    6. Then flip and cook until cooked through, another 3-4 minutes.
    7. Remove from the pan and keep warm.
    8. Heat the remaining oil and cook the rest of the pancakes.
    9. Garnish pancakes with chopped green onion.
    10. Serve with sour cream or garlic mayo if desired.

    Serving Suggestions:
    They can be topped with sour cream, roasted chicken bits, sautéed veggies, ketchup, sausage and eggs, basically anything you might have handy!

    If you make this recipe, be sure to snap a photo and hashtag it #Recipestable. I’d love to see what you cook!


    What are your holiday traditions guys? I would love to hear some from you all. Are there recipes passed down to you from your grand mom? Or the one from many generations? Share them all in comments below.

    Happy Cooking!!

  • The Best and Easiest Spaghetti Meatballs Recipe

    The Best and Easiest Spaghetti Meatballs Recipe

    How are you all doing? Did anything exciting happen lately? I am sorry for my absence, life has kept me, but I have a free few days a head of me to be around more.

    Let’s Start Today’s Post with some Food for the Soul  

    “Expectation is the root of all heartache”.  _William Shakespeare

    quote

    I guess I need not say much about the quote I am sharing with all of you today. I am a person of high expectations – despite trying to develop myself into a better person and having reduced my level of expectation from all around me, I have not reached the level where I would have zero expectation.

    I guess it is not human to reach that kind of a stage, but still I would love to reach a stage where my expectations are so low that it does not guarantee any heartbreaks if things don’t happen just like how I want it to be. I really don’t know whether I will ever reach that situation but yes, I am trying…

    It’s Getting Cold . Now Let’s Have Some Food Talk To Warm & Nourish Our Soul!!

    Today’s Recipe: Spaghetti Meatballs

    What’s better than a warm fire and a big bowl of comfort food on a cold winter night?  Today I want to share a recipe that feels, to me, like the closest you can get to “comfort food” during Whole 30.

    The Best and Easiest Spaghetti Meatballs
    Can’t stop, won’t stop with the Comfort Food recipes this winter. ♡

    For a bowl of Italian comfort, Make my best & Easiest Spaghetti Meatballs! It only takes 35 minutes to make this delicious family favorite, all from scratch, and I promise you will never have leftovers. While the spaghetti sauce cooks, you’ll make the meatballs and while the meatballs cook, you’ll boil your pasta. Makes 16 meatballs, two per person. I made these meatballs with chicken mince , but you can use whatever ground meat you’d like to use, actually(beef, lamb, turkey). They are super soft, tender  and juicy because they cook right in the sauce and I used fresh bread crumbs and not dried ones.The sauce is my Homemade Italian Tomato Sauce and I just add the meatballs (& spaghetti) to make this a complete meal… but don’t forget the salad.

    The Best and Easiest Spaghetti Meatballs
    The Best and Easiest Spaghetti Meatballs

    This is really a quick and easy recipe because the sauce takes 5 minutes of prep and the meatballs take 10 minutes to put together. Then it all cooks in one pot and you have the most delicious spaghetti dinner. 

    The Best and Easiest Spaghetti Meatballs
    The Best and Easiest Spaghetti Meatballs

    Whether you’re having company or a family dinner, you can’t go wrong with Easiest Spaghetti Meatballs. Try my easy recipe and you’ll see why they call it comfort food. They really just melt in your mouth. 

    Here’s your go-to, foolproof, The Easiest Spaghetti Meatballs recipe you’ll never want to be without.

    I have also posted Mince Macaroni which is another easiest & tastiest version of making Pasta home. Do check it out as well.  It’s finger lickin’ good. You’ll be coming back for more. 


    Put your own spin on it. And lemme know how it turns out. Post a photo on Facebook (Recipestable) or  on Twitter so I can see how lovely yours turn out.


    Happy Dinner Making!!

  • Keema Macaroni Recipe (Mince Macaroni)

    Keema Macaroni Recipe (Mince Macaroni)

    Keema Macaroni (Mince Macaroni)

     Pasta, for me, is the ultimate comfort food.  I love anything to do with pasta or macaroni, as they are my go-to on my lazy days. Today i am sharing a super easy Keema Macaroni recipe for busy weeknight Meals. One dish I make quite frequently when I have some mince is this one. Nice and simple, full of flavors.

    Keema Macaroni ( Mince Macaroni)
    Photo: Keema Macaroni ( Mince Macaroni)

    This ain’t your ordinary pasta. With flavors bursting out from every corner, this one is delicious! To make it more unique and give a distinct flavor, I have used my ever favorite Italian Pasta Sauce

    Photo: Keema Macaroni ( Mince Macaroni)
    Photo: Keema Macaroni ( Mince Macaroni)

    You can use any macaroni for this recipe, but I totally recommend trying elbow or something that can help hold all of those tiny pieces of mince. I used my favorite whole wheat pasta. Cook it al dente according to package instructions.

    While the pasta is cooking, saute up an onion and mince until cooked.  Then add in some garlic, herb seasoning and pasta sauce.  And once the pasta is cooked, drain and add it to the saute pan. I would add a dollop cheese or mayonnaise to make it more moist and gulp it down!

    Isn’t that to easy?? Easy enough even for a weekday night? Of Course Yes!!

    Keema Macaroni ( Mince Macaroni)
    Photo: Keema Macaroni ( Mince Macaroni)

    This is a really delicious pasta dish and the taste of the basil really comes through beautifully. The minced meat balances out the starch of the macaroni really well. A perfect dance of herb and spice ensues in your mouth…That you have to experience!

    As you can see, the recipe is just as good and vibrant and delicious as ever.  🙂

    Keema Macaroni ( Mince Macaroni)
    Photo: Keema Macaroni ( Mince Macaroni)

    Some Tips for the Perfectly Cooked Keema Macaroni:

    1. Never cook your macaroni in boiling hot water, it destroys the outer layer of the macaroni however you may not realize it. So, always throw in your macaroni or whatsoever in simmering water, a stage before boiling for best results.
    2. Always add a reasonable amount of salt to water, in which you will be cooking your macaroni.
    3. Once your macaroni has been boiled, strain it, take it out of the hot water and quickly rinse them in cold or regular tap water and the set aside. This stops the macaroni from further cooking, which results in soggy, dull and bland macaroni.
    4. Once you throw macaroni into your dish, let it cook and absorb the wonderful flavours of the dish, by letting it sit in the pan for 2-3 minutes with the lid closed and on slowest flame. Macaroni is bland, has no particular flavour so this step is very critical as well as rewarding.

    Check it out the Keema Macaroni (Mince Macaroni) recipe and printable version here!!

    Keema Macaroni (Mince Macaroni)

    The best flavors of Italian food meets macaroni, mince & Italian seasoning in this savory and irresistible dish.

    • 500 gm mince meat (lamb, beef, chicken your choice)
    • 400 gm macaroni
    • 1 tablespoon olive oil
    • 1 large onion (minced)
    • 1 teaspoon grated ginger
    • 1 teaspoon minced garlic
    • 1 cup italian Pasta Sauce
    • 1/2 teaspoon crushed red chilies
    • 1/2 teaspoon paprika powder
    • 1 teaspoon herb seasoning
    • Salt to taste
    • For Garnishing
    • green or black olives
    • basil leaves
    • cheese (optional)
    1. Cook macaroni till el dente. Drain and set aside.
    2. Heat olive oil in a large pan or wok over medium heat.
    3. Saute onion, ginger and garlic in oil for few minutes or until t starts changing color and gets aromatic.
    4. Add minced meat and cook for 5-10 minutes or it start changing color.
    5. Add in the rest of the ingredients from Pasta sauce to salt and cook on low heat for around 20 minutes or until the mince is done.
    6. Add water little by little to ensure that the mince does not stick to the pan.
    7. Once the mince is cooked, add in the drained macaroni and give it a nice mix to ensure the all spices covers the macaroni.
    8. Keep on low flame with tight lid for around 5 minutes.
    9. Turn the heat off and take it out in a serving dish.
    10. Garnish with olives and fresh basil.
    11. You can top with some cheese. Enjoy!!

    Serving Suggestions:
    Serve warm!

    Recipe Note’s:

    1. You can use any pasta of choice , i like the taste of brown rice pasta compared to others.
    2. You can add veggies e.g. carrots, capsicum, green peas if you like. Everything in this recipe is optional. Go as you please. Play with flavours.

    If you make this recipe, be sure to snap a photo and hashtag it #Recipestable. I’d love to see what you cook!


    What are your holiday traditions guys? I would love to hear some from you all. Are there recipes passed down to you from your grand mom? Or the one from many generations? Share them all in comments below.

    Happy Cooking!!

  • Easy Smooth & Rich Egg Pudding Recipe

    Easy Smooth & Rich Egg Pudding Recipe

    This Egg Pudding. Wow.

    Easy Smooth & Rich Egg Pudding
    Easy Smooth & Rich Egg Pudding

    Egg Pudding

     Have you ever wanted something so bad you think you’d die if you don’t have it? And when you think you’ve finally gotten it, its snatched away from you?

    If yes, then this Egg Pudding is especially for you.

    Easy Smooth & Rich Egg Pudding

    Eat it warm, eat it cold; it provides comfort like no other.

    Egg pudding is just one of those things that never fails to bring a smile on your face or warmth to your toes. Its rich, its smooth, and it is so so SO easy to make even my fogged up brain can whip it up. Just needs a little bit of patience and whole lot of whisking!

    Easy Smooth & Rich Egg Pudding
    Easy Smooth & Rich Egg Pudding

    Egg Pudding was my most favorite treat growing up. This easy dessert can be quickly made for festive occasions. Surprise everyone and get loads of compliments by making this easy egg pudding. 

    Easy Smooth & Rich Egg Pudding
    Easy Smooth & Rich Egg Pudding

    Here’s a recipe for making a easy, simple, yet rich, smooth and satisfying egg pudding. I made this for my family and it totally rocked!! They said it was the most creamiest and richest egg pudding they’ve ever tasted. I never had any leftovers, and it would never be enough for them (lol). The only thing I WOULD get however, would be requests to make more!

    Easy Smooth & Rich Egg Pudding
    Easy Smooth & Rich Egg Pudding

    The creamy texture of this soft-smooth pudding is so inviting, you could call it comfort food. This recipe for egg pudding has a pleasant vanilla flavor complemented by cinnamon or nutmeg. This is the best dessert. I like it most for its sponginess. And it is also very easy to make with in 35 minutes.

    Easy Smooth & Rich Egg Pudding
    Easy Smooth & Rich Egg Pudding

    Some Important Tips to Make Best Egg Pudding: 

    Learn how to make best Egg Pudding by following these tips and tricks.

    1. One-dish Pudding: Recipe can be baked in lightly greased 1-1/2 qt. soufflé or baking dish. Pour hot water to within 1 inch of top of dish. Increase baking time to 35 to 40 minutes.
    2. No-mess pouring: Make pudding in a bowl with a pouring lip, or transfer it to a large glass measure, to make filling pudding cups easier and neater.
    3. For perfectly smooth custard: Strain it through a sieve when filling pudding cups or baking dish to remove any tough egg strands.
    4. Don’t skip the hot-water bath. A hot water bath, insulates the pudding from the direct heat of the oven and promotes even cooking so the edges don’t overcook before the center is done. Very hot tap water will do.
    5. When is it done? Baked Pudding  should be removed from the oven (and water bath) before the center is completely set. The center will jiggle slightly when dish or cup is gently shaken. Pudding will continue to “cook” after it’s removed and center will firm up quickly. Over baked Pudding may curdle.
    6. The knife test: Test for doneness with a thin-bladed knife. Insert knife about 1 inch from the center of the dish. If knife is clean when pulled out, the pudding is done. If pudding clings to the blade, bake a few minutes longer and test again.
    7. Serving Options: You can have this yummy dessert by adding dry fruits, jelly or caramel, but today I am making the basic one. 

    If you are craving for something sweet yet easy dessert in this foggy weather, nothing could be better than this Egg Pudding.  Do try it, your kids are going to fall in love with this proteins and calcium rich dessert. You can also serve this dessert for your next party and this will definitely not going to disappoint your guests.

    Check it out the Easy Smooth & Rich Egg Pudding recipe and printable version here!!

    Easy Smooth & Rich Egg Pudding

    This easy dessert can be quickly made for festive occasions. Surprise everyone and get loads of compliments by making this easy egg pudding.

    • 6 eggs
    • 2 cups milk
    • 1/2 cup castor sugar
    • 1 can (14 ounce. condensed milk)
    • 1 teaspoon. vanilla extract
    • a pinch of ground nutmeg OR cinnamon (optional)
    • grated chocolate (option)
    1. Preheat oven to 350°F or 170°C.
    2. Heat milk in a small saucepan until very hot but not bubbly.
    3. Meanwhile, beat eggs, sugar, vanilla and salt in medium bowl until blended but not foamy;
    4. slowly stir in hot milk.
    5. Add condensed milk and nutmeg powder beat until mixed well.
    6. Pour pudding batter through a strainer (to prevent bubbles from forming) into your pudding-
    7. mold.
    8. Cover the mold with aluminum foil.
    9. Place pudding pan on rack in the center of the preheated oven; pour very hot water into the pan
    10. (hot-water bath) to within 1/2 inch of top of pudding mold.
    11. Bake 25 to 30 minutes or until a knife inserted near center comes out clean, centers will still be soft.
    12. Remove pudding mold from water bath.
    13. COOL on wire rack 5 to 10 minutes.
    14. Once it’s baked, invert onto a plate. Garnish with grated chocolate and cream. Enjoy!!

    Serving Suggestions:
    Serve warm or refrigerate until cold.

     I have also posted Hot Chocolate Pudding Recipe which is another easiest & tastiest version of making Pudding. Do check it out as well.  It’s finger lickin’ good. You’ll be coming back for more. 


    Put your own spin on it. And lemme know how it turns out. Post a photo on Facebook (Recipestable) or  on Twitter so I can see how lovely yours turn out.


    Happy Baking!!

    If you like this post, Please Subscribe to my blog and let me know your feedback by commenting below.. I have lots more recipes to share with you.

  • Mini Pizza Cups Recipe

    Mini Pizza Cups Recipe

    Pizza is always a crowd pleaser, but making your own can be a bit of a headache. This bite-sized alternative is easy to make and healthy (just 150 calories each!) and as much fun to make as they are to eat.

    Mini Pizza Cups
    Mini Pizza Cups

    Mini Pizza Cups

    I’m sure you’ve all heard of or made Pizza Cupcakes or  Pizza Muffins before. But as simple or obvious as this recipe seems, sometimes we need a good reminder of the un-fussy classics. Sometimes you don’t have time or the right ingredients to make an elaborate meal. When this happens, it’s good to have something simple and inexpensive to fall back on.

    Mini Pizza Cups recipe

    Healthy, Budget Friendly Mini Pizza Cups? Yes, Yes, and Yes!

    Mini Pizza Cups recipe
    Mini Pizza Cups

    If you’re crazy about pizza like me, but can’t justify eating it as much as you’d like, this is a great recipe for you. I used leftover pizza dough, chicken, lots of fresh vegetables, and a tablespoon or so of cheese on each mini pizza. Considering each pizza cup base 60 calories, the shredded chicken & cheese about 40 calories, and the rest of the ingredients were vegetables, I’m guessing each pizza had about 150 calories. This is not scientific, but it’s my best guess.

    Mini Pizza Cups
    Mini Pizza Cups

    An interesting and fun way to present your pizzas. These cute little pizza cups will delight anyone, especially kids. Have your children create their own pizzas, and get creative with the toppings. Perfectly shaped and easy to handle, they make for a great addition to lunch boxes or for picnics and road trips.

    mini-pizza-cups
    Mini Pizza Cups

    Hope you will give this a try and let me know how it turns out for you..

    Check it out the Mini Pizza Cups recipe and printable version here!!

    Mini Pizza Cups Recipe

    Pizza is always a crowd pleaser, but making your own can be a bit of a headache. This bite-sized alternative is easy to make and healthy (just 150 calories each!) and as much fun to make as they are to eat.

    For Pizza Dough

    • 2-1/2 cups plain or all purpose flour
    • 4 tablespoon oil
    • 1-1/2 teaspoon instant yeast
    • 1 teaspoon castor sugar
    • 1 teaspoon salt
    • 2 pinches of baking powder
    • warm milk with a bit of water for kneading

    For Mini Pizza Cups

    • 1 cup pizza Sauce or Ketchup (Recipe here)
    • 1 cup cooked chicken
    • 1 small Capsicum (chopped)
    • 1 small onion (chopped)
    • 5-6 black Olives (thinly sliced)
    • 1 cup mozzarella Cheese (grated)
    • Italian herb Seasoning (for topping)
    • 1 teaspoon oil (for greasing)

    To Make Dough

    1. Mix all the dry ingredients and the oil in a bowl or food processor, then gradually add the warm milk a little at a time.
    2. Knead it into a soft dough.
    3. Dab a touch of oil all over the dough, then cover it and place it somewhere warm.
    4. Leave it to rise to double its size, takes about 30 minutes to an hour depending on the weather.
    5. Once ready, punch down the dough and then divide it into 18 equal balls.
    6. Grease 24 cups muffin pan with oil or butter and set aside.
    7. Roll each dough ball out into a circle of about quarter inch thickness, then gently place it in the cup hole of the pan, patting it gently to fit the shape.
    8. Repeat this method with the rest of the balls.
    9. Next, spread a light layer of pizza sauce in each cup. Then add the chicken, capsicum and onions.
    10. Sprinkle some cheese over the filling and drizzle some ketchup over the top of each cup.
    11. Top with olives and herb seasoning.
    12. Allow the pizza cups to rest and rise for 20 minutes, then preheat the oven at 180 degree C.
    13. Bake them for about 12-15 minutes or until the cheese is bubbly and the dough is cooked through.
    14. Remove the pizza cups from the pan and allow them to rest on a wire rack to cool slightly before serving.
    15. Delicious Mini Pizza Cups are ready to serve. Enjoy!

    Recipe Note’s:
    These delicious Mini Pizza cups can be frozen for up to 2 weeks.

    Serving Suggestions:
    Serve with your favorite dipping sauce.

    I have also posted My Fav French Bread Pizza Recipe and Pizza Rolls Recipe which are another easiest & tastiest version of making Pizza. Do check it out as well.  It’s finger lickin’ good. You’ll be coming back for more.


    Put your own spin on it. And lemme know how it turns out. Post a photo on Facebook (Recipestable) or  on Twitter so I can see how lovely yours turn out.

    Follow my blog with Bloglovin


    Happy Baking!!

    If you like this post, Please Subscribe to my blog and let me know your feedback by commenting below.. I have lots more recipes to share with you.

  • Chapli Kebab Pizza Recipe (An Italian-Pakistani Twist)

    Chapli Kebab Pizza Recipe (An Italian-Pakistani Twist)

    Give pizza night a new twist by making spicy Chapli Kebab Pizza (Heavenly Double TREAT)!!

    Monday nights are for creativity. Or maybe, you’re like me and just have leftover Chapli Kebab’s wasting away in your fridge. Pinterest gave me the inspiration I needed to take dinner from a boring pizza night to an Italian-Pakistani Twist.

    This Chapli Kebab Pizza is my Pakistanized pizza makeover…..you could say that this is an Pakistani-Italian delight….hey, fusion food is the latest fad.  A delicious and easy to make pizza with crispy, juicy chapli kebab’s and  melty mozzarella cheese!  It is sure to be a hit! 

    Chapli Kebab Pizza (Desi Pizza)

    Photo: Chapli Kebab Pizza

    Chapli Kebab Pizza

    This pizza is so easy to make with left over Chapli Kebab’s with the cheesy topping….nobody could resist. I added dried Italian herbs to the pizza base and that gave a subtle Italian flavor with the Pakistani flavored topping. And just followed my heart to a logical conclusion. I took the shortcut and used the Chili Garlic sauce in place of pizza sauce and lessen cheese to keep it healthy and low fat( you can add more cheese). Well… I needn’t explain what the result was. The recipe finding its place in this blog itself says it all….. Right???

    chapli-kebab-pizza3

    So why go to pizza hut…when you can make healthy homemade ones?? This pizza was a huge hit with my family try it…you will love me more, honestly 🙂 

    Chapli Kebab Pizza recipe

    Photo: Chapli Kebab Pizza

    Bismillah, Let’s get started!

    Check it out the Chapli Kebab Pizza recipe and printable version below.

    Chapli Kebab Pizza Recipe

    A delicious and easy to make pizza with crispy, juicy chapli kebab’s and melty mozzarella cheese! It is sure to be a hit!

    For Pizza Dough

    • 2 cups plain flour
    • 1 egg (lightly beaten)
    • 4 tablespoon oil
    • 1-1/2 teaspoon dry instant yeast
    • 1/2 teaspoon salt
    • 1/2 teaspoon sugar
    • 1/2 cup warm milk

    For Pizza Topping

    • 8 leftover chapli kebab’s
    • 1 cup pizza sauce or Chili Garlic Sauce
    • 1/2 cup cheddar cheese (shredded)
    • 1/2 cup Mozzarella Cheese (shredded)
    • 1/2 teaspoon dried basil
    • 1/2 teaspoon dried oregano
    • fresh coriander leaves or parsley (for topping)

    To Make Pizza Dough

    1. In a large bowl, add yeast and sugar.
    2. Pour the lukewarm milk and let it stand for about 10 minutes or more until it becomes frothy.
    3. Place flour and salt in another large bowl.
    4. Add the yeast mixture and mix well until well combined.
    5. Now add the oil and knead well till you get a soft ball of dough.
    6. Cover the bowl with a wet cloth or a plastic wrap and keep in a warm place for 1 hour or until the dough is rise and volume is doubled.

    To Make Pizza

    1. Once it has doubled, turn the dough onto a well floured surface, pat down and divide into eight small balls.
    2. Preheat oven at 180 degree C.
    3. Roll dough into pizza crust’s.
    4. Transfer to a mini Pizza pans or baking sheets.
    5. Spread Pizza sauce or Chili Garlic Sauce evenly.
    6. Arrange chapli kebab’s on top of the sauce.
    7. Sprinkle the dried basil and oregano.
    8. Top with cheddar and Mozzarella cheese.
    9. Sprinkle coriander fresh leaves.
    10. If needed, you can sprinkle a bit more cheese.
    11. Bake, in the preheated oven, for 15 minutes or until the crust turn brown and cheese melts.
    12. Remove the pizza pans from the oven.
    13. Slices each into halves and serve warm. ENJOY!!

    Serving Suggestions:
    Serve alone as an appetizer, or accompany with a light pasta or salad.

     Recipe Note’s:

    I am a firm believer that every oven is different and you should check on your food periodically to make sure it is cooking properly.


    Put your own spin on it. And lemme know how it turns out by sharing a picture  on Instagram, Facebook (Recipestable) or Twitter with this hashtag #Recipestable so I can see how lovely yours turn out.


    Happy Baking!!

    If you like this post, Please Subscribe to my blog and let me know your feedback by commenting below.. I have lots more recipes to share with you.

  • 25 Minute Chicken and Noodles Recipe

    25 Minute Chicken and Noodles Recipe

    I’m back with another post on Light Meal On Thursday. Last Thursday happened to be my brother’s birthday so there was definitely no light eating on that day, hence did not post a light meal.

    Quick & Light Neal – 25 Minute Chicken and Noodles 

    Today’s recipe is 25 Minute Chicken and Noodles.  It’s an ideal meal on lazy days or when one wants a light meal. Just make this and one is sorted.

    25 Minute Chicken and Noodles
    Photo: 25 Minute Chicken and Noodles

    I really hesitated on adding this recipe to the blog.  It’s really very simple and seems like something everyone already makes.  Then I remembered that my blog is not just for my readers, but also a record of recipes I make frequently.  This is one of family favorites(especially my nano _grandma)!  

    25 Minute Chicken and Noodles

    I’m not going to lie. But when I made this Chicken and Noodles for the family and grandma… they devoured it. I’m NOT KIDDING. I was SHOCKED. They were begging for me. I ended up with NO leftovers. HUH?

    And the best part? The entire recipe took 25 minutes to make. Enough yapping…Hope you enjoy!

    25 Minute Chicken and Noodles
    Photo: 25 Minute Chicken and Noodles

    A quick and delicious one pot recipe with chicken broth, chicken, noodles and healthy vegetables. This quick and easy skillet dish features all your favorite ingredients from chicken noodle soup, but without the soup. It’s a hearty meal perfect for a busy day. You can make a delicious, family-friendly dinner in just 25 minutes. 

    Bismillah, Let’s get started!!

    Check it out the 25 minute Chicken and Noodles recipe and printable version here!!

    25-Minute Chicken and Noodles Recipe

    • 2 cups cubed cooked chicken
    • 1 cup chicken broth
    • 2 cups vegetables (my fav red pepper, green onions, carrots, green pepper etc)
    • 1 packet noodles
    • 2 tablespoon soy sauce
    • 1 tablespoon hot pepper sauce
    • 1 tablespoon sesame oil
    • 1/2 tsp dried basil leaves (crushed)
    • 1/2 tsp ground black pepper
    • 1/4 teaspoon white pepper
    • salt to taste
    1. Heat oil in a large skillet over medium heat.
    2. Add chicken and stir fry for 5 minutes or until no longer pink and all juices run clear.
    3. Stir in the chicken broth and cook for 10 minutes or until chicken is tender.
    4. Season with basil and pepper.
    5. Stir in noodles. Bring to a boil then reduce heat to low. Cover and simmer for 5-7 minutes or until done and most of the liquid is absorbed.
    6. Sprinkle soy sauce and hot pepper sauce.
    7. Add vegetables and stir well.25-Minute Chicken and Noodles are ready to serve. Enjoy!

     Put your own spin on it. And lemme know how it turns out by sharing a picture  on Instagram, Facebook (Recipestable) or Twitter with this hashtag #Recipestable so I can see how lovely yours turn out.


    Happy Baking!!

    If you like this post, Please Subscribe to my blog and let me know your feedback by commenting below.. I have lots more recipes to share with you.

  • Baby Chicken Bread Recipe

    Baby Chicken Bread Recipe

    The recipe I am sharing today is a Family FAVORITE. All families have certain dishes they love to cook and eat. Mine goes gaga for these baby Chicken Breads! Put 12 dozen in front of them and they’ll still demand more. I am sure you will face the same situation with your siblings, cousins, random guests when you try these magical Baby Chicken Bread. (unless they are gluten intolerant. Oops)

    I thought, I would share this FAMILY FAVORITE with everyone since so many Friends nd ClassFellows have asked for this recipe. Enjoy!

    Baby Chicken Bread
    Photo: Baby Chicken Bread

    Baby Chicken Bread

    Chicken bread is a classic of Pakistani bakeries and we served it at most of the tea parties as a staple here. This simple yet delicious bread is easy to make and full of flavor.

    All you really need is a few basic ingredients: salt, flour, baking soda and yeast etc. The “trick” to achieving a perfect texture is not to over knead the dough and don’t over bake, as this will make it tough & hard, ugh not good! Brush with egg wash. Sprinkle a few sesame seeds. And voila! It’s ready to go in the oven for 25 minutes. 

    Baby Chicken Bread recipe
    Photo: Baby Chicken Bread

    On weekend night, I decided to bake chicken bread from scratch and Just for a twist I made  them in baby sizes.

    Don’t ask me why I do these things. I’m not quite sure myself.

    But you have to admit….they’re pretty darn cute.

     Baby Chicken Bread
    Photo: Baby Chicken Bread

    So now that my kitchen is covered with Baby Chicken Breads, what should I do with them?
    Of course, slathering them with hot pepper sauce and taking a big bite doesn’t count. I already did that. Twice.

    Baby Chicken Bread
    Photo: Baby Chicken Bread

    This recipe is especially handy because it makes A LOT of Baby Chicken Breads (1-1/2 dozen to be exact). So they are the perfect, fuss-free party food. Easy to make, fun to eat.

    Bismillah, Let’s get started!

    Check it out the Baby Chicken Bread recipe and printable version below.


    Baby Chicken Bread Recipe

    Chicken bread is a classic of Pakistani bakeries and we served it at most of the tea parties as a staple here. This simple yet delicious bread is easy to make and full of flavor.

    For Baby Chicken Bread Dough

    • 4 cups plain flour
    • 1 tablespoon instant yeast
    • 2 tablespoon dry powdered milk
    • 1 teaspoon salt
    • 1 teaspoon castor sugar
    • 4 tablespoon oil
    • 1 egg (plus one for glazing)

    For Baby Chicken Bread Filling

    • 2-1/2 cups boiled chicken (shredded)
    • 1 large onion (finely chopped)
    • 1 teaspoon salt
    • 1 teaspoon black pepper
    • 1 teaspoon garam masala powder
    • 1/2 cup coriander leaves
    • 4 green chilies (finely chopped)
    • 1 cup milk
    • 2 tablespoon plain flour
    • 2 tablespoon butter
    • sesame seeds & flax seeds as required

    To Make the Baby Chicken Bread Dough

    1. In a large mixing bowl combine the plain flour, salt, castor sugar, dry milk powder, instant yeast, oil and egg.
    2. Slowly mix in the lukewarm water with your hands till all the ingredients are mixed well and dough starts to form.
    3. Knead the dough for 5-7 minutes on a floured surface till the dough becomes smooth and is no longer sticky.
    4. Bang the dough on the floured surface 7-8 times for elasticity.
    5. Shape the dough in a large ball add place in a greased bowl.
    6. Brush the top lightly with some oil.
    7. Cover with a kitchen cloth and let the dough to rise somewhere warm until doubled in size, around 1 hour.

    To make the Chicken Filling

    1. Meanwhile, Melt butter in a frying pan over medium heat.
    2. Fry onion till soft and translucent.
    3. Now add 2 tablespoon plain flour and stir well.
    4. Season with salt , black pepper and garam masala powder.
    5. Stir in the milk and cook for 2-3 minutes or until thickened.
    6. Stir in the shredded chicken add chopped green chillies and coriander leaves.
    7. Remove from the heat and let it cool completely.
    8. Punch the dough to release air.
    9. Preheat oven at 200 degree C.
    10. Now divide the dough into 14-16 parts depending on how small you want the baby chicken bread to be.
    11. Roll each piece of dough to a rectangular shape.
    12. Snip the sides with a sharp knife and put chicken filling in the center.
    13. Fold each side so they overlap each other (like a braid) the filling will show slightly but that’s ok.
    14. Brush top with beaten egg.
    15. Sprinkle sesame seeds and flex seeds.
    16. Bake, in the preheated oven, for 25-30 minutes or until its turn golden brown.
    17. Right after taking out of the oven apply butter well on whole bread and let it rest covered with a cloth for 2-3 minutes to soften the bread completely.
    18. Delicious Baby Chicken Breads are ready to serve.

    Serving Suggestions:
    Voila! Enjoy your delicious bread with hot tea to the loving and deserving.


     Recipe Tip’s:

    1. I always make big batches of chicken bread at a go and then wrap them well in foil, then put them in some sort of a cellophane bag and tie it up tight and freeze.
    2. They can keep up to 4 weeks! When you need one, you just thaw it out overnight in the fridge or keep it out on the counter until it’s thawed out, then unwrap and then splash a little bit of water using your fingertips on it and put it in the oven for about 5 minutes to freshen it back up. Becomes as good as new! 

    Put your own spin on it. And lemme know how it turns out by sharing a picture  on Instagram, Facebook (Recipestable) or Twitter with this hashtag #Recipestable so I can see how lovely yours turn out.


    Happy Baking!!

    If you like this post, Please Subscribe to my blog and let me know your feedback by commenting below.. I have lots more recipes to share with you.

  • Pulled Chicken Sandwiches Recipe

    Pulled Chicken Sandwiches Recipe

    If I ask what my brother wants for dinner, more than likely he will say “sandwiches/burgers.” This recipe is a twist on the usual burgers and packs a big taste punch with the pulled chicken, cheese and barbecue sauce. If you’re anything like me then a burger needs to be covered in cheese, ice-berg leaves, and many slices of olives and tomatoes.

    Pulled Chicken Sandwiches Recipe
    Photo: Pulled Chicken Sandwiches

    Next time you’re craving a burger or sandwich, give this recipe a shot. It will become your new favorite! Your Dinner guests are guaranteed to be impressed with this deceptively easy Pulled Chicken Sandwich recipe, which includes a few-ingredient rub and a simple 15-minute sauce that comes together while the chicken oven baked. 

    Did I mention these sandwiches are braised in a special sweet and tangy sauce? Yep! It gives the chicken a deep, rich flavor that intensifies with age, so you can make the chicken a day ahead and your sandwiches will taste even better! Perfection!

    pulled Chicken Sandwiches recipe
    Photo: Pulled Chicken Sandwiches

    You can serve this chicken in many ways, but I made them in sandwich form because, honestly, what man can resist a toasty bun piled high with tender, juicy pulled chicken, oodles of caramelized onions, tangy barbecue sauce and melty cheese? I can’t think of one! You can serve this on a sandwich as I did, or you can serve on tacos, nachos and burritos, Ole! I’m already thinking of the delicious ways I plan to use this in the future.

    Photo: Pulled Chicken Sandwiches
    Photo: Pulled Chicken Sandwiches


    Bismillah, Let’s get started!

    Check it out the Pulled Chicken Sandwiches recipe and printable version below.

    Pulled Chicken Sandwiches Recipe

    For Chicken

    • 500 gm boneless chicken thighs
    • 1 teaspoon grated ginger
    • 1 teaspoon garlic (minced)
    • 1 teaspoon hot sauce
    • 1 teaspoon paprika
    • 1 teaspoon cumin powder
    • 1/4 teaspoon freshly ground (black pepper)
    • salt to taste
    • cooking spray

    For Sauce

    • 1 small onion (minced)
    • 2 teaspoons canola oil
    • 1 tablespoon dark brown sugar
    • 1 teaspoon red chili powder
    • 1/2 teaspoon garlic powder
    • 1/2 teaspoon mustard powder
    • 1/4 teaspoon ground allspice
    • 1/8 teaspoon crushed red chili
    • 1/2 cup tomato ketchup
    • 2 tablespoons apple cider vinegar

    Remaining ingredients

    • 4 burger buns (toasted)
    • 4 slices Mozarella cheese
    • 1/4 cup cheddar cheese (grated)
    • ice burg leaves
    • tomato slices
    • olives as required

    To Make Chicken

    1. Preheat oven to 200 degrees C.
    2. Place chicken in a large bowl. Add ginger, garlic, hot sauce, paprika powder, cumin powder, black pepper and salt.
    3. Rub evenly over the chicken.
    4. Place chicken on an oven grill rack coated with cooking spray, and bake 20 minutes or until the chicken is nicely browned.
    5. Let stand for 5 minutes.
    6. Remove chicken from the oven and shred with two forks and set aside.

    To Prepare Sauce

    1. While chicken cooked, heat oil in a small saucepan over medium heat.
    2. Add onion and cook for 5 minutes or until translucent or, stirring occasionally.
    3. Stir in brown sugar, chili powder, garlic powder, mustard powder, allspice and red chili.
    4. Cook for 30 seconds then stir in the apple cider vinegar and tomato ketchup.
    5. Bring to a boil.
    6. Reduce heat to medium low and let it simmer for 10 minutes or until slightly thickened.
    7. Now Stir in chicken and cook 2 more minutes.

    To Make Pulled Chicken Sandwiches

    1. Place iceberg lettuces and mozzarella slices on the bottom half of each bun.
    2. Divide chicken mixture into 4 equal portions and put it on cheese slices.
    3. Top each bun with grated cheese, tomato slices and olives.
    4. Cover with remaining bun. Delicious Pulled Chicken Sandwiches are ready to serve. ENJOY

    Serve on buns, over fresh greens, or on top of a baked potato for a filling dinner. enjoy 🙂

    Pin it For Later

    Pin it for later

    Put your own spin on it. And lemme know how it turns out. Post a photo on Facebook (Recipestable) or  on Twitter so I can see how lovely yours turn out.


    Happy Cooking!!

    If you like this post, Please Subscribe to my blog and let me know your feedback by commenting below.. I have lots more recipes to share with you.

  • Sweet and Sour Chicken with Noodles Recipe (30 Minute Meal)

    Sweet and Sour Chicken with Noodles Recipe (30 Minute Meal)

    Sweet and Sour Chicken with Noodles

    An easy and delicious weeknight meal loaded with healthy ingredients. A one-pan, 30 minute chicken stir fry recipe.This quick and easy sweet and sour chicken with noodles will be ready to eat in less than 30 minutes.

    sweet-sour-chicken-with-noodles

    Sweet and sour Chicken is one of the most popular Chinese dishes and My family is a big fan of sweet and sour chicken so I thought I would try this recipe with noodles. It was a huge hit in our house and even they ate tons of it! Definitely a keeper for a easy go to dinner meal.

    sweet-sour-chicken-with-noodles1

    This Sweet and Sour Chicken recipe is super easy to make. All you will need is one wok or a skillet, and all of the ingredients listed below. It takes about 30 minutes to make this mouthwatering dish. Delicious dinner made in no time!

    Tender, juicy pieces of chicken in a tangy sweet and sour sauce with pineapple chunks, onion and peppers, served on a Bed of Noodles.

    Bismillah, Let’s get started!

    Check it out the Sweet and Sour Chicken with Noodles recipe and printable version below.

    Sweet and Sour Chicken with Noodles

    This Sweet and Sour Chicken recipe is super easy to make. All you will need is one wok or a skillet, and all of the ingredients listed below. It takes about 30 minutes to make this mouthwatering dish. Delicious dinner made in no time!

    • 6 boneless chicken breast halves (cut into 1-inch pieces)
    • 2 tbsp cornstarch
    • 2 tbsp vegetable oil
    • 1 egg white
    • 1 tsp white pepper
    • 2 tbsp ginger & garlic (grated)
    • 1 can pineapple chunks (drained)
    • 1 red bell pepper (cut into 1- inch cubes)
    • 1 green bell pepper (cut into 1- inch cubes)
    • 1 onion (cut into cubes)
    • salt to taste

    For Sweet and Sour Sauce

    • 2 tbsp soy sauce
    • 2 tbsp pure honey
    • 1/2 cup white vinegar
    • 1/2 cup tomato ketchup
    • 1/2 cup pineapple juice
    • 1/4 tsp salt
    • boiled noodles (to serve)

    Method

    To make Sweet and Sour Sauce

    1. In a bowl, combine the soy sauce, honey , vinegar, tomato ketchup, pineapple juice and salt.
    2. Whisk well and set aside.

    To make Sweet and Sour Chicken

    1. Rinse Chicken and pat dry.
    2. In a medium bowl, add chicken ,cornstarch, egg white, salt and pepper. Mix well.
    3. Stir to coat the chicken evenly. Marinate for 30 minutes at room temperature.
    4. Heat a large nonstick pan over high heat until blazing hot.
    5. Add 1 tbsp of oil and swirl to coat.
    6. Add the coated chicken to the pan and spread the chicken in form of one layer.
    7. Let the chicken fry, don’t touch for 1 -2 minutes or until the bottoms are browned.
    8. Turn and fry the other side of chicken for more 1-2 minutes.
    9. Once the chicken is cooked, remove from the pan and set aside.
    10. Heat the remaining 1 tbsp oil in the pan over medium heat.
    11. When the oil heat up, then add grated ginger & garlic, red bell pepper, green bell pepper.
    12. Stir fry for 1-2 minutes then add pineapple chunks and sweet and sour sauce.
    13. Turn the heat to high.
    14. Bring to boil then add the chicken and simmer on low heat for 2-3 minutes or until the chicken is cooked thoroughly. Sweet and Sour Chicken is ready to serve!

    Serve over boiled noodles.

     If you make this recipe, I’d love to see pics of your creations on Instagram, Facebook and Twitter! Hashtag them #recipestable.


    Put your own spin on it. And lemme know how it turns out. Post a photo on Facebook (Recipestable) or  on Twitter so I can see how lovely yours turn out.


    Happy Cooking!!

    If you like this post, Please Subscribe to my blog and let me know your feedback by commenting below.. I have lots more recipes to share with you.

  • The Best Creamed Peas Recipe

    The Best Creamed Peas Recipe

    Creamed Peas 

    Everything’s better with cream…especially vegetables.Vibrant green peas simmer in a simple sauce of milk, flour, and butter in this quick side dish. 

    The Best Creamed Peas
    The Best Creamed Peas

    In my search for a good creamed peas recipe, I found many, but none that quite matched what I wanted. So I took to my own creativity and came up with this absolutely fabulous and The Best Creamed Pea recipe. My family love it so much and we have this on the side quite often. And I double this every time, and not a single pea is left! Alhumdulillah 🙂

    The Best Creamed Peas
    The Best Creamed Peas

    Do try this recipe, these Creamed Peas can become your ultimate side dish.

    Bismillah, Let’s get started!

    Check it out the Creamed Peas recipe and printable version below.

    Creamed Peas Recipe

    Vibrant green peas simmer in a simple sauce of milk, flour, and butter in this quick side dish.

    • 1-1/2 cup green peas (boiled)
    • 2 tablespoon butter
    • 1 tablespoon all-purpose flour
    • 2 tablespoon heavy cream
    • 1/4 cup milk
    • 1/2 teaspoon white sugar
    • a pinch of pepper
    • salt to taste

    Method

    1. Melt butter in a saucepan over low heat and whisk in flour until well blended and smooth.
    2. Now very gradually stir in the milk. When milk is combined, add sugar, salt and pepper.
    3. Cook and stir for few minutes or until sauce begins to boil.
    4. keep stirring for 1-2 minutes then add green peas and stir. Cover pan and allow to simmer for 2 minutes over medium heat or until sauce is thickened.
    5. Reduce heat to medium low then stir in heavy cream.
    6. Cook over medium-high heat until for 1 minutes or until thick and bubbly.
    7. Remove from the heat and dish it out. Delicious Creamed Peas are ready to enjoy 🙂

    Serving Suggestions:
    Serve with grilled Kabobs.

    Recipe Note’s:

    Don’t over cook the peas. Soggy peas will ruin this dish. You want them tender but firm.


    Put your own spin on it. And lemme know how it turns out. Post a photo on Facebook (Recipestable) or  on Twitter so I can see how lovely yours turn out.


    Happy Cooking!!

    If you like this post, Please Subscribe to my blog and let me know your feedback by commenting below.. I have lots more recipes to share with you.

  • The Easiest Chocolate Samosa Recipe

    Samosas are always hit appetizer or snack of tea party and iftar even now it’s included in wedding dinner’s appetizer also.
    Today, I m sharing my Chocolate Samosa recipe with all of you. Crispy samosas with chocolate and walnut is a classic snack for everyone. Try once you will love it for sure

    Bismillah, let’s get started!

    Check it out the Chocolate Samosa recipe and printable version below.

    Chocolate Samosa Recipe

    Crispy samosas with chocolate and walnut is a classic snack for everyone. Try once you will love it for sure

    • 200 gm dark chocolate (grated)
    • 2 tablespoon chopped walnuts
    • 2 tablespoon fresh cream
    • 12 Samosa wraps
    • 1 egg (lightly beaten)
    • oil for frying
    1. In a bowl, mix together the fresh cream, chocolate and walnuts. Now make samosas with chocolate filling and sealed with beaten egg.
    2. Heat sufficient oil in a pan and deep fry samosas on medium heat for 2 minutes or until they turn crispy ang golden.
    3. Drain onto an absorbent paper.
    4. Drizzle some melted chocolate over them.
    5. Chocolate Samosa is ready to serve. Enjoy!

    If you like this post, Please Subscribe to my blog and let me know your feedback by commenting below.. I have lots more recipes to share with you.

  • Strawberry French Toast Roll Ups Recipe

    Strawberry French Toast Roll Ups Recipe

    Aslam-o-Alakaum My Lovelies !!

     In the Name of Allah, Most Gracious, Most Merciful

    Happy Spring Season!

    Spring is a perfect time to enjoy plump, juicy strawberry. Strawberry is a great fruit in so many ways. They’re sweet. They’re easy to handle and prepare, and they are kid-friendly.

    Celebrate spring with Strawberry!

    Is there a person on this planet that doesn’t like Strawberry and French Toast?  Today I have come up with a  wonderful and very different recipe. Strawberry French Toast Roll Ups – just a handful of ingredients to make these in 15 minutes. These strawberry french toast roll ups are so fun and easy to make.They taste like doughnuts!

    Photo: Strawberry French Toast Roll Ups recipe

    For the rest of us that love the good life, here’s an easy recipe that will transform any bread into sweet, eggy magic.

     Strawberry French Toast Roll Ups recipe
    Photo: Strawberry French Toast Roll Ups 

    A must try recipe, your family will love these french toast roll ups filled with strawberries.

    Let’s begin!!

    Check it out the Strawberry French Toast Roll Ups  recipe and printable version below!!


    There are countless variations on this timeless recipe, so go ahead and get messy. Make up your own and share, there’s so many different ways to make this simple dish. Just about every recipe will have something similar as what i have for a base, feel free to use it as a guide and modify to make your breakfast super tasty.


    I have also posted Almond French Toast Hearts which is another easiest version of making breakfast or lunch box item . Do check it out as well.


    Put your own spin on it. And lemme know how it turns out. Post a photo on Facebook (Recipestable) or  on Twitter so I can see how lovely yours turn out.

    Happy Breakfast making!!

    If you like this Strawberry French Toast Roll Ups, Please Subscribe to my blog. I have lots more recipes to share with you. And If you make it then let me know your feedback by commenting below.

  • Chocolate Banana Filled Pancake Rolls Recipe

    Chocolate Banana Filled Pancake Rolls Recipe

    Aslam-o-Alakaum !!

    In the Name of Allah, Most Gracious, Most Merciful

    Its been a long time since I’ve posted something here, its has been a busy month.Actually I was really busy in my studies…..Sorry, I didnt get time to post anything.

    Chocolate Banana Filled Pancake Rolls

    Looking for a nice relaxing breakfast or dessert. Pancake Rolls? Today, I’ll share another pancake rolls recipe ~ “Chocolate and Banana Filled Pancake Rolls”,I made this a while back, clicked pictures but never got around to posting it. The recipes are piling up ! I’ll post a lot more soon, InshAllah.

    Chocolate and Banana Filled Pancake Rolls Recipe
    Photo: Chocolate and Banana Filled Pancake Rolls

    I made plain pancakes and spread generously with choco bliss and topped further with honey but it really is like a plain canvas for your imagination to run wild with flavours! So I decided to give my simple pancakes a new twist. Roll-up in banana slices and topped with chocolate curls.

    Chocolate and Banana Filled Pancake Rolls recipe
    Photo: Chocolate and Banana Filled Pancake Rolls

    You can add strawberries, apples, dried fruits and berry compote in the mixture! It’s up to you take pleasure in feeling like a domestic queen. A perfect way to start a day.

    Chocolate and Banana Filled Pancake Rolls
    Photo: Chocolate and Banana Filled Pancake Rolls

    Check it out the Chocolate and Banana Filled Pancake Rolls recipe and printable version below!!

    Chocolate and Banana Filled Pancake Rolls

    Looking for a nice relaxing breakfast or dessert. Pancake Rolls? “Chocolate and Banana Filled Pancake Rolls”!

    • 2-1/2 cups plain flour ((maida))
    • 1/3 cup castor sugar
    • 3 teaspoon baking powder
    • 2 teaspoon baking soda
    • 1 tsp salt
    • 4 eggs (at room temperature)
    • 1 cup milk
    • 2 tablespoon butter

    For Filling

    • Choco bliss or nutella
    • banana (sliced)

    Method

    1. Sieve together all the ingredients.
    2. Whisk eggs and milk in mixing bowl.
    3. Gradually add pancake mix and mix until well combined.
    4. Heat a flat pan or griddle with a little butter.
    5. Pour a big spoonful of batter onto the hot griddle or pan and spread it evenly.
    6. When bubbles appear on the surface of the pancake, flip them over to make them golden brown on both sides.
    7. Transfer the pancakes on a plate or clean surface.
    8. Spread choco bliss or Nutella generously over the warm pancakes.
    9. Place the banana on top.
    10. Roll up and sprinkle chocolate curls over them.
    11. Chocolate and Banana Filled Pancake Rolls are ready to serve. ENJOY!!

    Serving Suggestions:
    Serve straightaway with coffee or tea or a glass of milk.

    Recipe Note’s:

    In this recipe,  I made the batter a little thin because I wanted the pancakes to thin, more like crepes. For more traditional pancakes, use only about 1/2 cup milk.

    Put your own spin on it. And lemme know how it turns out. Post a photo on Facebook (Recipestable) or  on Twitter so I can see how lovely yours turn out.


    I have also posted Chocolate Chip Pancakes which is another easiest version of making tea time snack or lunch box item . Do check it out as well.


    Happy Pancakes making!!

    If you like this Chocolate and Banana Filled Pancake Rolls, Please Subscribe to my blog. I have lots more recipes to share with you. And If you make it then let me know your feedback by commenting below.

  • Chicken Tikka Masala Macaroni Recipe

    Chicken Tikka Masala Macaroni Recipe

    Aslam-o-Alakaum My Lovelies !!

     In the Name of Allah, Most Gracious, Most Merciful

    Happy Spring Season!

    Spring seems to be here, which is just amazing – I honestly just want to run around outside all day everyday and enjoy the beautiful sunshine! I love how the world changes when the sun comes out, everyone is so much happier and life just seems brighter and more awesome. It’s one of my favorite season of the year because of it’s colors, flowers,  birds cheering. What a great blessing of Allah (SWT). Alhumdulillah. 

    One of the most important things about this season is the positive impact you can make for your health and well being! So, Today I am sharing a SUPER yummy healthy, nutritious pasta recipe that has become a new family favorite around here (jus 237 calories)!!

    Chicken Tikka Masala Macaroni (Clean Eating Version)

     Chicken tikka Masala works well with macaroni. Who knew?

    Clean Eating Chicken Tikka Masala Macaroni
    Photo: Chicken Tikka Masala Macaroni (Clean Eating Version)

    Normally I’m not a huge pasta lover. But this Chicken Tikka Masala Macaroni is exactly how I like to eat macaroni when I want to follow my clean eating diet and don’t wish to work with many ingredients and want to cook dinner easily! This macaroni is in  Pakistani Style, tossed with chicken, tikka marinade, and fresh veggies.

    Pretty nutritious isn’t it? Honestly, it’s a dish which will satisfy your taste buds and same time will give you a proper nutritious lunch or dinner.

    Clean Eating Chicken Tikka Masala Macaroni
    Photo: Chicken Tikka Masala Macaroni (Clean Eating Version)

    Yeah, I know you will say’hey, Macaroni is surely not so Asian’, not in clean eating and will give me a doubtful look. But trust me that you will never be disappointed if you will give that Asian twist to any of your dishes.

    This Chicken Tikka Masala Macaroni is so easy and will be made with such ingredients, which you can find at your kitchen any time. So surely, it will be a time save too. For clean eating purpose, please make sure you are using whole grain pasta and Organic chicken. 

    This may not be the more traditional version you’re thinking of, but it’s close enough to get the job done and it definitely qualifies as comfort food. 

    Clean Eating Chicken Tikka Masala Macaroni
    Photo: Chicken Tikka Masala Macaroni (Clean Eating Version)

    Serve this decadent dish with a fresh green salad or some lightly steamed broccoli with a squeeze of lemon. By the way, this dish could just as easily be vegetable tikka mac and cheese if you substitute the chicken with some veggies such as cauliflower, zucchini or eggplant instead. Give this unusual recipe a try and let me know what you think! This is sure to be a winner with all the family.

    Check it out the Chicken Tikka Masala Macaroni (Clean Eating Version) recipe and printable version below!!

    Chicken Tikka Macaroni (Clean Eating Version)

    Chicken tikka Masala works well with macaroni. Who knew?This Chicken Tikka Masala Macaroni(Clean Eating Version) is exactly how I like to eat macaroni when I don’t wish to work with many ingredients and I want to cook easily!

    • 1 packet whole wheat macaroni
    • 500 gm boneless Organic chicken (cubed)
    • 1 onion (cubed)
    • 1 medium size capsicum (cubed)
    • 1 tablespoon butter or olive oil

    Chicken Tikka Marinade

    • 2 tablespoon fresh yogurt
    • 1 teaspoon ginger garlic powder
    • 1 teaspoon red chilli powder
    • 1 teaspoon cumin powder
    • 1 teaspoon coriander powder
    • 1 teaspoon dry mango powder
    • 1/2 teaspoon garam masala powder
    • 1/4 teaspoon red pepper flakes
    • 1 lemon (juice)
    • few drops of hot sauce (optional)
    • salt to taste

    For Garnishing

    • few green chilies (thinly sliced)
    • few coriander leaves (chopped)

    Method

    1. Put marinade ingredients over the chicken cubes. Mix to coat evenly.
    2. Cover and marinade for 20-30 minutes to blend flavors.
    3. Meanwhile,boil macaroni to al dente according to instructions on the package. Keep aside.
    4. Now melt butter in a deep pan or skillet over medium heat.
    5. Stir fry tikka chunks until they start releasing thier juices.
    6. Mix well.
    7. Cover and let it simmer on medium heat for 3-4 minutes or until chicken is tender.
    8. Add green chilies, capsicum, onion and saute for 3-4 minutes.
    9. Add macaroni and stir well to coat evenly.
    10. Turn the heat off and take it out in a serving dish.
    11. Garnish with green chilies, coriander leaves.
    12. Your Chicken Tikka Macaroni is ready.

    Serve with steamed veggies


    Put your own spin on it. And lemme know how it turns out. Post a photo on Facebook (Recipestable) or  on Twitter so I can see how lovely yours turn out.

    Happy Clean Eating!!

    If you like this Chicken Tikka Masala Macaroni (Clean Eating Version), Please Subscribe to my blog. I have lots more recipes to share with you. And If you make it then let me know your feedback by commenting below.

  • Chocolate Chip Pancakes Recipe

    Chocolate Chip Pancakes Recipe

    Aslam-o-Alakaum My Lovelies !!

     In the Name of Allah, Most Gracious, Most Merciful

    Hope, you are doing splendidly and enjoying the season. Well I’m in the middle of work, and anxiety has begun to sink its sharp little claws into my brain. It’s almost the final month of my training and I’m already drowning under a sea of coding assignments and project.

    Ahhh I love to code even though it makes me want to tear my eyes out every 10 minutes. Crying Out Loud ;(  I have constant fears that I’ve forgotten the code, functions, or left something somewhere blah blah blah. Problem is I love it but I have too much code to write though… ugh. This assignment is really doing my nut in! 

    code

    I’ m carving chocolate soo bad while coding up my project and backing up files. Every time I write a code, I delete it again. Almost time for a pancake break 😛  Anyhow before going back to coding, I decided to update you guys with this short post. 

    If there’s one thing you should know about me right up front it’s that I love Chocolate and pancakes, always have. Chocolate chips, Pancakes, foggy weather and coding are the reasons I love life.  Sounds super yummy! 

    chocolate-chips
    Pancakes are probably in my Top 10 favorite foods. But they need chocolate chips. 🙂

    Time for a Chocolate Chip Pancakes Break.

    No matter how difficult  life gets, just remember, there’s always time for a Pancakes break. 😀 These Chocolate Chip Pancakes have been a blessing while trying to write my final coding project. lol. They simple to make, so comforting, and lightened up with a few delicious tweaks. 

    Chocolate Chip Pancakes
    Photo: Chocolate Chip Pancakes

    This Chocolate Chip Pancakes recipe is a favorite of mine to make for special occasions or holidays. Eat while hot so the chocolate is all gooey. If you want to make it extra special, serve the pancakes with berries and whipped cream

    Chocolate Chip Pancakes Recipe
    Photo: Chocolate Chip Pancakes

    It was love at first bite, I’m telling you. The texture is fluffy but hearty and slightly dense, and plenty moist from the butter. They’re perfectly sweet even without any additional sugar – the chocolate chips provide a touch of decadence.

     Chocolate Chip Pancakes Recipe
    Photo: Chocolate Chip Pancakes

    They’re super tasty, easy to make, and use regular everyday ingredients. 

    Ingredients You will Need to Make These Pancakes
    Ingredients You will Need to Make These Pancakes

    Ingredients You will Need:

    1. Flour
    2. Sugar
    3. Baking Powder
    4. Cinnamon Powder
    5. Salt
    6. Eggs
    7. Milk
    8. Butter
    9. Vanilla Essence
    10. Chocolate Chips

    Tools You needed to make this recipe are:

    1. A pan or griddle
    2. A Spatula
    3. A Mixing Bowl
    4. Hand Beater

    Check it out the Chocolate Chip Pancakes Recipe and printable version below!!

    Chocolate Chip Pancakes

    This Chocolate Chip Pancakes recipe is a favorite of mine to make for special occasions or holidays. Eat while hot so the chocolate is all gooey. If you want to make it extra special, serve the pancakes with berries and whipped cream

    For Pancake Batter

    • 1-1/4 cups all purpose flour
    • 2 tbsp sugar
    • 1 tsp baking powder
    • 1/4 tsp ground cinnamon
    • 1/4 tsp salt
    • 2 large eggs
    • 1 cup milk
    • 4 tbsp melted butter
    • 3/4 tsp vanilla
    • 1 cup chocolate chips

    For Serving

    • 1/2 cup heavy whipping cream
    • 1 tbsp confectioners’ sugar
    • 1/2 tsp vanilla extract

    Method

    To Make the Dipping Sauce

    1. Take a small bowl, add cream cheese, sugar and vanilla to it. Beat until stiff peaks form. Now cover and refrigerate until serving.

    To Make Pancakes

    1. In a large bowl, mix together the flour, sugar, cinnamon, baking powder and salt.
    2. Stir flour mixture into wet ingredients. Beat until smooth.
    3. Fold in chocolate chips.
    4. Pour batter 1/4 cup full onto a lightly greased hot pan or skillet.
    5. Flip when bubbles form on top. Cook a minute more or until second side is golden brown. Chocolate Chip Pancakes are ready to serve. ENJOY!!

    Serving Suggestions:
    Serve with whipped cream.

    Tips For Diet Version Pancakes (Clean Eating):

    1. You can make gluten free Pancakes by using gluten-free oats and flour.
    2. For Sweeting: Add 1 Tablespoons of honey, apple syrup, or nectar is optional for extra sweetening, but I didn’t find it necessary.
    3. Don’t add butter. Mash very ripe banana with baking powder. It gives
    4. them a moist and fluffy texture.
    5. Serve plain or with a small drizzle of honey and a few additional chocolate chips for melting.

    Put your own spin on it. And lemme know how it turns out. Post a photo on Facebook (Recipestable) or  on Twitter so I can see how lovely yours turn out.

    Happy Chocolate Pancakes making!

    If you like this Chocolate Chip Pancakes Recipe, Please Subscribe to my blog. I have lots more recipes to share with you. And If you make it then let me know your feedback by commenting below.