Tag: Veggie

  • Very Veggie Box Patties Recipe

    Very Veggie Box Patties Recipe

    Very Veggie Box patties, the name itself rings in your ear, doesn’t it?
    You must be wondering is it a box or a patty 😉

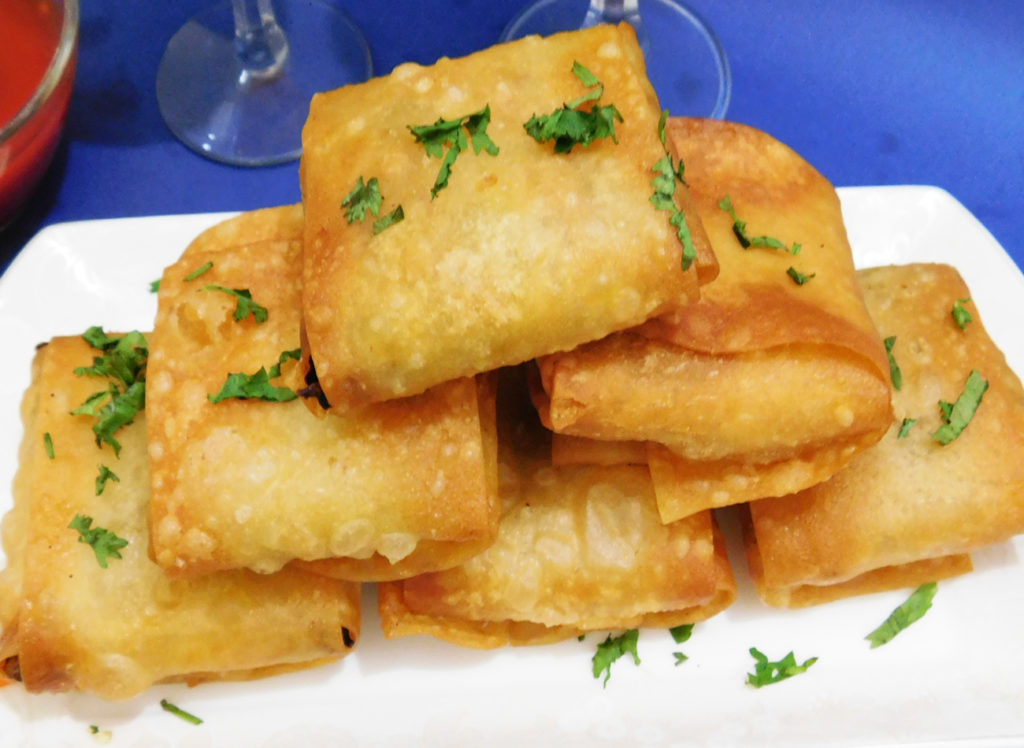
    The unique and interesting name is because of the way the these patties are folded and made, like wrapping a box. A savory veggie filling is put inside samosa wrappers and then deep fried.

    Very Veggie Box Patties Recipe

    So what exactly are Very Veggie Box Patties? 

    If you are not familiar with box Patties, they are a deep-fried Pakistani pastry snack usually filled with something savory. They are called box patties because their shape resembles a square box which is made by overlapping two samosa wrapper sheets. They are loved all throughout the year but they become almost a staple in every household during Ramadan on the Iftar tables.

    Very Veggie Box Patties Recipe ~ Ramadan snack doesn’t get better than this!

    Ingredients in This Very Veggie Box Patties?

    Not only are these simple to make (they require nothing more than few veggies, seasoning and samosa sheets), but the stuffing possibilities are endless!

    1. Veggies: I used carrots, green peas, sweet corn, capsicum, boiled potatoes, cabbage.
    2. Olives: Green and Black Olives
    3. Seasoning: Black pepper, red Pepper flakes, salt
    4. Sauce: red chili Sauce and soy sauce
    That’s all you need to make this Very Veggie Box Patties ! Surprisingly simple ?

    How to Make this Veggie Box Patties:

    This Very Veggie Box Patties recipe is so easy to make and simple that definitely it’s worth trying.

    1. Prepare the Filling: I start off with sautéing veggies to which I add boiled green peas, potatoes, carrot, capsicum, cabbage and sweet corn and olives. Then season it with salt, black pepper, red chili flakes, soy sauce and for an extra kick red chili sauce . 

    2. Prepare the Box Patties: Then put two samosa sheets in a cross pattern, one over the other so they make a + (plus) sign. Then put some veggie filling in the middle. Fold each of the edges one by one over each creating a parcel.
    3. Frying: Then deep fry on medium flame till crispy and golden. You can fry these in advance and keep them in the oven on warm mode and serve when required.

    Very Veggie Box Patties Recipe

    Can I play around with the filling?

    Yes, you can! In this recipe, I have used vegetables carrot, cabbage, capsicum, corn and olives. Some options that I suggest are:

    • For a meaty version use chicken or beef instead of veggies or use shredded cottage cheese (paneer) instead of meat for a vegetarian option. Just make sure that the protein in the filling is cooked through. As the box patties are only fried for a few minutes, I wouldn’t suggest to put raw meat.
    • Skip the vegetables, or add more vegetables. Such as French beans carrots, black olives, green chilies, mushrooms or broccoli. 
    • If you are using large vegetables like broccoli or carrots, make sure they are finely chopped. Pulsing them in the processor for a few seconds will work.
    • Add some taco seasoning for a Mexican twist or experiment with other spice blends. 😛
    • To give a different taste to the patties box, you can also add pizza seasoning or Oregano and Chili Flakes to the vegetable stuffing.
    Very Veggie Box Patties Recipe
    Very Veggie Box Patties Recipe

    Other variations to this Very Veggie Box Patties?

    • Healthy Alternative: These square shaped patties are filled with a flavorful veggie filling. The chewiness of the veggie stuffing and the crunchiness of the covering, is a delicious combination. There are two options, baking or frying. If you do not like oil, you can bake it in pre-heated oven for 15 minutes or until crispy and golden brown. Deep frying obviously gives best results but they can also be baked or air-fried.
    • Wrappers: If you do not get samosa sheets , then cut the spring roll sheets into strips. The trimmings you can fry and keep them to garnish your soups or salads.
    • Extra Crispness: For extra crispiness, roll them with Bread Crumbs before frying.
    Very Veggie Box Patties Recipe
    Very Veggie Box Patties Recipe

    Can I freeze them? 

    Definitely!

    1. Grease a tray (can be plastic or a baking tray) and lay out the box patties one by one on it, making sure there is space between each one of them.
    2. Keep them in the freezer for an hour or so till they are partially frozen. Once they are frozen, carefully remove them from the tray and place them in a plastic box or  zip lock bags.
    3. To make the box patties, just take them out of the freezer, thawed and deep fry on medium heat until crispy and golden brown. 
    4. This recipe actually makes a large batch that can be easily frozen and is just the thing to have on hand for impromptu guests or if you are in the mood for a light snack to enjoy with your evening tea.

    Bismillah let’s get started.
    Check it out Very Veggie Box Patties Recipe and printable version here!!

    Want more Tea Time Snack Inspiration? 

    Here are some other Snack recipes on my blog:

    Hope that you all enjoy this one as much as we have!  Cheers!

    Pin it for Later:

    Very Veggie Box Patties Recipe

    What are your favorite Tea Time Snacks? Leave me a comment below to inspire my next snack recipe!

  • Crunchy Pickled Kachumber Salad Recipe

    Crunchy Pickled Kachumber Salad Recipe

    Looking for something more adventurous than your usual Kachumber salad? Try this tasty Crunchy Pickled Kachumber Salad, a crunchy, squeaky pickle salad that would be amazing alongside a super fatty main dish, like this Chicken Biryani. But don’t worry, it’s not one briny mouthful, there are a lot of different textures going on between the crisp onions, crunchy pickles, red cabbage and juicy carrots.

    Crunchy Pickled Kachumber Salad Recipe
    Photo: Crunchy Pickled Kachumber Salad Recipe

    I like to experiment with creating no-cook dishes that can be easily thrown together at the last minute. I especially enjoy playing with the salads I’ve learned and putting a new spin on them, using whatever ingredients I have on hand to create something entirely new.

    This salad happened during one of my kitchen experiments. Things I really love in spring: 

    1. Super crisp, crunchy salads
    2. Juicy Colorful Veggies

    So clearly it make sense to combine these two faves into one, right?

    Crunchy Pickled Kachumber Salad

    I started with a simple family recipe for a Kachumbar salad. But for a change, I used the homemade pickled Cucumber, onion and baby carrots, vinegar, salt for this recipe. then tweaked the dressing and added some stuff I found in the fridge—red radishes and half a red cabbage. The result is a delightfully flavorful salad—cold, crunchy, pickled and easy to throw together at a moment’s notice. I call it my Crunchy Pickled Kachumber Salad.

    Crunchy Pickled Kachumber Salad Recipe
    Phot: Crunchy Pickled Kachumber Salad Recipe

    Some Useful Tips

    • If you like pickle vegetables, you’re going to love this salad. You can use store bought pickles or make your own by following my recipe.
    • Usually, we tend to favor pickles that are bright with acid and low on sugar; anything labeled “half-sour” usually fits the bill. If using sweeter pickles, add a bit more vinegar and black salt. And honestly, you can use whatever pickles you want in this recipe.
    • Organic cucumbers are smaller and thinner than non organic cucumbers.  They are smaller and slightly sweeter than the non-organic variety, and they have less seeds. Organic cucumbers are great for snacking. They have a wonderful mineral flavor to them. Unfortunately some grocery stores only carry Organic cucumbers seasonally, and some don’t carry them at all.
    • If you can’t find them, substitute Non-organic cucumbers—those are the long thin ones wrapped tightly in plastic. Avoid using regular fat cucumbers, as they are coated with wax and prone to bitterness.

    This is my favourite salad to serve with my Restaurant Style Lahori Mutton Karahi recipe. It just works so well with Tawa fish and the sweetness of the Apricot Chutney. I highly recommend serving this up with some extra Cucumber on the side. 

    Bismillah let’s get started. 

    Check it out Hot and Sour Noodles Recipe and printable version here!!

    Want more Salad Inspiration? 

    Here are some other salad recipes on my blog:

    Put your own spin on it. And lemme know how it turns out and do take a few seconds to rate it! I would love to see your recreations so tag me on instagram @recipestable or Facebook (Recipestable) or on Twitter so I can see how lovely yours turn out.

  • Vegetable Stuffed Buns Recipe

    Vegetable Stuffed Buns Recipe

    Homemade Vegetable Stuffed Buns?  These Stuffed buns are loaded with veggies and are topped with two types of sesame seeds.  So warm, soft, Fluffy, fragrant and stuffed with fresh veggies – no can or frozen veggies, all real – totally yummy  ( + point is it contains only 200 calories). Try making these if you’re looking for the ultimate comfort food.

    Vegetable Stuffed Buns

    Photo: Vegetable Stuffed Buns

    This.

    I’ve made it twice in the last week, once for bringing life to the original recipe concept and taking some photos, and once for “recipe testing”. Aka licking the filling and testing the dough. Again. More. Soft Buns In my mouth. I like this recipe a lot, you guys.

    Unlike store bought buns, these are healthy and homemade, and can be packed with any filling of your choice, be it cheese, chicken, lamb or mutton, mushrooms (choices are endless). These vegetable stuffed buns are a fun way of using leftover dough and any stuffing of your choice. These can be eaten for tea or breakfast or a satisfying meal with some salad. It works well as a snack for children to take to school, or to simply enjoy with a favorite drink at any time of the day.

    These stuffed buns succeeds in titillating your senses with its soft, tenderness, and that fresh sesame-ish flavour makes these buns more appetizing. Bake Stuffed buns not because you must but because it tastes so yummy that you would regret not making it at your earliest once you devour its first bite! Having said that, I am not dropping more clues, get ready with some all purpose flour and some basic ingredients (filling of your choice) and get ready to bake fresh stuffed buns this weekend! So, are you ready to read the recipe?

    Vegetable Stuffed Buns

    Photo: Vegetable Stuffed Buns

    When you make these Vegetable Stuffed Buns, all you have to do is open your windows and let the divine baking aromas drift and I will come to you. My nose can find these things. Okay? See you soon.

    Check it out the Vegetable Stuffed Buns recipe and printable version here!!

    Extra Bonus Tips:

    1. It can last  for a week in an air tight container in the refrigerator or it can be frozen for longer. Any time you wish to serve these heat them in the microwave for 15-20 seconds or preheat in the oven for 2-3 minutes and enjoy the warm, soft vegetable-y stuffed buns!
    2. What I really love is that once you have this basic idea, the variety of stuffing you can make for these buns is absolutely endless.

    I have also posted Baby Chicken Bread recipe which is another easiest & tastiest version of making stuffed bread at home. Do check it out as well.  It’s finger lickin’ good. You’ll be coming back for more. 


    Put your own spin on it. And lemme know how it turns out. Post a photo on Facebook (Recipestable) or  on Twitter so I can see how lovely yours turn out.


    Happy Baking!!

  • Veggie Pizza Cups Recipe

    Veggie Pizza Cups Recipe

    As a child I was not the veggie lover I am today.When my mommy cooked veggies, I was apprehensive. Vegetables? Ew! A few years have passed since then and I love veggies of all shapes and sizes.  

    This weekend, I had a day off and I decided to cook nothing but finger foods. I knew I wanted veggie pizza, but I wanted something more convenient and easier to eat. I have found that when I make veggie pizza in the flat pizza style, it can be a little messy to eat because the toppings want to fall off. So, I did a quick Youtube search and found the recipe I used as inspiration for my Veggie Pizza Cups.

    Veggie Pizza Cups

    Veggie Pizza Cups recipe
    Photo: Veggie Pizza Cups

    Ramadan is coming and with it comes family get-together’s and parties. And if you need an easy to make appetizer recipe for your next party, then you should try this Veggie Pizza Cups. There’s no reason for buying store made appetizers when they’re so easy to make, fun & cheap and are guaranteed to be a hit at your next party. Don’t slave away in the kitchen when you could be enjoying the party!

     Veggie Pizza Cups recipe

    The idea may seem daunting at first but I hope by now I’ve got you well acquainted with handling different types of pizza’s. Be it: my The Perfect pizza dough recipe used to make not just this beautiful Baby Chicken Bread but also these cute little Mini Pizza Cups. Or this super easy and frugal recipe for Pizza Paratha. And how can we forget, my all-time favorite, the soft puffy Pizza Rolls …O’so good!

     Veggie Pizza Cups recipe
    Cute little Veggie Pizza Cups in Oven

    It’s one of my favorite finger food. It’s amazing that just a few basic ingredients can come together into something so delicious.  For topping, I decided to use mixed veggies (corn, carrot, capsicum, green onion) and mushrooms in these because they’re my favorites veggies, but you could easily mix it up and use any toppings you like. I really do recommend making it as listed though, because these were just perfect. It tastes just like you’re eating a slice of pizza! Don’t skip out on the Italian Seasoning either – I think it adds a lot of flavor.

    They tasted delicious and impressed my family without making a mess. I will definitely be making them again this holiday season.

     Veggie Pizza Cups recipe
    Photo: These bite-sized Veggie Pizza Cups are perfect for picky eaters.

    These Veggie Pizza Cups can be used for appetizers, party snacks, a light lunch, the first course of a dinner. Perfect party for picky eaters.

    It would freeze well if you decided to double the batch. Enjoy 🙂

    Check it out the Veggie Pizza Cups recipe and printable version here!!

    I do hope that your plans for this holiday weekend teeter more to the side of savoring than that of to-doing.


    If you make this recipe, be sure to snap a photo and hashtag it #Recipestable. I’d love to see what you cook!

    Happy Cooking!!

  • Broccoli Spaghetti Soup Recipe

    Broccoli Spaghetti Soup Recipe

    Aslam-o-Alakaum My Lovelies !!

     In the Name of Allah, Most Gracious, Most Merciful

    Broccoli Spaghetti Soup ( Clean Eating Version)

    I have slacked off a little on my health and I am working to reclaim it. This month, I am working on my diet and working on improving my all round health and fitness levels. I will NOT let this chronic illness get the best of me. InshaAllah.

    During the winter months, I find myself craving soup time and time again. So Today, I’m sharing an easy and healthy recipe for Broccoli Spaghetti Soup (Clean Eating Version). A simple soup that nourishes the body and soul. 

     Broccoli Spaghetti Soup Recipe
    Photo: Broccoli Spaghetti Soup (Clean Eating Version)

    I Picked these beauties from my Kitchen Garden yesterday. Not bad for the last day of the year and unseasonably cold weather!  Wishing you all Happy Harvesting ♥

    Beatuies from my garden
    Beatuies from my garden

    Oh ya, this is the good stuff. I mean,  spaghetti and broccoli are such a wonderful, comforting combination anyway. But turn that into soup and you’ve got a wonderful meal for a cold winter night! 

    Broccoli Spaghetti Soup (Clean Eating Version)
    Broccoli Spaghetti Soup (Clean Eating Version)

    In the last week, I seriously made four different types of soups. This Broccoli Spaghetti Soup was my favorite of the four, and surprisingly, the healthiest as well!

    The recipe starts with crisp stalks of organic broccoli. I am making the organic distinction here, because the main flavor of this soup comes from the broccoli, so it’s got to be top notch.  That means organic and preferably local.First tossed broccoli with olive oil until tender, caramelized and aromatic.  Then stir in born broth and cooked spaghetti. It’s chunky, brothy savory, and just the right balance of pasta and green veggie. I love the aroma of parsley and chunky broccoli in this soup.

    Broccoli Spaghetti Soup (Clean Eating Version)
    Broccoli Spaghetti Soup (Clean Eating Version)
    Do try it, Great for a busy weeknight too. It cooks up in jus 15 minutes (pretty quick). The ingredients are very basic, you probably have most of them on hand already, and if not, a quick trip to any grocery store will quickly get you what you need.

    Ingredients You will Need:

    1. Organic Broccoli Florets 
    2. Born Broth
    3. Seasoning 
    4. Spaghetti 

    Tools You needed to make this recipe are:

    1. A deep soup pot
    2. A wooden spoon
    3. A Strainer 
    4. Soup Bowls

    Check it out the Broccoli Spaghetti Soup (Clean Eating) recipe and printable version below!!

    Put your own spin on it. And lemme know how it turns out. Post a photo on Facebook (Recipestable) or  on Twitter so I can see how lovely yours turn out.

    Happy Soup making!

    If you like this Broccoli Spaghetti Soup, Please Subscribe to my blog. I have lots more recipes to share with you. And If you make it then let me know your feedback by commenting below.


  • Baked Vegetable Spring Rolls Recipe

    Assalamu alaikum wa rahmatullahi wa barakatuhu!

    In the Name of Allah, Most Gracious, Most Merciful

    I hope you’re well and have had a good start to the week.   I’m sorry to let you worry about me, but these days I’m a bit busy.  As you know study study study. lol 😀 I am madly busy with my assignments. Sorry for this post being late.

    My class got cancelled today. Glad I get a chance to breathe. So I decide to write a post for my lovely reader’s. Last week, I made these Veggie rolls ( Baked Version) to give myself a break from ‎assignment work. They are very easy to prepare and tastes absolutely delicious! I had too much fun making this. 

    baked veggie rolls
    Take a Break and bake Some Veggie Rolls 🙂

    These yummlicious veggie rolls are healthy and very filling. And they smell amazing when they’re baking. They crisped up fine in the oven. The only problem is that three wrappers have 180 calories! What!???? That’s a lot. I ate 3 rolls anyway. 😛 😉 They are ready in only 35 minutes and you can use your favorite veggies.

    Baked Veggie Rolls Recipe
    Photo: Baked Veggie Rolls Recipe

    You could fry these, too, but I was trying to keep them healthy. I hope you all give this Baked Veggie Rolls recipe a try and let me know how they turn out!

    Baked Veggie Rolls 

    So let the fun begin!

    1. First Prepare Veggie Filling: Heat a small amount of oil in a wok over medium heat. Add giner and garlic. Saute until fragrant. Might you think, it’s a stupid instruction, isn’t it? Tell you what, just cook your garlic few seconds until they’re soft-ish.
    2. Now add green peas, red beans and corns. Cook for 2-3 minutes or until they are soft.Add remaining veggies and add a splash of vingear. Stir fry for few minutes. You can add soy sauce or any store bought sauce etc. But I didn’t add it. As I try to avoid artifical ingredients to follow my journey towards clean eating. 🙂
      Sprinkle black pepper, red chili, and maybe a little salt if you need it. If you want to use fresh herbs then I think that would be lovely.
    3. Stir well and Let everything simmer for a couple of minutes, but don’t let everything get overly soft because you still have to stuff and bake your rolls.
    4. Take the mixture into a bowl and let it cool for few minutes. Once everything is cool, you can either proceed to stuffing the rolls, or cover your bowl and put everything in the fridge overnight. If you do refrigerate the veggie mixture, be sure to bring it room temperature before stuffing your rolls.
    5. When you’re ready to stuff your rolls, be sure your stuffing mixture and wrappers are at room temperature. You’ll want a clean work surface for this part and a bowl of water nearby.
    6. Don’t be intimidated by this part. You just want the rolls to hold the yummy stuffing in. They don’t need to be perfect. And, frankly, if someone is going to judge you on how pretty your spring rolls are, then you probably shouldn’t be feeding them. lol 😛
    7. Preheat an oven for 200 degree C and brush a baking sheet with oil.
    8. Place a wrapper out in a diamond shape on your work surface.Put a tablespoons of filling in the center of the wrapper. I under-stuffed these rolls, so they turned out chewier that I would have liked. However, you don’t want to stuff them so full that they split open. It’s a delicate balance.
    9. Bring the bottom point of your wrapper up over the filling and tuck it under as tight as you can. Fold the sides over and shape into a roll.
    10. Moisten the edges of the top flap slightly with water and roll the roll over, pressing the point on the underside of the roll to seal it.
    11. Put on a lightly oiled baking sheet and repeat this method the rest of your rolls.
    12. Lightly brush the tops of the rolls with egg-wash and sprinkle sesame seeds over them.
    13. Bake in the preheated oven for 20 minutes or until they turn golden brown. This took my oven around 22-25 minutes.
    14. You can eat these veggie rolls with tamari or soy sauce, but we prefer sweet and sour sauce.
      Ready !!
    Baked Veggie Rolls Recipe
    Photo: Baked Veggie Rolls Recipe

    Sorry I din’t get step by step picture as I was hungry and on in a hurry to eat 😛

    Check it out the Baked Veggie Rolls Recipe and printable version below!!

    Keep me in your duas please, and have a lovely week,

    Wasalaam!

    If you like this Baked Veggie Rolls Recipe, Please Subscribe to my blog. I have lots more recipes to share with you. And If you make it then let me know your feedback by commenting below.

  • Healthy Vegetable Fried Brown Rice Recipe

    Healthy Vegetable Fried Brown Rice Recipe

     Vegetable Fried Brown Rice Recipe
    Photo: Vegetable Fried Brown Rice

    The sky is the limit when it comes to preparing fried rice.  Vegetarian Fried Brown Rice  is a popular dish to be sure. But the stuff you get in restaurants is a stroke in a bowl. Not very appetizing if you ask me. While this dish will always be a little high on the sodium scale, homemade and clean eating is the only way to go if you just cannot live without it.

    Vegetable Fried Brown Rice (Clean Eating Version)
    Photo: Vegetable Fried Brown Rice (Clean Eating Version)
     Vegetable Fried Brown Rice (Clean Eating Version)
    Photo: Vegetable Fried Brown Rice (Clean Eating Version)
     Vegetable Fried Brown Rice (Clean Eating Version)
    Photo: Vegetable Fried Brown Rice (Clean Eating Version)

    With this Vegetarian Fried Brown Rice Recipe I use brown rice and a little olive oil to make it healthier and six different types of vegetables.The essence of this dish lays in its versatility. This is really a “left-over” dish. So save yourself some work and wait until you have some cold, cooked  brown rice and fresh veggies in the fridge that you need to use up. This Vegetarian Fried Brown Rice Recipe is perfect for that occasion.  Top with a little Homemade chilli sauce and you’ve got a wonderful dinner!

     Vegetable Fried Brown Rice (Clean Eating Version)
    Photo: Vegetable Fried Brown Rice (Clean Eating Version)

    Check it out the Vegetarian Fried Brown Rice Recipe and printable version below!!

    If you like this Vegetarian Fried Brown Rice Recipe, Please Subscribe to my blog. I have lots more recipes to share with you. And If you make it then let me know your feedback by commenting below.


  • Healthy Breakfast Option: Spinach and Cheese Omelet Recipe (Packed with Nutrients!)

    Spinach and Cheese Omelet

    Add extra nutrients to your breakfast by stirring in chopped fresh spinach, fresh herbs and shredded cheese into your protein-packed omelet. A carb-cutter’s perfect start for the day. Healthy and Nutritious Omelet made with home grown spinach from My Kitchen Garden.

    Spinach and Cheese Omelet Recipe
    Photo: Spinach and Cheese Omelet Recipe

    Freshly picked home grown spinach leaves turn into mouthwatering Omelet. Yes, this Spinach omelet is better than your omelet. Oragnic Eggs, fresh spinach, and CHEESE!!!! Please no drooling on my photo.

    This organic spinach and cheese omelet is full of flavors, it makes a perfect healthy breakfast. Enjoy it!

    Spinach and Cheese Omelette Recipe
    Photo: Spinach and Cheese Omelette Recipe

    Growing your own food isn’t just about saving money, it’s about so much more.I truly believe that as humans we posses an innate desire or need to take a hand-on role in the production of the food we consume. Whether through growing your own, foraging in the wild, hunting or even going to a local farm, knowing exactly where your food comes from provides a deep sense of appreciation for what you eat.

    Spinach and Cheese Omelette Recipe
    Spinach and Cheese Omelette made with Home grown Spinach

    Check it out the Spinach and Cheese Omelette Recipe here!!

    Spinach and Cheese Omelet Recipe

    This organic spinach and cheese omelet is full of flavors, it makes a perfect healthy breakfast. Enjoy it!
    Course Breakfast
    Cuisine American, Pakistani
    Keyword breakfast, cheese, eggs, kids friendly, omelet, Quick and Easy, spinach
    Prep Time 5 minutes
    Cook Time 8 minutes
    Total Time 13 minutes
    Servings 2
    Author Bushra Waheed

    Ingredients

    • 4 organic eggs
    • 1 cup baby spinach leaves chopped
    • 4 tablespoon grated cheddar cheese
    • 2 teaspoon butter or olive oil
    • 1/4 teaspoon pepper
    • salt to taste

    Instructions

    • Beat eggs in a bowl.
    • Stir in the baby spinach.
    • Season with salt and pepper. Mix well.
    • Melt butter in a pan over medium heat.Pour the egg mixture it it. As egg mixture starts to cook, gently lift edges of omelet with a spatula and tilt pan so uncooked egg mixture flows underneath.Cook for 2 minute or until almost set.
    • Sprinkle cheese over the omelet.
    • Fold omelet in half, allowing cheese to melt.
    • Slide cooked omelet onto a serving plate. Delicious Spinach and Cheese Omelet is ready to serve.

    Notes

    Serve with buttered toast and green smoothie.


    If you like Spinach and Cheese Omelet Recipe and make it then let me know your feedback by commenting below.And if you know more innovative ways in which we can utilize this mouth watering Spinach and Cheese Omelet, do share with us and we would be glad to give it a try.

  • Crunchy Vegetable Nuggets Recipe

    Crunchy Vegetable Nuggets

    Are you looking for a healthy alternative for processed chicken nuggets? This Crunchy Vegetable Nuggets Recipe is sure to be a favorite for your kids.

    Crunchy Vegetable Nuggets Recipe
    Photo: Crunchy Vegetable Nuggets Recipe

    These Vegetable Nuggets are crispy from the outside and soft from inside comprising of different flavours of many vegetables, cheese and herbs. This is the best way to turn vegetables into tiny kid-friendly nuggets. Making homemade veggie nuggets isn’t hard and beat the store-bought.

    Crunchy Vegetable Nuggets Recipe
    Photo: Crunchy Vegetable Nuggets Recipe

    You can serve Vegetable Nuggets with tea in the evening or as a starter to your guests. Do try it!!
    Check it out the Crunchy Vegetable Nuggets Recipe and printable version below!!

    Crunchy Vegetable Nuggets

    Are you looking for a healthy alternative for processed chicken nuggets? This Crunchy Vegetable Nuggets Recipe is sure to be a favorite for your kids.
    Prep Time 20 minutes
    Cook Time 10 minutes
    Total Time 30 minutes
    Servings 6
    Author Bushrah | Recipestabale

    Ingredients

    • 2 boiled potatoes
    • 1/2 cup grated carrots
    • 1/4 cup sweet corn
    • 1/4 cup boiled green peas
    • 1/4 cup green beans trimmed and boiled
    • 1/4 cup cheese grated
    • 1/2 teaspoon mixed herbs basil, parsley
    • 2 tablespoon chopped coriander leaves
    • 1/2 teaspoon black pepper
    • Salt To Taste
    • 1 egg lightly beaten
    • 2 tablespoon plain flour
    • 2 tablespoon cornflour
    • 1/2 cup bread crumbs
    • Oil for deep frying

    Instructions

    Directions

    • In a large bowl, combine together the boiled potatoes, grated carrots, beans, green peas and sweet corns.
    • Season with herbs, salt and pepper.
    • Add corainder leaves and cheese. Mix until well combined.
    • Now add add plain flour,cornflour in it.
    • Shape into nuggets.
    • Place bread crumbs in a shallow bowl.
    • Dip vegetable nuggets in egg then coat with bread crumbs.
    • Heat oil in a deep pan over medium heat.
    • Deep fry nuggets for 2-3 minutes or until golden brown.
    • Remove from the oil and absorbent on kitchen paper.Crunchy Vegetable Nuggets are ready to serve. ENJOY!!

    Notes

    Serving Suggestions:
    Serve with tomato ketchup or your favorite dipping sauce.

    Note: For a healthier version of these nuggets, you can bake them. After you bread them, lay them out on a baking sheet and drizzle with olive oil. They will probably need to bake at 350-400 degrees F. for 15-20 minutes to get nice and crispy.

    I have also posted Chicken Nuggets Recipe which is another quick version of making Nuggets. Do check it out as well.

    [divider]

    If you like this Crunchy Vegetable Nuggets Recipe,Please Subscribe to my blog. I have lots more recipes to share with you. And If you make it then let me know your feedback by commenting below.

  • Spice Up Your Life: Easy Stuffed Mirch Pakora Recipe

    Stuffed Mirch Pakora

    Are you a Spicy snacks lover? Today I am sharing Stuffed Mirch Pakora Recipe, all time favorites and very easy to make. Start off your meal with this crunchy starter.

    Stuffed Mirch Pakora Recipe
    Photo: Stuffed Mirch Pakora 

    You can make these stuffed Mirch Pakoras as a Iftar time snacks in Ramadan, they hardly take around half an hour to prepare and serve .

    Stuffed Mirch Pakora Recipe
    Photo: Stuffed Mirch Pakora 

    It is also goes great with hot cup of tea on rainy days. Serve hot with tamarind chutney and green chilli chutney or tomato chutney , or tomato sauces .

    Check it out the Stuffed Mirch Pakora Recipe and printable version below!!

    Stuffed Mirch Pakora

    Today I am sharing Stuffed Mirch Pakora Recipe, all time favorites and very easy to make. Start off your meal with this crunchy starter.
    Prep Time 5 minutes
    Cook Time 10 minutes
    Total Time 15 minutes
    Servings 4
    Author Bushrah | Recipestable

    Ingredients

    • 8 large size green chilies slit vertically and deseeded.

    For Stuffing

    • 2 tablespoon mint chutney
    • 2 tablespoon tamarind pulp
    • 2 tablespoon pomegranate seeds Anardana, crushed
    • 1/2 teaspoon red chili
    • 1/2 teaspoon cumin powder
    • salt to taste

    For The Batter

    • 1/2 cup chickpea flour besan
    • 1/2 cup rice flour
    • 1/2 teaspoon red pepper
    • 1/4 teaspoon carom seeds ajwain, optional
    • salt to taste

    Other Ingredients

    • oil for frying

    Instructions

    Directions

      To Make Stuffing

      • In a bowl, mix together the mint chutney, tamaring pulp, pomegranate seeds, red chili, cumin powder and salt.
      • Set aside.

      To Make Batter

      • In another small bowl, combine the chickpea flour,rice flour, red pepper, carom seeds and salt.
      • Add enough water to make a thick batter and set aside.

      To Proceed

      • Divide stuffing into 8 equal portions.
      • Stuff each chilli with a portion of the stuffing.
      • Heat oil in a large pan over medium heat.
      • Dip the stuffed chillies in the flour batter.
      • Deep fry pakoras in hot oil for 4-5 minutes or until they turn golden brown in colour from all sides.
      • Drain on absorbent paper. Stuffed Mirch Pakora is ready to serve.

      Notes

      Serving Suggestions:
      I served them with mango Chutney to mild the taste.
      I have also posted Chips Pakora Recipe which is another easiest version of making tea time snack or lunch box item . Do check it out as well.

      [divider]

      If you like Stuffed Mirch Pakora Recipe , Please Subscribe to my blog. I have lots more recipes to share with you. And If you make it then let me know your feedback by commenting below.

    • Cabbage Dry Curry Recipe

      Cabbage Dry Curry ( Weight Watcher’s)

      Cabbage is one of my favorite vegetables because it’s super versatile and it will keep for a long time in my crisper. Although cabbage may be good for weight loss because of its high water content, it has many other (more important) advantages, too.

      Cabbage Dry Curry recipe

      Photo: Cabbage Dry Curry[/caption]

      Today, I present to you a Weight watcher’s Recipe with a simple list of ingredients. An easy to make Cabbage Dry Curry recipe, that will not only nourish your body but will also please your palette. Do try it!!

      Check it out the Cabbage Dry Curry Recipe here!!

      Cabbage Dry Curry Recipe (Weight Watcher’s)

      Course Main Course
      Cuisine Indian, Pakistani
      Keyword cabbage, curry, veggie, Veggie Curry
      Prep Time 10 minutes
      Cook Time 25 minutes
      Total Time 35 minutes
      Servings 4
      Author Bushra Waheed

      Ingredients

      • 500 gm cabbage chopped or thinly sliced
      • 1 tsp olive oil
      • 2 onions finely chopped
      • 2 to matoes finely chopped
      • 1 teaspoon lemon juice
      • 1 teaspoon red pepper powder
      • 1/2 teaspoon rai powder
      • 1/2 teaspoon cumin powder
      • salt according to taste
      • For Garnishing:
      • few green chilies
      • few coriander leaves

      Instructions

      • Heat oil in a pot or pan over medium heat.
      • Sauté onion in hot oil until translucent.
      • Now add rai, tomatoes, red pepper, cumin powder and salt.
      • Add a little water and cook for a while.
      • Now add cabbage. Cover the lid and cook for 10 minutes.
      • Remove the lid and cook on full heat to dry out the water.
      • Dish it out. Garnish with green chilies and coriander leaves. Cabbage Dry Curry is ready to serve. ENJOY!!

      Notes

      The left overs can be used as a filling for a grilled sandwich that will make for a quick lunch box or after school snack for your kid.
      Serving Suggestions:
      Serve with Oats chapati or brown rice.

      If you like Cabbage Dry Curry Recipe and make it then let me know your feedback by commenting below.

    • Kachnar Keema Recipe (Kachnar with Minced Meat)

      LET’S CELEBRATE SPRING

      Today marks the start of spring. Traditional rites and festivals of spring revolved around its importance in growing food. Plants start to grow and animals come out of hibernation and begin reproducing. People come out of hibernation too!

      I’m really excited to be back with another Traditional Pakistani recipe (if you didn’t see my Kachnar Gosht and Karela Gosht then I’d really recommend you give those a try too).

      So let’s celebrate spring with another Traditional Pakistani food (Kachnar Keema). 

       Kachnar Keema Recipe
      Photo: Kachnar Keema

      A Lil Bit About Kachnar:

      Kachnar/Orchid is a species of flowering plant in the family Fabaceae, native to southeastern Asia, from southern China west to Pakistan and India.

      Kachnar tree, Bauhinia variegate, is also known as Orchid tree or Butterfly tree because of the way it’s flowers look. This is a very popular ornamental tree in subtropical and tropical climates, grown for its scented flowers and also used as food item in South Asian cuisine.

      Varieties of Kachnar:

      Kachnar has three varieties (red, white and mauve) depending upon the colour of its flowers.

       Kachnar Keema Recipe
      Photo: Kachnar Keema Recipe

      Kachnar Keema

      In Pakistan, its buds are considered a delicacy. They are available for a short season only and are difficult and expensive to buy. Eating Kachnar ( Orchid)is very beneficial for our health as this vegetable is blessed with advantages and it taste is really good when cooked with addition of any mince meat(keema).  

      Kachnar Keema Recipe
      Photo: Kachnar Keema Recipe

      One thing I love about cooking is discovering new flavours that go together, especially when it’s flavours that you wouldn’t necessarily think to put together and today’s Kachnar Keema recipe is one of those creations.

      Kachnar Keema Recipe
      Photo: Kachnar Keema Recipe

      My take on a traditional Pakistani Kachnar Keema with lamb mince, kachnar buds, and served hot chapatai and Raita.

      I’ve been trying to perfect Kachnar Keema for a while, but I’ve always found that it was lacking a little something – it had meatiness from the lamb, bitterness from the kachnar buds and saltiness from the spices but it needed just a hint of creaminess. A few weeks ago on a whim (figuring that mince meat and yogurt go well) I decided to add some yogurt to my Kachnar Keema and the problem was solved – it is delicious.

       Kachnar Keema Recipe
      Photo: Kachnar Keema Recipe

      If you’re reading this and thinking “hmmmm, what would be the taste, or would I like this recipe?” then stop!! Whilst you can taste the flavour of the kachnar, it compliments the mince rather than overpowering it.

      Soooooooo…. convinced? 😉

      Kachnar Keema Recipe
      Kachnar Keema Recipe

      Extra-Bonus Tips :

      Before serving sprinkle lemon juice if this is to your taste. (I think it improves the flavour.) It’s good with naan, chapattis, or any other kind of bread, and Zeera Raita (Cumin Yogurt Sauce).
      This has Taste and is a Treat.
       Kachnar Keema Recipe
      Photo: Kachnar Keema Recipe

      Here is an easy to cook Kachnar Keema recipe to try out!

      Kachnar Keema Recipe

      One thing I love about cooking is discovering new flavours that go together, especially when it’s flavours that you wouldn’t necessarily think to put together and today’s Kachnar Keema recipe is one of those creations.
      Prep Time 15 minutes
      Cook Time 1 hour 15 minutes
      Total Time 1 hour 30 minutes
      Servings 6
      Author Bushrah | Recipestable

      Ingredients

      • 1 kg mutton or lamb mince keema
      • 1/2 kg kachnar
      • 1/2 cup oil or ghee
      • 3 onions finely chopped
      • 2 large tomatoes finely chopped
      • 1 teaspoon ginger paste
      • 1 teaspoon garlic paste
      • 1/2 cup plain yogurt
      • 2 teaspoon red chili powder
      • 1 teaspoon coriander powder
      • 1 teaspoon cumin powder
      • 1/2 teaspoon garam masala powder
      • 1/4 teaspoon turmeric powder
      • salt to taste

      Instructions

      • Wash kachnar properly with water.
      • Now heat oil in a skillet or wok over medium high heat.
      • Saute onion in hot oil until transculant.
      • Now add ginger garlic paste and cook for 30 seconds.
      • Then add tomatoes, and mince.
      • Cook on high flame for few minutes or until meat is no longer pink.
      • Season with red chili, salt, cumin powder, coriander powder and turmeric powder.
      • Add 1 cup water and cover with the lid.
      • Let it simmer for 40 minutes or until mince is cooked thoroughly.
      • Remove the lid and cook mince on high heat for 5-8 minutes or until oil comes on top.
      • Now add kachnar and yogurt.
      • Cook and stir for 10 minutes or until done.
      • Now put on dum for few minutes then dish it out. Kachnar keema is ready to serve. ENJOY!!

      Notes

      Serving Suggestion:
      Serve Kachnar Keema with hot Chapati, Zeera Raita and Salad

      If you make this recipe, be sure to snap a photo and hashtag it #Recipestable. I’d love to see what you cook!

      Happy Cooking!!

    • Aloo Keema Matar Recipe

      Aloo Keema Matar

      Nothing beats the Aloo Keema Matar, a simple yet flavoursome dish that all can enjoy at any time.  Minced meat cooked with fresh peas (matar) and potatoes (aloo) in an Pakistani and Indian spiced fragrant sauce.

      Aloo Keema Matar Recipe
      Photo: Aloo Keema Matar Recipe

      Check it out the Aloo Keema Matar Recipe here!!

      [divider]

      [one_fourth]Prep Time:10 minutes[/one_fourth] [one_fourth]Cook Time:1 hour[/one_fourth] [one_fourth]Servings:5 [/one_fourth] [one_fourth_last]Difficulty Level:Easy[/one_fourth_last]

      [divider]

      [tabs type=”horizontal”] [tabs_head] [tab_title]Ingredients[/tab_title] [tab_title]Nutrition[/tab_title] [/tabs_head] [tab]

      • 1 kg mutton mince ( keema)
      • 1 cup green peas
      • 1/4 cup oil or ghee
      • 2 cups water
      • 2 large potatoes, cubed
      • 2 inch piece of ginger, thinly sliced
      • 2 large onion, finely chopped
      • 2 tomatoes, finely chopped
      • 1 tablespoon ginger garlic paste
      • 1 teaspoon crushed red pepper
      • 1 teaspoon red chilli powder
      • 1 teaspoon coriander powder
      • 1 teaspoon cumin seeds, roasted & crushed
      • 1/4 teaspoon turmeric powder
      • 1 teaspoon garam masala powder
      • salt according to taste

      For Granishing:

      • 1 teaspoon chopped coriander leaves
      • 2 green chillies, sliced

      [/tab] [tab]Yield: 5 servings

      Nutritional information is not yet available. [/tab] [/tabs]

      Directions:
      [tabs type=”horizontal”] [tabs_head] [tab_title]Step by Step Method[/tab_title] [tab_title]Serving Suggestions[/tab_title][/tabs_head] [tab]

      Step 1

      Heat oil in a pot over medium high heat.

      Step 2

      Saute onions and ginger until crisp-tender.

      Step 3

      Add ginger garlic paste. Fry till lightly golden brown.

      Step 4

      Add mutton mince and Cook on high flame for 15-20 minutes or until it changes colour and the mince water completely dry.

      Step 5

      Add tomatoes, crushed chilli, red chilli powder, cumin seeds, turmeric powder, coriander powder and salt.

      Step 6

      Mix well.

      Step 7

      Adjust the seasoning according to taste.

      Step 8

      Cook on high flame for 10-15 minutes or until tomatoes are tender.

      Step 9

      Add potatoes and peas mix it well.

      Step 10

      Add 2 cups of water and cook on medium low heat and cook for 20 minutes or until potatoes and peas are cooked.

      Step 11

      Increase the flame and cook for 5 minutes or until water dries up

      Step 12

      Sprinkle garam masala, fresh coriander, green chillies over it.

      Step 13

      Put on dum for 5 minutes then dish it out.Delicious Aloo Keema Matar is ready to serve. ENJOY!!

      [/tab] [tab]

      • Serve with chapati or roti.

      [/tab] [/tabs]
      If you like Aloo Keema Matar Recipe and make it then let me know your feedback by commenting below.And if you know more innovative ways in which we can utilize this mouth watering Aloo Keema Matar, do share with us and we would be glad to give it a try.

    • Beetroot Raita Recipe

      Beetroot Raita

      It’s an awesome Yogurt dip(Raita) especially for Veggie lovers. Beatroot is also a great source of iron so give it to all who are suggested to take iron.Must try this Beetroot Raita Recipe, you’ll like it.

       Beetroot Raita Recipe
      Photo: Beetroot Raita Recipe

      Check it out the  Beetroot Raita Recipe here!!

      [divider]

      [one_fourth]Prep Time:10 minutes[/one_fourth] [one_fourth]Cook Time:15 minutes[/one_fourth] [one_fourth]Servings: 2[/one_fourth] [one_fourth_last]Difficulty Level: Easy[/one_fourth_last]

      [divider]

      [tabs type=”horizontal”] [tabs_head] [tab_title]Ingredients[/tab_title] [tab_title]Nutrition[/tab_title] [/tabs_head] [tab]

      • 1 medium beetroot
      • 1 cup yogurt
      • Salt to taste
      • 1 green chili, chopped finely
      • 1 teaspoon oil
      • 1/4 teaspoon black mustard seeds
      • A few cilantro leaves for garnishing
      • 1/2 teaspoon cumin powder
      • 1 teaspoon sugar

      [/tab] [tab]Yield: 2 servings

      Nutritional information is not yet available. [/tab] [/tabs]

      Directions:
      [tabs type=”horizontal”] [tabs_head] [tab_title]Step by Step Method[/tab_title] [tab_title]Serving Suggestions[/tab_title][/tabs_head] [tab]

      Step 1

      Cook the beetroot either in the microwave or in a pot with water.

      Step 2

      For the microwave, place it in a microwavable-pan of water 1 inch high, prick with fork and cook on high for 6 to 8 minutes until done.

      Step 3

      Peel off the skin.

      Step 4

      Grate the beetroot and put in a serving bowl.

      Step 5

      Add yogurt to it and mix well.

      Step 6

      Add sugar, salt and cumin powder to it and mix.

      Step 7

      Heat the oil in a pan, season it with black mustard seeds and the chopped green chilies.

      Step 8

      When the seeds start to sputter, remove from the stove and add the seasoned oil to the beetroot and yogurt mixture.

      Step 9

      Garnish the beetroot salad with coarsely chopped cilantro leaves. Beetroot Raita is ready to serve.

      [/tab] [tab]

      • Serve with paratha or any curry.

      [/tab] [/tabs]
      If you like Beetroot Raita Recipe and make it then let me know your feedback by commenting below.And if you know more innovative ways in which we can utilize this mouth watering Beetroot Raita, do share with us and we would be glad to give it a try.

    • Cheesy Spinach Bake Recipe

      Cheesy Spinach Bake

      Cheesy and delicious Spinach Casserole. Looks terrible but taste absolutely awesome!!

      Cheesy Spinach Bake Recipe
      Photo: Cheesy Spinach Bake Recipe

      Check it out the Cheesy Spinach Bake Recipe here!!

      [divider]

      [one_fourth]Prep Time:10 minutes[/one_fourth] [one_fourth]Cook Time:25 minutes[/one_fourth] [one_fourth]Servings: 6[/one_fourth] [one_fourth_last]Difficulty Level: Easy[/one_fourth_last]

      [divider]

      [tabs type=”horizontal”] [tabs_head] [tab_title]Ingredients[/tab_title] [tab_title]Nutrition[/tab_title] [/tabs_head] [tab]

      • 2 packages (10 oz each) frozen chopped spinach, thawed and drained
      • 1 can (10-3/4 ounces) condensed cream of potato soup, undiluted
      • 2 cups shredded Monterrey Jack cheese
      • 1 cup sour cream
      • 1/2 cup grated Parmesan cheese

      [/tab] [tab]Yield: 6 servings

      Nutritional information is not yet available. [/tab] [/tabs]

      Directions:
      [tabs type=”horizontal”] [tabs_head] [tab_title]Step by Step Method[/tab_title] [tab_title]Serving Suggestions[/tab_title][/tabs_head] [tab]

      Step 1

      Place spinach in a large bowl.

      Step 2

      Stir in potato soup, sour cream.

      Step 3

      Transfer into a greased 11×7-inch. baking dish.

      Step 4

      Sprinkle with Parmesan and Monterrey Jack cheese.

      Step 5

      Bake, uncovered, at 325 degree F, for 30 minutes or until cheese is melted and bubbly. Cheesy Spinach Bake is ready to serve. Enjoy!!

      [/tab] [tab]

      • Serve warm with crusty bread.

      [/tab] [/tabs]
      If you like Cheesy Spinach Bake Recipe and make it then let me know your feedback by commenting below.And if you know more innovative ways in which we can utilize this mouth watering Cheesy Spinach Bake, do share with us and we would be glad to give it a try.

    • Cool & Refreshing Tomato Raita Recipe (The Perfect Dip!)

      Tomato Raita

      Tomato Raita is one of the easiest condiment recipes which does not require any cooking and can be made at home by combining chopped tomatoes and yogurt. This tomato raita recipe is a great accompaniment for spicy dishes.Goes great with spicy pilafs or any spicy dishes.

      Tomato Raita recipe
      Photo: Tomato Raita

      Tomato Raita recipe
      Photo: Tomato Raita

      Check it out the Tomato Raita Recipe  here!!

      Prep Time:5 minutes

      Cook Time:not required

      Servings:2

      Difficulty Level: Easy

      Ingredients: 

      • 2 tomatoes
      • 1 cup plain yogurt
      • 1 green chili, chopped
      • Salt to taste
      • few coriander leaves
      • 1/2 teaspoon cumin seeds
      • 1/4 teaspoon chaat masala powder

      Directions:

      Step 1

      Beat yogurt in a mixing bowl.

      Step 2

      Add chopped tomatoes, green chili, salt, cumin seeds, and a pinch of chaat masala.

      Step 3

      Mix well.

      Step 4

      Garnish with fresh coriander leaves.

      Step 5

      Sprinkle remaining chaat masala over it. Tomato raita is ready to serve.

      Recipe Note’s

      • You can add black pepper powder along with or instead of green chili according to your taste.

      Serving Suggestions:

      • Serve with rice or bread immediately or after cooling in the fridge for sometime.

      If you like Tomato Raita Recipe and make it then let me know your feedback by commenting below.And if you know more innovative ways in which we can utilize this mouth watering Tomato Raita, do share with us and we would be glad to give it a try.