Tag: cheese

  • The Best Meatball Pizza Recipe

    The Best Meatball Pizza Recipe

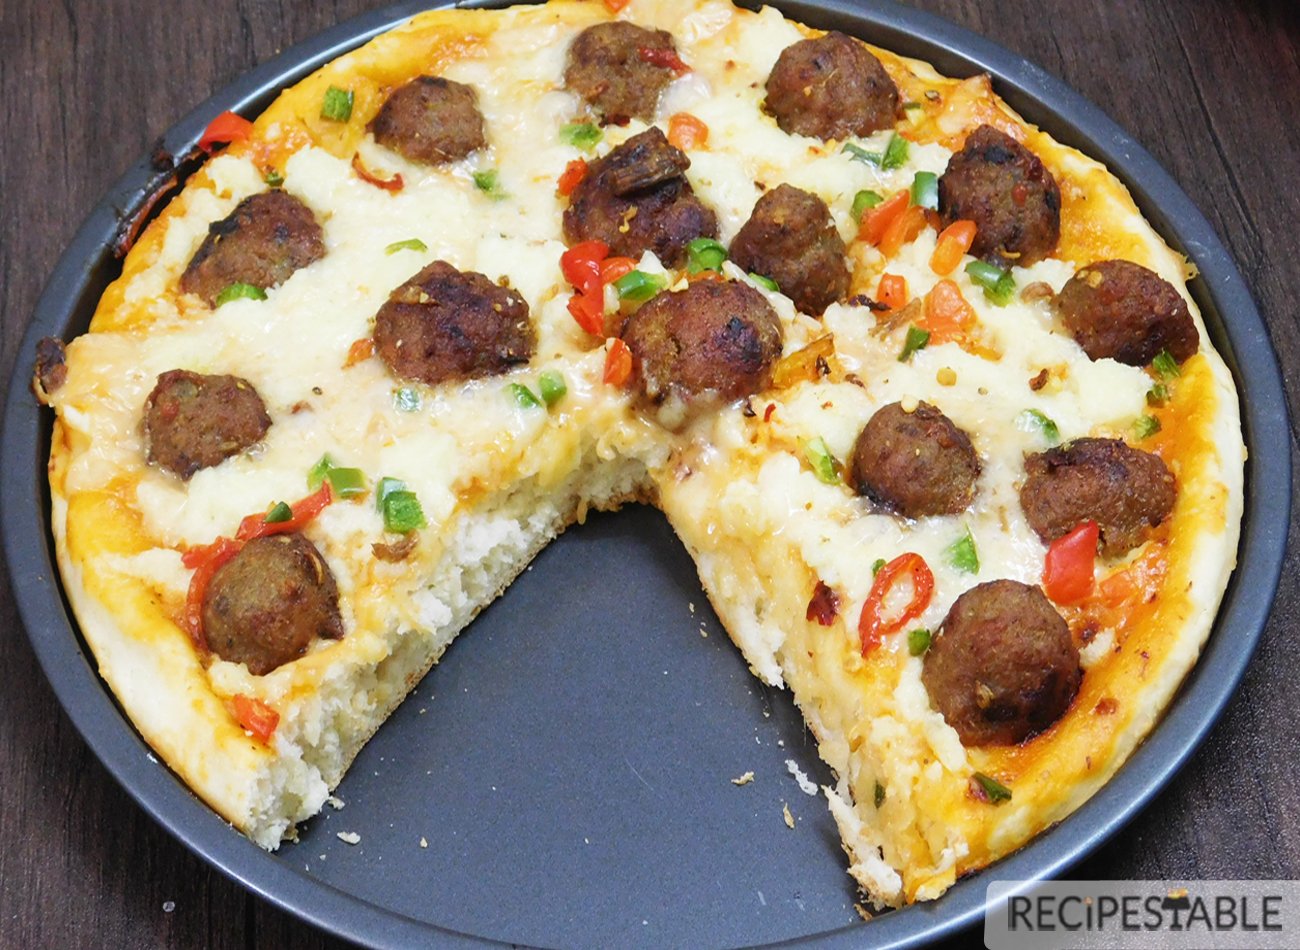
    This meatball pizza, made with a secret sauce, mozzarella cheese, and the surprise element of juicy chicken meatballs piled atop pizza dough, takes homemade pizza to a whole new and indulgent level. That’s better than takeout.

    The Best Meatball Pizza Recipe

    Chewy crust, spicy sauce, meatballs and plenty of melted cheese? Ummmm…. yes, please.

    The Best Meatball Pizza Recipe
    The Best Meatball Pizza Recipe

    Pizza is always a winner in our house and cheesy meatballs are definitely comfort food around here, so we threw together a super easy, super cheesy meatball pizza. Make a big batch of meatballs and freeze in portions along with this fresh pizza dough recipe so you’ll have meatball pizzas ready to go when you want them.

    The Best Meatball Pizza Recipe
    The Best Meatball Pizza Recipe

    You can use frozen meatballs to save on time but you will have to adjust points accordingly, I prefer to make my own and I added a little pizza flare to mine.

    How do you make Meatball Pizza?

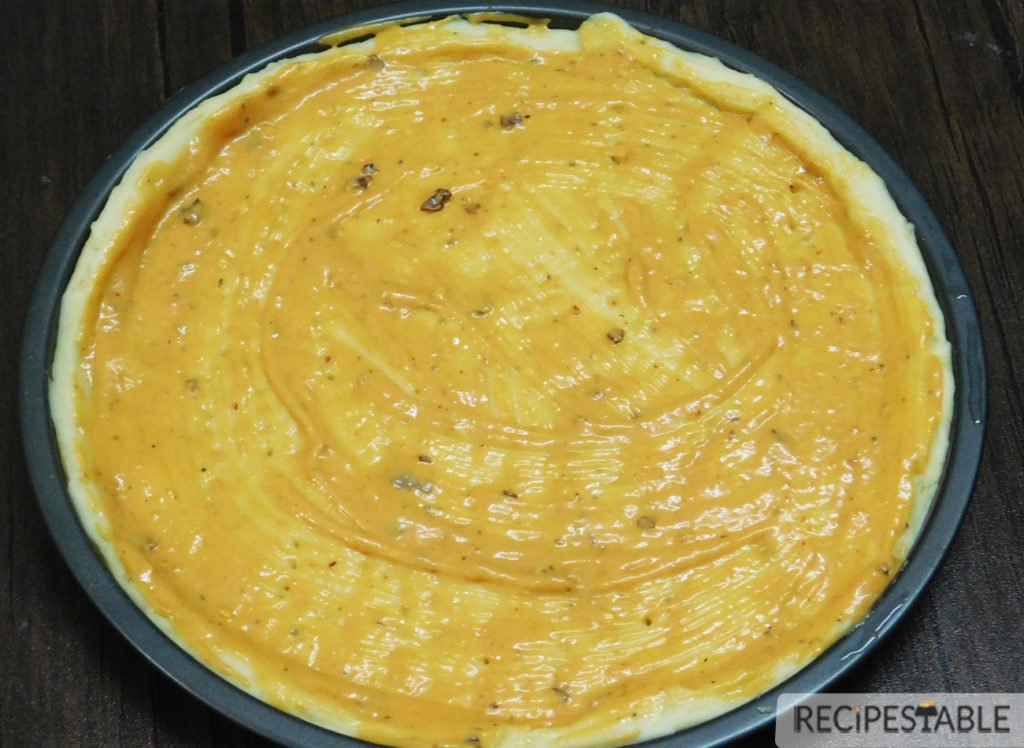
    1. A pizza pan is rubbed with a little bit of oil. Pizza dough is spread into the pan, poked with a fork. Then spread prepared sauce over it.

    Spread pizza sauce over the dough

    2. The topping is assembled by cooking the meatballs in a hot pan.

    The Best Meatball Pizza Recipe
    Meatballs 🙂

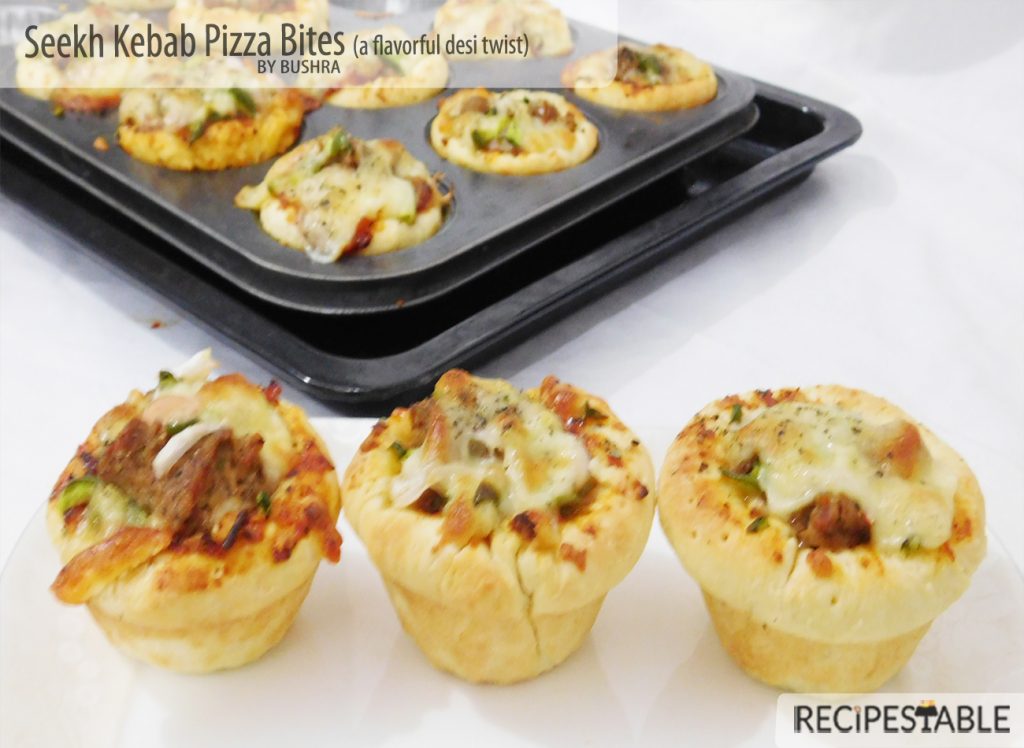
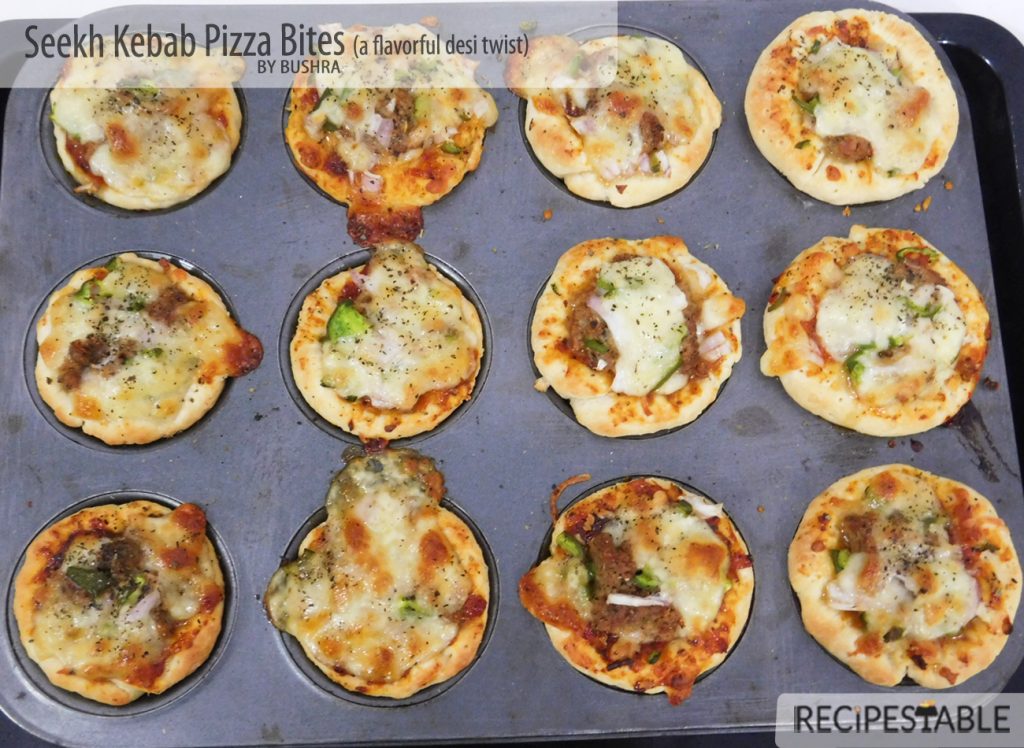
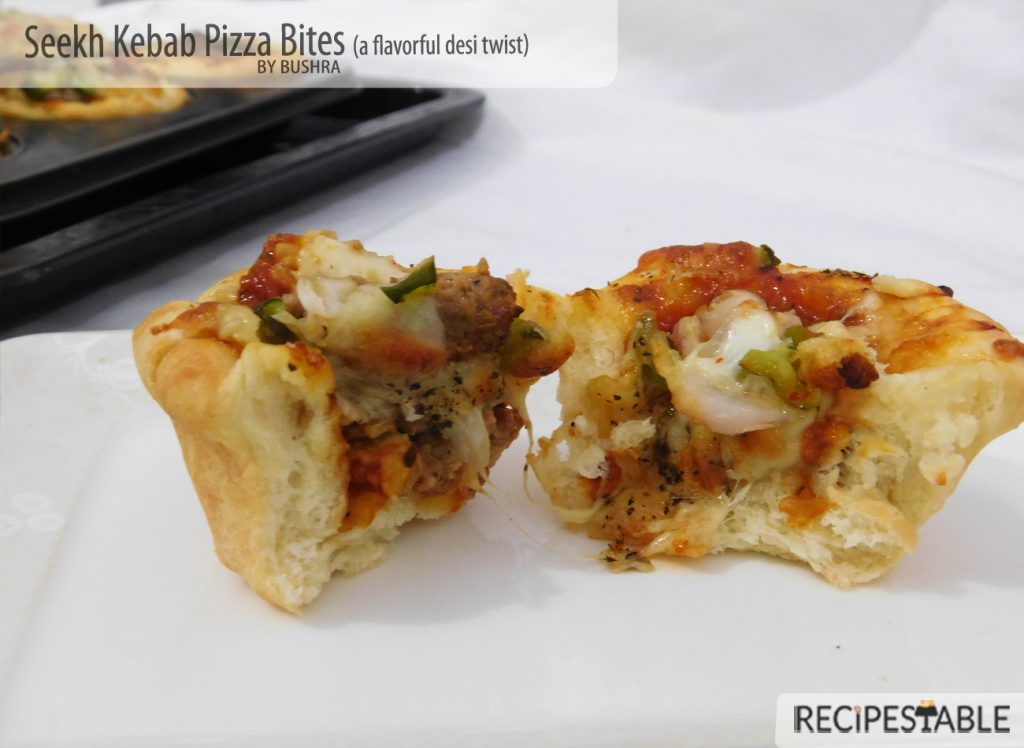
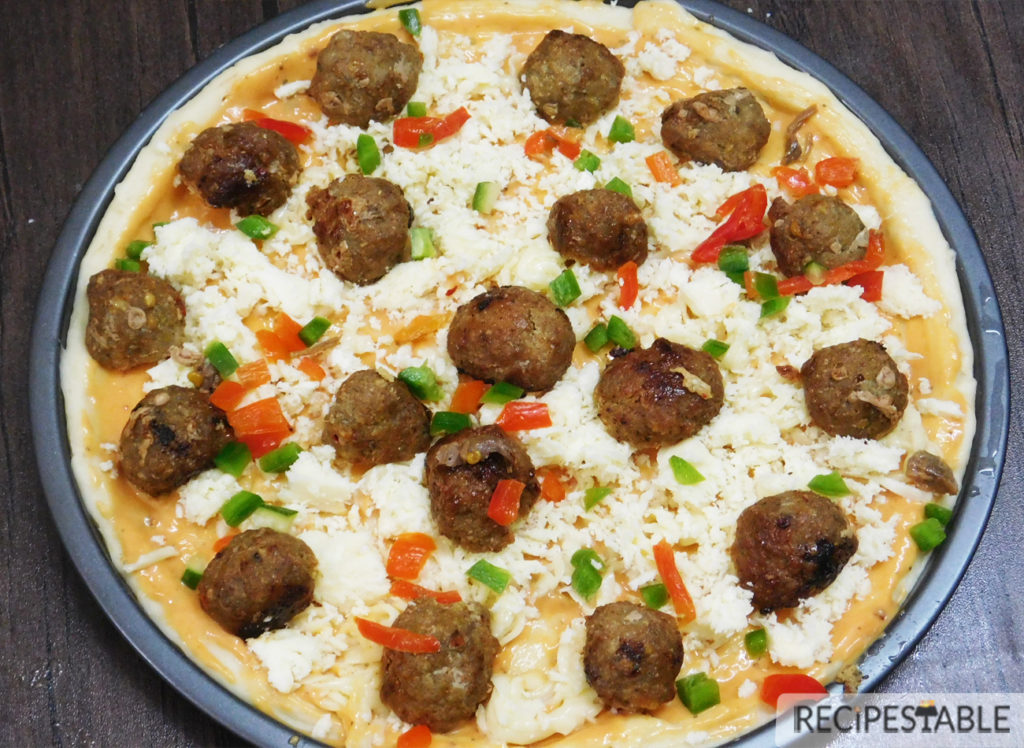
    3. Then pizza dough is topped with the cheddar cheese, meatballs, red and green bell pepper and a generous portion of mozzarella cheese.

    The Best Meatball Pizza Recipe
    Meatball Pizza ready to go in the oven!!

    4. Then baked in the preheated oven until the cheese is golden and crust is cooked! Remove from the oven and cut into the wedges. ENJOY 🙂

    The Best Meatball Pizza Recipe
    The Best Meatball Pizza Recipe

    Where is the best place to buy Pizza dough?

    1. Most markets have some sort of pizza dough that they sell.  You’ll probably be able to find the kind of pizza dough in the can (not my favorite), and some will offer it in a little plastic baggie (probably a better product and likely more fresh).
    2. I do have a tip for the best place to buy pizza dough.  Most pizza restaurants will likely be willing to sell you a ball of their pizza dough.  Just ask!  That’s going to be your best bet for good pizza dough!
    3.  You can also make your own. I have good recipe for Easy Pizza Dough.

    What are the best toppings for pizza?

    1. If you’re a meat lover, you’ll most likely enjoy some sort of meat lover’s pizza like this Meatball Pizza!  BBQ Chicken Pizza is my another favorite. 
    2. And my personal choice for pizza topping is Bell Peppers, Olives and Pineapple.  Chicken Chunks, Sausage are also popular pizza toppings ( but I don’t like it that much).
    3. Some people like to add olives, corn, goat cheese, spinach and more.  The possibilities are endless!

    It’s pretty likely that everyone in your family will enjoy this Meatball Pizza.  It’s a nice, quick and easy dinner for those nights that are crazy!

    Bismillah let’s get started.
    Check it out The Best Meatball Pizza Recipe and printable version here!!

    The Best Meatball Pizza Recipe

    Instead of ordering pizza tonight, try this perfectly pleasing meatball pizza recipe! Great for light dinner or go-with — so simple! So delish!
    Keyword 30 minutes meals, Baking, cheese, chicken mince, Dinner, meatball, Pizza, Quick and Easy
    Prep Time 10 minutes
    Cook Time 25 minutes
    Total Time 35 minutes
    Servings 4
    Author Bushra Waheed

    Ingredients

    For The Meatballs:

    • 500 gm chicken mince
    • 1 bread slice crust removed
    • 1/3 cup warm water
    • 1 large egg white lightly beaten
    • 1 tsp chopped garlic
    • 1 small garlic clove minced
    • 1 tsp onion powder
    • 1 tbsp fresh parsley chopped
    • 1 tbsp fresh basil chopped
    • 1 tsp red pepper crushed
    • freshly ground black pepper to taste
    • salt to taste
    • oil for frying

    For the Meatball Pizza:

    • 1 pound homemade pizza dough for recipe click here
    • 12 meatballs halved and thawed
    • 1/4 cup pizza sauce
    • 2 tbsp mayonnaise
    • 1 cup Mozzarella Cheese shredded
    • 1/4 cup cheddar cheese
    • 1 small green pepper chopped
    • 1 small red pepper chopped
    • few fresh basil optional
    • a pinch of crushed red pepper to add a extra kick
    • and/or other toppings of your choice

    Instructions

    To Make The Meatballs:

    • In a bowl, combine the bread and water. Let stand, turning the bread occasionally to thoroughly moisten it, for 10 minutes.
    • Squeeze the bread gently to remove most of the water.
    • Discard the water. Tear the bread into 1-inch chunks and toss them into a large bowl.
    • Add the chicken mince, ginger, garlic, onion powder, parsley, basil, egg white, red pepper, 1/4 teaspoon salt, and black pepper to taste.
    • Mix thoroughly with moistened hands.
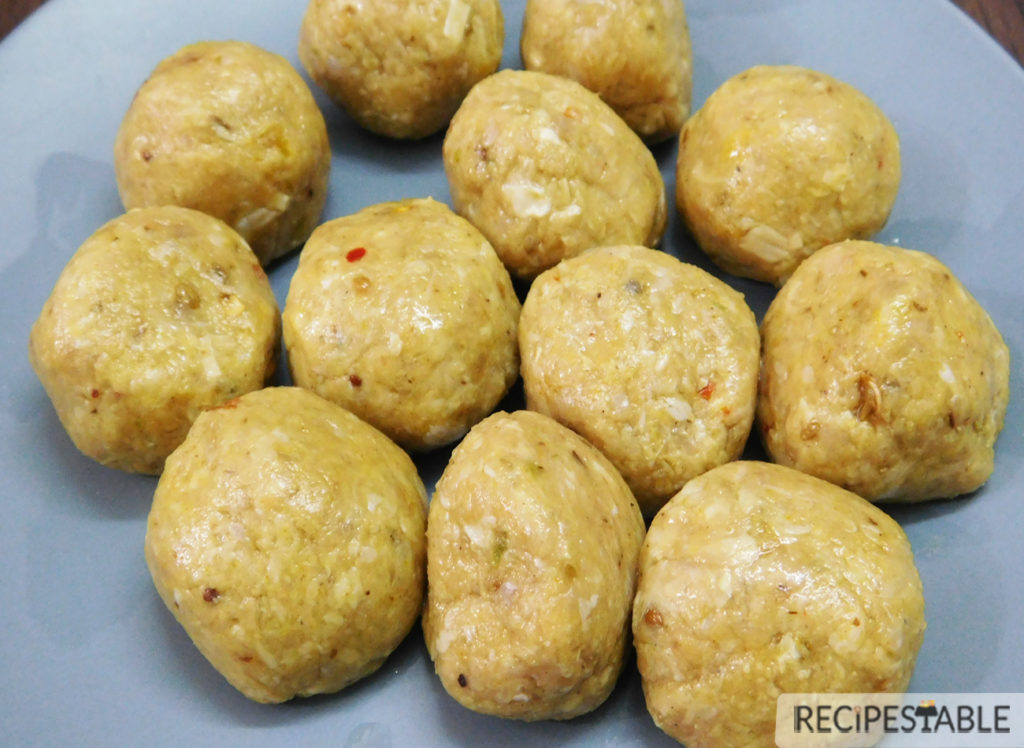
    • Shape the meat mixture into 12 mini balls.
    • Place the meatballs on the lined sheet, cover with plastic wrap, and refrigerate for at least 2 hours or up to overnight.
    • Now heat oil in a frying pan over medium heat and cook meatballs for 6-8 minutes or until golden, flip and cover the pan fry additional 5 minutes to cook from inside(make sure not to over cooked).
    • Remove meatballs from the oil and drain on kitchen paper.
    • Let the meatballs cool slightly and then cut each one in half.
    • Set aside.

    To Prepare the Sauce:

    • In a small bowl, mix together the pizza sauce, mayonnaise, basil and a pinch of crushed red pepper. Set aside.

    To Assemble The Meatball Pizza:

    • Preheat the oven at 180 degre C or 425 F.
    • Drizzle a round pizza pan or a rectangular baking sheet with olive oil or non-stick spray.
    • On lightly floured surface, roll out pizza dough into a 12-inch circle, with a rolling pin.
    • Spread bases evenly with prepared pizza sauce. Scatter evenly with cheddar cheese.
    • Top with meatballs halves and pressing lightly into base. Scatter evenly with Mozzarella cheese.
    • Top with chopped green and red bell pepper.
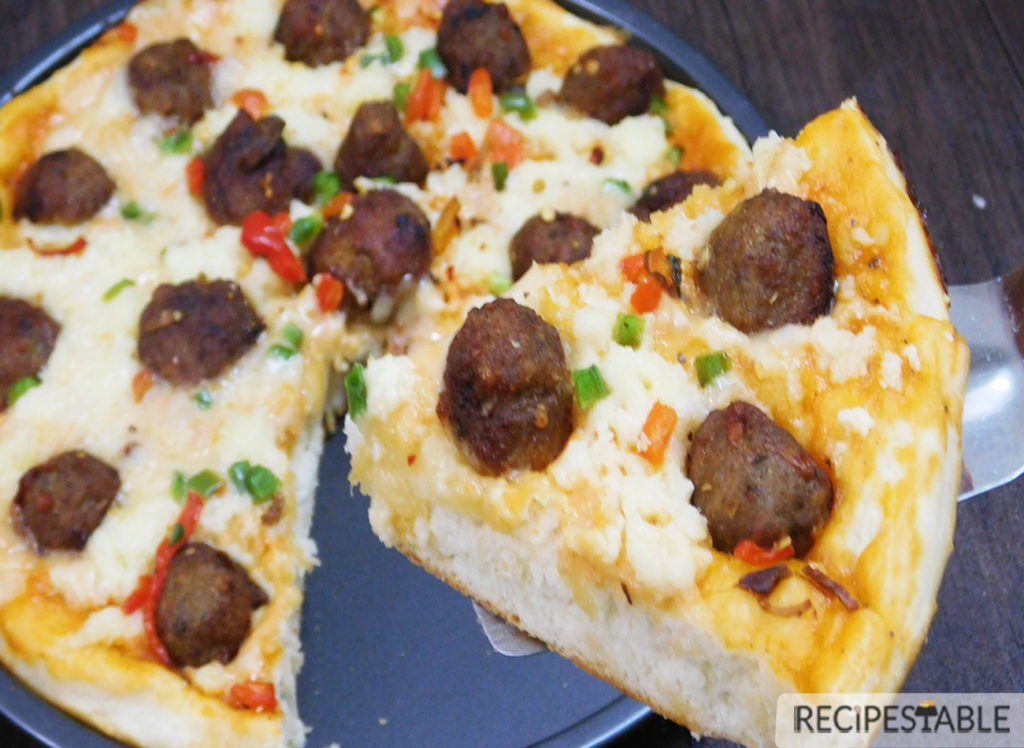
    • Bake 25 minutes or until the crust is crisp and golden and the cheese is hot and bubbly.
    • Let pizza sit for a few minutes then cut into 4 slices.
    • Delicious Meatball Pizza is ready to serve.
    • ENJOY 🙂

    Notes

    Serve with salad mix.

    Some Useful Tips & Hints:

    1. For make-ahead meatballs, you can make the meatballs up to the end of step 1 and freeze them layered between baking paper in an airtight container. Store them for up to 2 months. Defrost in the fridge overnight and continue recipe from step 2.
    2. Chicken mince is easily available at major supermarkets or local butchers.
    3. Use a store-bought pizza base for quicker version.
    4. You can add your favorite herbs and spices for a spicy version.

    Want more Pizza Inspiration? 

    Here are some other pizza recipes on my blog:

    If you’re looking for more easy, family friendly dinner ideas, you might also enjoy my The Best and Easiest Spaghetti Meatballs Recipe or this Butter Chicken Pasta,  Homemade Lamb Burgers and Keema Macaroni are also fun recipes for the family!

    Put your own spin on it. And lemme know how it turns out and do take a few seconds to rate it! I would love to see your recreations so tag me on instagram @recipestable or Facebook (Recipestable) or on Twitter so I can see how lovely yours turn out.

  • Seekh Kebab Pizza Bites Recipe (A Flavorful Desi Twist)

    Seekh Kebab Pizza Bites Recipe (A Flavorful Desi Twist)

    Craving pizza but your taste buds is calling for some desi twist?

    Satisfy your cravings with these Seekh Kebab Pizza Bites that are ready in 30 minutes or less and featuring everyone’s favorite flavor combo: Pizza, Seekh Kebab and  cheesy goodness—are sure to be the talk of the party.

    A Flavorful Desi Twist - Seekh Kebab Pizza Bites Recipe
    A Flavorful Desi Twist – Seekh Kebab Pizza Bites Recipe

    You all know I love pizza, and I couldn’t go too long without experimenting different pizza toppings. (For you newbies, they happen to be one of my favorite finger food!) These days pizzas come with many desi variations like butter chicken, spicy tikka or seekh kebabs.

    Seekh Kebab Pizza Bites (A Flavorful Desi Twist)

    So, Today why not take the classic Italian and make them unabashedly Pakistani ?

    Creativity, especially when it comes to food has absolutely no limits. There are some flavor combinations that are so brilliant —like seekh kebabs, pizza sauce, and cheese. All three of these offer undeniable flavor on their own, but when paired together, the result is nothing less than perfect. So, I changed the shape of pizza and turned it everyone’s favorite pizza ingredients into these cute little “Seekh Kebab Pizza Bites”!

    The smokiness of seekh kebabs, the sharp flavor of cheddar, the cheesy goodness of Mozzarella and the zest of pizza sauce combine like they were always meant to be together. All this ohso yummy !

    Seekh Kebab Pizza Bites Recipe
    Seekh Kebab Pizza Bites Recipe

    Does your family love pizza as much as mine does?

    Then this weekend, try something new : “Seekh Kebab pizza Bites”! These adorable little pizza bites are yours to enjoy. And let me tell ya – they will easily disappear quickly!

    Seekh Kebab Pizza Bites Recipe
    These Seekh Kebab Pizza Bites make a fun and delicious way to serve everyone’s favorite pizza! 

    Ingredients in Seekh Kebab Pizza Bites?

    To make these seekh kebab pizza bites, you’ll need pizza dough, pizza sauce, leftover seekh kebabs, onion, green bell pepper, Cheddar & Mozzarella cheese and Italian seasoning.

    Seekh Kebab Pizza Bites Recipe
    Seekh Kebab Pizza Bites Recipe

    How to make the Seekh Kebab Pizza Bites

    First I line up the muffin pan with homemade pizza dough and cut it into round circles (No need to be extremely accurate with the measurements).  I just wanted the pizza bites to be about the same size. Then I top it with the pizza sauce. I always keep a jar of homemade pizza sauce in my pantry to make these kinds of easy pizzas at a moment’s notice. Next is the cheese then the leftover seekh kebabs with onion and peppers then sprinkle herb seasoning and bake at 180 degree C for 10-15 minutes!

    These couldn’t be more simple.

    Seekh Kebab Pizza Bites Recipe
    Seekh Kebab Pizza Bites Recipe

    Once they have cooked, I remove them from the oven and allow them to cool enough so that they can be safely eaten, about 5 minutes and serve.

    Voila!!!

    Make-Ahead Seekh Kebab Pizza Bites Recipe

    They also make a great make-ahead meal or snack!

    Seekh Kebab Pizza Bites Recipe
    Seekh Kebab Pizza Bites Recipe

    How to Freeze Seekh Kebab Pizza Bites

    Once they have cooled completely, place them onto a sheet pan and allow them to flash freeze for about 30 minutes. Then, package them in freezer-safe zip top bags or containers for up to 2 weeks. To serve from frozen, just thaw overnight in the refrigerator and then reheat in the oven for about 10 minutes until heated throughout.

    Extra Bounce Tip:

    The fun thing is that they are completely customizable. And if you have kids around, or want to get friends involved in customizing their own, these are a great idea for a make-your-own-appetizer set up. Everyone will love tossing in their favorite toppings.

    Seekh Kebab Pizza Bites Recipe
    Seekh Kebab Pizza Bites Recipe

    Definitely a fun twist on serving pizza.  And in my opinion, much cuter — which is of course the bigger issue. enjoy 🙂

    Bismillah let’s get started.
    Check it out Seekh Kebab Pizza Bites Recipe and printable version here!!

    Want more Pizza Inspiration? 

    Here are some other pizza recipes on my blog:

    Put your own spin on it. And lemme know how it turns out and do take a few seconds to rate it! I would love to see your recreations so tag me on instagram @recipestable or Facebook (Recipestable) or on Twitter so I can see how lovely yours turn out.

  • Italian Herb Crusted Cheese Pizza Recipe

    Italian Herb Crusted Cheese Pizza Recipe

    Let’s Make Pizza Night Fun!

    After a whole month of no blogging, no cooking and baking I’m back in the biz with this star of a recipe – “Italian Herb Crusted Cheese Pizza!”

    I was extremely busy with my mid terms exams and eid shopping, so I couldn’t get a chance to publish new posts on my blog. Exams were taking priority sadly. But from now till eid, I’ll be try to more regular (InshaAllah)!

    I’m a lover of Italian food and fresh herbs and my family loves pizza in all forms. One of our favorite family meals is homemade pizza. We make regular Homemade pizza, Pan pizza, Pizza Cups, Pizza Rolls, Pizza sandwiches , Pizza Paratha and Pizza fries. One thing we love about it is that you can get really creative with toppings and today’s recipe is one of my recent (and favorite) creations –Italian Herb Crusted Cheese Pizza.

     Italian Herb Crusted Cheese Pizza recipe
    Photo: Italian Herb Crusted Cheese Pizza

    Can you say “Delicioso?”  OMG, this pizza did not disappoint!   This, to me, is the perfect Italian Flavored pizza. The crust is light and crispy. The sauce is thick and tomato-y. The fresh mozzarella is mild and cheesy. The basil leaves are bright and fresh and the herb aroma is amazing. When I bit in and my mouth filled with saucy, cheesy, herby goodness I’m pretty sure I had a pizzagasm.  The cheese melted perfectly into the crust , the flavors being even more dramatic where it had browned into that crunchy, cheesy topping. 

     Italian Herb Crusted Cheese Pizza
    Photo: Italian Herb Crusted Cheese Pizza

    I love eating food where in each bite you get something a little bit different, it makes it all the more interesting and enjoyable to eat and this pizza definitely delivers that… I like the basil leaves to be baked along with the pizza, but you can sprinkle them on top after baking if you prefer them uncooked. This recipe can be done with little effort, but it has a big impact on your taste buds and entire dinner experience.

    Italian Herb Crusted Cheese Pizza recipe
    Photo: Italian Herb Crusted Cheese Pizza

    For this pizza I decided to use the pre-made homemade pizza dough, but feel free to make your own from scratch. It’s very straightforward to make and if you don’t fancy making your own pizza base then you could simply add the toppings to a store bought pizza crust. I always brush my pizza dough with olive oil and herb seasoning to make it even more delicious!
    While my pizza dough was rising in the pan, I prepared the pizza toppings. The pizza crust bakes for about 10-15 minutes in a 200 degree oven (or until crispy and light brown and cheese is melted). The secret to a good Sicilian crust is a nice coating of olive oil on the pan. That helps crisp up the bottom of the crust. A very hot oven is also crucial. The hard part is waiting for this oh so delicious pizza! The wait is definitely worth it, because you are rewarded with an amazingly delicious pizza.

    Photo: Italian Herb Crusted Cheese Pizza
    Photo: Italian Herb Crusted Cheese Pizza

    I’m thinking cheesy flatbread for my next attempt!

    Bismillah, let’s get started!!

    Check it out the Chicken Shashlik Sticks recipe and printable version here!!

    If you make this recipe, be sure to snap a photo and hashtag it #Recipestable & #TastyRecipesbyBushrah. I’d love to see what you cook!

    Happy Pizza Making!!

  • Chapli Kebab Pizza Recipe (An Italian-Pakistani Twist)

    Chapli Kebab Pizza Recipe (An Italian-Pakistani Twist)

    Give pizza night a new twist by making spicy Chapli Kebab Pizza (Heavenly Double TREAT)!!

    Monday nights are for creativity. Or maybe, you’re like me and just have leftover Chapli Kebab’s wasting away in your fridge. Pinterest gave me the inspiration I needed to take dinner from a boring pizza night to an Italian-Pakistani Twist.

    This Chapli Kebab Pizza is my Pakistanized pizza makeover…..you could say that this is an Pakistani-Italian delight….hey, fusion food is the latest fad.  A delicious and easy to make pizza with crispy, juicy chapli kebab’s and  melty mozzarella cheese!  It is sure to be a hit! 

    Chapli Kebab Pizza (Desi Pizza)

    Photo: Chapli Kebab Pizza

    Chapli Kebab Pizza

    This pizza is so easy to make with left over Chapli Kebab’s with the cheesy topping….nobody could resist. I added dried Italian herbs to the pizza base and that gave a subtle Italian flavor with the Pakistani flavored topping. And just followed my heart to a logical conclusion. I took the shortcut and used the Chili Garlic sauce in place of pizza sauce and lessen cheese to keep it healthy and low fat( you can add more cheese). Well… I needn’t explain what the result was. The recipe finding its place in this blog itself says it all….. Right???

    chapli-kebab-pizza3

    So why go to pizza hut…when you can make healthy homemade ones?? This pizza was a huge hit with my family try it…you will love me more, honestly 🙂 

    Chapli Kebab Pizza recipe

    Photo: Chapli Kebab Pizza

    Bismillah, Let’s get started!

    Check it out the Chapli Kebab Pizza recipe and printable version below.

     Recipe Note’s:

    I am a firm believer that every oven is different and you should check on your food periodically to make sure it is cooking properly.


    Put your own spin on it. And lemme know how it turns out by sharing a picture  on Instagram, Facebook (Recipestable) or Twitter with this hashtag #Recipestable so I can see how lovely yours turn out.


    Happy Baking!!

    If you like this post, Please Subscribe to my blog and let me know your feedback by commenting below.. I have lots more recipes to share with you.

  • Ditch the Triangle! Make Delicious Parcel Samosa at Home

    Parcel Samosa

    Craving Samosa? Today, I am giving you a special Parcel Samosa Recipe which is my favorite one. This crispy deep fried, Parcel Shaped has a cheesy chicken filling in it.Wow each bite it heavenly. Samosa Parcels are bite-size quick alternate option to one of the most popular Iftar Item or a Tea time Snack in Pakistan.

    Parcel Samosa Recipe
    Photo: Parcel Samosa Recipe

    Making perfect Samosas could be little tricky and tedious, but these Parcel Samosa’s are very easy and they taste as scrumptious as a perfect Samosa would.

    Parcel Samosa Recipe
    Photo: Parcel Samosa Recipe

    You can stuff this yummy samosa with any of your favorite stuffs. You can stuff it with paneer, fish, prawns, vegetables or anything that floats your boat. You can serve this with any of the chutneys like green chutney, tamarind chutney, sweet chutney. Do try it!!

     Check it out the Parcel Samosa Recipe and printable version below!!

    I have also posted Tikka Samosa recipe which is another quick version of making Samosas. Do check it out as well.

    [divider]

    If you like this Parcel Samosa Recipe,Please Subscribe to my blog. I have lots more recipes to share with you. And If you make it then let me know your feedback by commenting below.

  • Spicy Chicken Omelette Recipe

    Spicy Chicken Omelette

    If you’re in a hurry, try this Spicy Chicken Omelette Recipe that can be enjoyed any time of day. Combine chicken and egg for a delightful main dish that’s ready in just 25 minutes!

    Perfect for breakfast, lunch or dinner, be creative with you flavor combinations and add tomato, herbs, mushroom, or even olives!

    Spicy Chicken Omelette Recipe
    Photo: Spicy Chicken Omelette Recipe

    Check it out the Spicy Chicken Omelette Recipe here!!

    Spicy Chicken Omelette Recipe

    Course Breakfast
    Cuisine American, Pakistani
    Keyword breakfast, Chicken, eggs, omelet, spicy
    Prep Time 5 minutes
    Cook Time 8 minutes
    Total Time 13 minutes
    Servings 2
    Author Bushra Waheed

    Ingredients

    • 4 large eggs
    • 4 tablespoon milk
    • 1 cooked chicken breast thinly sliced
    • 1/4 cup chopped green onion
    • 2 green chilies finely chopped
    • 1/4 cup grated cheese
    • 1/4 teaspoon cayenne pepper
    • salt to taste
    • 1 tablespoon butter

    Instructions

    • In a small bowl, whisk together the eggs and milk.
    • Season with salt and pepper. Mix well.
    • Melt butter in a non-stick pan over medium heat. Add chicken, green onion and green chili. Cook and stir for 1-2 minutes then pour egg mixture over it.
    • As eggs set at the edges, with spatula, gently lift cooked portion to allow uncooked egg to flow underneath.
    • Cook on low flame for 2 minutes or until almost set.
    • Sprinkle cheese on half of the omelette.
    • Fold other half over cheese.
    • Remove from the heat and transfer into a platter.
    • Cut omelette in half. Spicy Chicken Omelette is ready to serve. ENJOY!!

    Notes

    Serve with salad, bread or paratha.

    If you like Spicy Chicken Omelette Recipe  and make it then let me know your feedback by commenting below.And if you know more innovative ways in which we can utilize this mouth watering Spicy Chicken Omelette, do share with us and we would be glad to give it a try.

  • Buffalo Chicken Cheese Balls Recipe

    Buffalo Chicken Cheese Balls

    This modern and Buffalo Chicken Cheese Balls Recipe is full of buffalo chicken, Hot Sauce, mozzarella, and cheddar cheese! Great as an appetizer or light lunch.

    Among all the chicken favorites Chicken Cheese Balls are not only very easy to cook but also flavorful, moist, cheesy and crunchy at the same time. Be it a casual lunch idea for family or a small home party; Buffalo Chicken Cheese Balls are sure to please your family and guests alike. It also makes a delicious lunch box item for the children. Buffalo chicken cheese balls tastes better if served with Garlic Sauce or Tomato ketchup. 

    Buffalo Chicken Cheese Balls Recipe
    Photo: Buffalo Chicken Cheese Balls Recipe

    These Buffalo Chicken Cheese Balls are one of the best foods ever created. They are incredibly easy to make and they taste out of this world delicious! Not to mention my picky eatin.

    I didn’t get a very good shot of the buffalo chicken cheese balls.. I was too eager to get on with it and eat them! Some day I’ll learn to be more patient. (InshaAllah) 🙂

    Buffalo Chicken Cheese Balls Recipe
    Photo: Buffalo Chicken Cheese Balls Recipe

    Here is a really simple, quick yet a better recipe to try this weekend.

    So let us start!! Ready ??

    Check it out the Buffalo Chicken Cheese Balls Recipe and printable version below!!

    Buffalo Chicken Cheese Balls

    This modern and Buffalo Chicken Cheese Balls Recipe is full of buffalo chicken, Hot Sauce, mozzarella, and cheddar cheese! Great as an appetizer or light lunch.
    Prep Time 15 minutes
    Cook Time 5 minutes
    Total Time 20 minutes
    Servings 9
    Author Bushrah | Recipestable

    Ingredients

    • 3 cups boiled & shredded chicken
    • 2 green onions finely chopped
    • 1/2 cup hot pepper sauce
    • 1 cup Cheddar cheese grated
    • 1 cup Mozzarella cheese
    • 1 cup all-purpose flour
    • 3 eggs lightly beaten
    • 1 cup plain bread crumbs
    • oil for frying

    Instructions

    Directions

    • In a large bowl, mix together the chicken, green onions, Cheddar cheese, Mozarella cheese and hot sauce.
    • Now shape the mixture into 1.5 inch balls.
    • Put the flour, eggs and bread crumbs in three separate dishes.
    • Dip and coat each ball in flour, then egg then bread crumbs.
    • Place the breaded chicken balls onto a plate while breading the rest; do not stack.
    • Heat oil in a deep pan over medium heat.
    • Fry the breaded balls in the hot oil for 1-2 minutes or until lightly browned.
    • Remove from the oil and drain on kitchen paper.Buffalo Chicken Cheese Balls are ready to serve. ENJOY!!

    Notes

    Serving Suggestions:
    Serve with Your Favorite Dipping Sauce.


    If you like this Buffalo Chicken Cheese Balls Recipe, Please Subscribe to my blog. I have lots more recipes to share with you. And If you make it then let me know your feedback by commenting below.

  • Chicken Cheese Sandwich Recipe

    Chicken Cheese Sandwich Recipe

    Chicken and Cheese Sandwich

    Chicken Cheese Sandwich is a light meal or snack in slight appetite. Leftover  chicken and cream cheese are turned into a hot and spicy chicken sandwich. When you pack lunch boxes or in game party these super fantastic sandwiches are a great solution of your huger.

    Chicken Cheese Sandwich Recipe
    Photo: Chicken Cheese Sandwich Recipe

    Check it out the Chicken Cheese Sandwich Recipe here!!

    Chicken Cheese Sandwich Recipe

    Course Appetizer, Comfort Food, Snack
    Cuisine American, Indian, Pakistani
    Keyword cheese, cheese sandwiches, Chicken, chicken sandwich, sandwich
    Prep Time 15 minutes
    Cook Time 5 minutes
    Total Time 20 minutes
    Servings 6
    Author Bushra Waheed

    Ingredients

    • 12 bread slices
    • 1 cup boiled & shredded chicken
    • 3 tablespoon Mayonnaise
    • 4 tablespoon shredded Cheese
    • 1 tablespoon cream cheese
    • salt and pepper to taste
    • shredded lettuce as required
    • tomato ketchup as required
    • butter as required

    Instructions

    • In a bowl, mix together the chicken, cheese, cream cheese and mayonnaise.
    • Season with salt and pepper.
    • Add shredded lettuce and mix well.
    • Remove the edges of bread slices.
    • Spread butter and toast on a hot griddle or pan.
    • Spread ketchup on one side of six bread slices.
    • Put some chicken cheese mixture over them. Cover with remaining bread slices and cut into triangles. Secure with wooden pick.
    • Transfer into a serving platter. Garnish with lettuce  leaves.
    • Delicious Chicken Cheese Sandwich is ready to serve. ENJOY!!

    Notes

    Serve with French Fries.

    If you like Chicken Cheese Sandwich Recipe and make it then let me know your feedback by commenting below.And if you know more innovative ways in which we can utilize this mouth watering Chicken Cheese Sandwich , do share with us and we would be glad to give it a try.

  • Easy Chicken Tacos Recipe: Perfect for Weeknight Dinners (Ready in 30 Minutes!)

    Chicken Tacos

    This Chicken Tacos Recipe is so quick and easy to make. It’s really good for those nights you don’t have a lot of time for dinner preparations. Do try it!!

    Chicken Tacos Recipe
    Photo: Chicken Tacos Recipe

    Check it out the Chicken Tacos Recipe here!!


    [one_fourth]Prep Time:20 minutes[/one_fourth] [one_fourth]Cook Time:25 minutes[/one_fourth] [one_fourth]Servings: 8[/one_fourth] [one_fourth_last]Difficulty Level: Easy [/one_fourth_last]


    [tabs style=”h1″ ]
    [tab title=”Ingredients” ]

    • 1 pound boneless chicken breasts, cut into small cubes
    • 1 cup lemonade
    • 2 tablespoons olive oil
    • 1 tablespoon lime juice
    • 1-1/2 teaspoons Worcestershire sauce
    • 1/2 teaspoon garlic powder
    • 1/2 teaspoon onion powder
    • 1 bay leaf
    • 1 (about 12 ounce) package corn tortillas
    • 1 head lettuce, shredded
    • 2 large tomatoes, chopped
    • 1 cup shredded Cheddar cheese
    • 1 cup salsa
    • 1 cup sour cream

    [/tab]
    [tab title=”Nutrition” ]

    Yield: 8 servings

    Amount Per Serving: ( 1 serving = 1 Each)

    • Calories: 401 kcal
    • Carbohydrates: 30.3 g
    • Cholesterol: 75 mg
    • Fat: 20.7 g
    • Fiber: 4.4 g
    • Protein: 24.9 g
    • Sodium: 435 mg

    Percent Daily Values are based on a 2,000 calorie diet.

    [/tab]
    [/tabs]

    Directions:

    [tabs style=”h1″ ]
    [tab title=”Step By Step Method” ]

    Step 1

    In a large bowl, combine together the chicken, lemonade, olive oil, lime juice, and Worcestershire sauce.

    Step 2

    Season with garlic powder, onion powder, and bay leaf.

    Step 3

    Marinate for 20 minutes to blend flavors.

    Step 4

    Place chicken in a skillet. Simmer on low heat for 20 minutes or until chicken is no longer pink and all juices run clear.

    Step 5

    Meanwhile, warm the tortillas in the oven or microwave until soft.

    Step 6

    Now divide chicken mixture in 8 tortillas evenly.

    Step 7

    Top each with lettuce, tomatoes, cheese, salsa, and sour cream. Delicious Chicken Tacos are ready to serve.
    [/tab]

    [tab title=”Serving Suggestions”]Serve with Lemonade.[/tab]
    [/tabs]
    If you like Chicken Tacos Recipe and make it then let me know your feedback by commenting below.And if you know more innovative ways in which we can utilize this mouth watering Chicken Tacos, do share with us and we would be glad to give it a try.

  • Level Up Your Burger Game: Open-Faced Texas Burgers Recipe!

    Open Faced Texas Burgers

    This is my version of Open Faced Texas Burger. These burgers are so moist,juicy, flavorful and stays together well when cooking!

    This Burger flavored with tangy BBQ sauce, onions, thyme are cooked, then topped with cheese and tomatoes for big Texas flavor. Don’t miss out on this heavenly delicious burgers and taste of the south!

    Open-Faced Texas Burgers Recipe
    Photo: Open Faced Texas Burgers Recipe

    Check it out the Open Faced Texas Burgers Recipe here!!


    [one_fourth]Prep Time:10 minutes[/one_fourth] [one_fourth]Cook Time:20 minutes[/one_fourth] [one_fourth]Servings: 5[/one_fourth] [one_fourth_last]Difficulty Level: Easy[/one_fourth_last]


    [tabs style=”h1″ ]

    [tab title=”Ingredients” ]

    • 400 gm ground beef
    • 2 tbsp chopped onion
    • 1/2 teaspoon chopped garlic
    • 1/8 teaspoon dried thyme
    • 2/3 cup shredded Monterey Jack cheese, divided
    • 2 burger buns
    • 1/2 cup tomato sauce
    • 1/4 cup tangy BBQ sauce
    • 1/4 cup Fried Crispy Onions
    • 1 teaspoon brown sugar
    • 1/2 teaspoon Worcestershire sauce

    For Serving:

    • French fries
    • lettuce leaves
    • BBQ Sauce
    • tomato slices

    [/tab]
    [tab title=”Nutrition” ]

    Yield: 2 burgers

    Amount Per Serving: ( 1 serving = 1 each)

    • Calories: 614
    • Fat: 36 g (17 g saturated fat)
    • Cholesterol: 133 mg
    • Sodium: 939 mg
    • Carbohydrate: 31 g
    • Fiber: 2 g
    • Protein: 41 g

    Percent Daily Values are based on a 2,000 calorie diet.

    [/tab]
    [/tabs]

    Directions:

    [tabs style=”h1″ ]
    [tab title=”Step By Step Method” ]

    Step 1

    Place ground beef, 1/2 cup cheese, onion, garlic and thyme in a large bowl.

    Step 2

    Mix well.

    Step 3

    Shape mixture into two round patties.

    Step 4

    Heat a large skillet or pan over medium heat.

    Step 5

    Cook patties over medium heat for 5 minutes on each side or until meat is no longer pink.

    Step 6

    Meanwhile, toast the burger buns.

    Step 7

    In a small saucepan, stir together the tomato sauce, brown sugar, Worcestershire sauce and Tangy BBQ sauce.

    Step 8

    Bring to a boil. Cook for 2 minutes or until sauce is slightly thickened.

    Step 9

    Now pour this over the beef patties. Turn to coat evenly.

    Step 10

    Put patties and sauce on burger bun.

    Step 11

    Sprinkle with remaining cheese and top with Crispy Fried onions.Open Faced Texas Burgers are ready to serve. ENJOY!!
    [/tab]

    [tab title=”Serving Suggestions”]Serve with French Fries.[/tab]
    [/tabs]

    If you like this  Open Faced Texas Burgers Recipe, Please Subscribe to my blog. I have lots more recipes to share with you. And If you make it then let me know your feedback by commenting below.

  • Lip Smacking Cheesy Chicken Cups Recipe

    Lip Smacking Cheesy Chicken Cups Recipe

    An EASY comfort food recipe with just few ingredients and ready in 30 minutes!! Lip Smacking Cheesy Chicken Cups with a cheesy filling are sure to be a family favorite. Great for breakfast, dinner, snacks, a party appetizer or anything in between!!

    Cheesy Chicken Cups Recipe
    Cheesy Chicken Cups

    Cheesy Chicken Cups

    I had some extra chicken cooked and was looking to use it in a super fast and easy recipe. Since I also had few slider buns in my fridge, this fit the bill perfectly. I love the idea of the Slider cups (I can’t wait to get creative and try other things with that concept) and the filling was ooey-gooey, warm and cheesy. This is a very quick and simple way to get that comfort food taste/feeling.

    Here is my first try. I was thrilled they turned out just right.  They look so Lip smacking and appetizing (thus the name Lip Smacking Cheesy Chicken Cups). These are just as beautiful as they are delicious. My taste buds are going crazy, and I cannot wait for the next course in this meal.
    For a change of pace from your average dinner, this Cheesy Chicken Cups fits the bill! Unusual as it may be, once you take a bit, you will be reminded of some of your favorite chicken recipes. This is cheesy, flavorful, and will be loved by the whole family. Try making it tonight!

    Cheesy Chicken Cups Recipe
    Cheesy Chicken Cups yes!  Please give me one moment. All righty – I’m good now. I had to take a break to stare at these little beauties

    Extra Cheesiness Alert

    Alright, lets move to the cheesiness of this recipe.  


    Cheesy chicken filling, extra cheese on top and pepper flakes all stuffed up in a crispy slider bun shell.  Slider Buns are great for so many appetizers.  I used regular sized muffin tins, so I used bun half per cup, overlapping the corners so that all the edges are covered.   This whole recipe is sure to leave you stuffed and satisfied!

    Cheesy Chicken Cups Recipe
    Cheesy Chicken Cups Recipe

    What I Love About The Cheesy Chicken Cups?

    What I love about these Cheesy Chicken Cups – they are SO SIMPLE.  Seriously, simple ingredients, and half an hour are all it takes to make these Lip Smacking Cheesy Chicken Cups!   They are very good and easy to make, filled with a delicious cheesy chicken filling that everyone will love. We normally have all these items on hand. Mini Slider Buns make great cups for these cheesy treats. You can also use any leftover chicken for this.

    Cheesy Chicken Cups Recipe
    Cheesy Chicken Cups Recipe

    If you serve these at your Iftar Party or next get together , you may want to make a few a double batch – your guests will love them too!

     Cheesy Chicken Cups with Pasta Salad
    Cheesy Chicken Cups with Pasta Salad that are hearty enough to serve for dinner.

    Bismillah let’s get started. 
    Check it out Hot and Sour Noodles Recipe and printable version here!!

    Lip Smacking Cheesy Chicken Cups Recipe

    Lip Smacking Cheesy Chicken Cups – baked to perfection in muffin tins! Great for holidays and lunch boxes – it’s portable and makes for easy serving!
    Prep Time 15 minutes
    Cook Time 15 minutes
    Servings 12
    Author Bushra Waheed

    Ingredients

    • 6 mini slider buns

    For Cheesy Chicken Filling:

    • 1 cup boiled chicken shreded
    • 1 small onion chopped
    • 1 tablespoon plain flour
    • 1 cup milk
    • 1/2 cup cheddar cheese
    • 2 tablespoon butter
    • 1 teaspoon black pepper freshly ground
    • 1 teaspoon dried basil
    • 1/2 teaspoon red chili flakes
    • salt to taste

    For Topping:

    • 1/2 cup grated cheese
    • red pepper flakes
    • dried or fresh basil

    Instructions

    • Preheat oven to 180 degrees C.
    • Lightly greased a muffin pan with non-stick cooking spray or butter.

    To Prepare the Chicken Filling:

    • Melt butter in a frying pan over medium heat.
    • Fry onion till soft and translucent. Now add the plain flour and stir well.
    • Stir in the milk and cook for 2-3 minutes or until sauce is thickened.
    • Season with salt, black pepper, red chili flakes.
    • Stir in the shredded chicken and keep stirring for few minutes or until well combined.
    • Add cheese and dried basil and give it a good stir.
    • Turn the heat off.

    To Assemble the Cheesy Chicken Cups:

    • Cut buns into halves and put each half into the prepared muffin pan.
    • Press the buns into the holes to form cups.
    • Spoon chicken filling evenly into cups.
    • Sprinkle remaining cheese over them.
    • Top with chili flakes and dried basil (optional).
    • Bake for 12 to 15 minutes or until cheese is melted and they turn golden brown.
    • Take it from the oven. Remove from the muffin pan.
    • Lip Smacking Cheesy Chicken Cups are ready to serve. ENJOY!!

    I have also posted Buffalo Chicken Cheese Balls Recipe and Mini Pizza Cups Recipe which are another easiest & tastiest version of Comfort Food. Do check it out as well.

    Put your own spin on it. And lemme know how it turns out. Post a photo on Facebook (Recipestable) or Instagram on Twitter so I can see how lovely yours turn out.

    Happy Cooking

  • Tandoori Moti Tikka Recipe: A Step-by-Step Guide to Cheesy Delight!

    Tandoori Moti Tikka

    Chicken Tikka with rich taste texture with cheese, fresh cream and yogurt. You can make this as starter or as main dish with coriander chutney and parathas. This tikka can be grill or bbq instead of baking.

    Tandoori Moti Tikka
    Photo: Tandoori Moti Tikka Recipe

    Check it out the Tandoori Moti Tikka Recipe here!!

    [divider]

    [one_fourth]Prep Time:10 minutes + marination[/one_fourth] [one_fourth]Cook Time:25 minutes[/one_fourth] [one_fourth]Servings: 4[/one_fourth] [one_fourth_last]Difficulty Level: Easy[/one_fourth_last]

    • 1 kg Boneless chicken, cubed
    • 1/2 cup plain Yoghurt
    • 1/4 cup cheddar cheese, grated
    • 2 egg whites, lightly beaten
    • 4 tablespoon fresh cream
    • 2 tablespoon lemon juice
    • 2 tablespoon ginger garlic paste
    • 1 teaspoon crushed black pepper
    • 1 teaspoon crushed red chilli
    • 1 teaspoon green chili paste
    • 1 teaspoon cumin powder
    • 1/2 teaspoon garam masala powder
    • Salt to taste
    • oil or melted butter for brushing

    [/tab] [tab]Yield:4 servings

    Nutritional information is not yet available. [/tab] [/tabs]

    Directions:
    [tabs type=”horizontal”] [tabs_head] [tab_title]Step by Step Method[/tab_title] [tab_title]Serving Suggestions[/tab_title][/tabs_head] [tab]

    Step 1

    Put chicken in a large bowl. Add alll ingredients except oil. Mix well

    Step 2

    Cover and marinate for at least 2 hours to blend flavors.

    Step 3

    Preheat oven at 180 degree C.

    Step 4

    Thread chicken pieces on metal skewers and grill in the pre heat oven for 20 mins or until chicken is tender and all juices run clear.

    Step 5

    Turn and basting occasionally with butter and left over marination after every 5 minutes.

    Step 6

    Remove from the oven. Transfer into a serving platter.Tandoori Moti Tikka is ready to serve. ENJOY!!

    [/tab] [tab]

    • Serve with onion rings, chutney and puri paratha.

    [/tab] [/tabs]
    If you like Tandoori Moti Tikka Recipe and make it then let me know your feedback by commenting below.And if you know more innovative ways in which we can utilize this  mouth watering Tandoori Moti Tikka, do share with us and we would be glad to give it a try.

  • Cheesy Spinach Bake Recipe

    Cheesy Spinach Bake

    Cheesy and delicious Spinach Casserole. Looks terrible but taste absolutely awesome!!

    Cheesy Spinach Bake Recipe
    Photo: Cheesy Spinach Bake Recipe

    Check it out the Cheesy Spinach Bake Recipe here!!

    [divider]

    [one_fourth]Prep Time:10 minutes[/one_fourth] [one_fourth]Cook Time:25 minutes[/one_fourth] [one_fourth]Servings: 6[/one_fourth] [one_fourth_last]Difficulty Level: Easy[/one_fourth_last]

    [divider]

    [tabs type=”horizontal”] [tabs_head] [tab_title]Ingredients[/tab_title] [tab_title]Nutrition[/tab_title] [/tabs_head] [tab]

    • 2 packages (10 oz each) frozen chopped spinach, thawed and drained
    • 1 can (10-3/4 ounces) condensed cream of potato soup, undiluted
    • 2 cups shredded Monterrey Jack cheese
    • 1 cup sour cream
    • 1/2 cup grated Parmesan cheese

    [/tab] [tab]Yield: 6 servings

    Nutritional information is not yet available. [/tab] [/tabs]

    Directions:
    [tabs type=”horizontal”] [tabs_head] [tab_title]Step by Step Method[/tab_title] [tab_title]Serving Suggestions[/tab_title][/tabs_head] [tab]

    Step 1

    Place spinach in a large bowl.

    Step 2

    Stir in potato soup, sour cream.

    Step 3

    Transfer into a greased 11×7-inch. baking dish.

    Step 4

    Sprinkle with Parmesan and Monterrey Jack cheese.

    Step 5

    Bake, uncovered, at 325 degree F, for 30 minutes or until cheese is melted and bubbly. Cheesy Spinach Bake is ready to serve. Enjoy!!

    [/tab] [tab]

    • Serve warm with crusty bread.

    [/tab] [/tabs]
    If you like Cheesy Spinach Bake Recipe and make it then let me know your feedback by commenting below.And if you know more innovative ways in which we can utilize this mouth watering Cheesy Spinach Bake, do share with us and we would be glad to give it a try.

  • Easy Cheesy Lasagna Recipe

    Easy Cheesy Lasagna

    This is a fast and easy way to make lasagna. It is yummy too. You get the same great flavor of a more complicated dish but exert none of the effort. Yum Yum !!

    Easy Cheesy Lasagna Recipe
    Photo: Easy Cheesy Lasagna Recipe

    Check it out the Easy Cheesy Lasagna Recipe here!!

    [divider]

    [one_fourth]Prep Time:10 minutes[/one_fourth] [one_fourth]Cook Time:30 minutes[/one_fourth] [one_fourth]Servings: 6[/one_fourth] [one_fourth_last]Difficulty Level: Easy[/one_fourth_last]

    [divider]

    [tabs type=”horizontal”] [tabs_head] [tab_title]Ingredients[/tab_title] [tab_title]Nutrition[/tab_title] [/tabs_head] [tab]

    • 1 pound ground beef
    • 1 (8 ounce) package wide egg noodles, cooked
    • 1 (8 ounce) package shredded mozzarella cheese
    • 1 (26 ounce) jar spaghetti sauce
    • 1 cup grated Parmesan cheese
    • 1 cup cottage cheese

    [/tab] [tab]Yield:6 servings

    Nutritional information is not yet available. [/tab] [/tabs]

    Directions:
    [tabs type=”horizontal”] [tabs_head] [tab_title]Step by Step Method[/tab_title] [tab_title]Serving Suggestions[/tab_title][/tabs_head] [tab]

    Step 1

    Heat a non-stick skillet over medium high heat.

    Step 2

    Place beef into the skillet. Cook for 15-20 minutes or until lightly browned.

    Step 3

    Drain.

    Step 4

    Stir in spaghetti sauce.

    Step 5

    Cover and simmer for 5 minutes.

    Step 6

    Stir in noodles.

    Step 7

    Sprinkle with mozzarella cheese and cottage cheese. Stir until well combined.

    Step 8

    Tranfer to a greased 2-quart casserole dish.

    Step 9

    Top with Parmesan cheese.

    Step 10

    Bake, uncovered, at 350 degree F, for 30 minutes or until bubbly and lightly browned. Easy Cheesy Lasagna is ready to serve. ENJOY!!

    [/tab] [tab]

    • Serve with Broccoli Bites.

    [/tab] [/tabs]
    If you like Easy Cheesy Lasagna Recipe and make it then let me know your feedback by commenting below.And if you know more innovative ways in which we can utilize this mouth watering Easy Cheesy Lasagna, do share with us and we would be glad to give it a try.

  • Italian Rice Balls Recipe

    Italian Rice Balls

    Arancini or rice balls are a traditional Italian recipe. Try this Italian Rice Balls Recipe and find out how to make these rice balls with cheese and Italian herbs.

    These cheesy deep fried rice balls are served with Italian dinners as a side like a bread. Goes great with sauce and pasta dishes.

    Italian Rice Balls Recipe
    Photo: Italian Rice Balls Recipe

    Check it out the Italian Rice Balls Recipe here!!

    [divider]

    [one_fourth]Prep Time:15 minutes[/one_fourth] [one_fourth]Cook Time:15 minutes[/one_fourth] [one_fourth]Servings: 12 [/one_fourth] [one_fourth_last]Difficulty Level: Easy[/one_fourth_last]

    [divider]

    [tabs type=”horizontal”] [tabs_head] [tab_title]Ingredients[/tab_title] [tab_title]Nutrition[/tab_title] [/tabs_head] [tab]

    • 2 cups cooked white rice
    • 1-1/2 cups dried bread crumbs
    • 2 eggs
    • 1/3 cup grated Parmesan cheese
    • 1 tbsp dried parsley
    • 1 teaspoon salt
    • 1/4 tsp freshly ground black pepper
    • oil for frying

    [/tab] [tab]Yield: 24 rice balls

    Amount Per Serving: ( 1 serving = 2 each)

    • Calories: 683 kcal
    • Carbohydrates: 34.7 g
    • Cholesterol: 47 mg
    • Fat: 57.8 g
    • Fiber: 1.3 g
    • Protein: 7.3 g
    • Sodium: 822 mg

     [/tab] [/tabs]

    Directions:
    [tabs type=”horizontal”] [tabs_head] [tab_title]Step by Step Method[/tab_title] [tab_title]Serving Suggestions[/tab_title][/tabs_head] [tab]

    Step 1

    Place rice in a large bowl.

    Step 2

    Add eggs, cheese, parsley, pepper, and salt.

    Step 3

    Stir until well combined.

    Step 4

    Place bread crumbs on a shallow dish or plate.

    Step 5

    Dampen hands and roll rice mixture into 1 inch balls.

    Step 6

    Then coat each ball with bread crumbs.

    Step 7

    Heat oil in a deep pan pver medium heat.

    Step 8

    Fry rice balls few at a time, for 2-3 minutes or until crispy and lightly browned.

    Step 9

    Drain on paper towels. Italian Rice Balls are ready to serve. ENJOY!!

    [/tab] [tab]

    • Serve with your favorite dipping sauce and pasta dishes.

    [/tab] [/tabs]
    If you like Italian Rice Balls Recipe and make it then let me know your feedback by commenting below.And if you know more innovative ways in which we can utilize this mouth watering Italian Rice Balls, do share with us and we would be glad to give it a try.

  • Cashew Chicken Casserole Recipe

    Cashew Chicken Casserole

    Plan ahead to get this dish ready the day before you need it. It’s easy to whip up with common pantry items. Give it a Try!!

    Cashew Chicken Casserole Recipe
    Photo: Cashew Chicken Casserole Recipe

    Check it out the Cashew Chicken Casserole Recipe here!!

    [divider]

    [one_fourth]Prep Time:15 minutes[/one_fourth] [one_fourth]Cook Time:35 minutes[/one_fourth] [one_fourth]Servings:6 [/one_fourth] [one_fourth_last]Difficulty Level: Easy[/one_fourth_last]

    [divider]

    [tabs type=”horizontal”] [tabs_head] [tab_title]Ingredients[/tab_title] [tab_title]Nutrition[/tab_title] [/tabs_head] [tab]

    • 1 can (8 ounces) sliced water chestnuts, drained
    • 1 can (14-1/2 ounces) chicken broth
    • 1 can (10-3/4 ounces) condensed cream of mushroom soup, undiluted
    • 1 can (10-3/4 ounces) condensed cream of chicken soup, undiluted
    • 1 small onion, chopped
    • 3 cups cubed cooked chicken
    • 2 cups uncooked elbow macaroni
    • 1-1/3 cups milk
    • 1/2 cup process cheese (Velveeta)
    • 1/2 cup chopped celery
    • 1/2 cup chopped green pepper
    • 1/4 cup butter, melted
    • 2/3 cups crushed saltines( about 20 crackers)
    • 3/4 cup cashew halves

    [/tab] [tab]

    Yield: 6 servings

    Amount Per Serving: 

    • Calories: 620
    • Fat: 34 g
    • Cholesterol: 102 mg
    • Sodium: 1,515 mg
    • Carbohydrate: 45 g
    • Fiber: 4g
    • Protein: 35 g

    [/tab] [/tabs]

    Directions:
    [tabs type=”horizontal”] [tabs_head] [tab_title]Step by Step Method[/tab_title] [tab_title]Serving Suggestions[/tab_title][/tabs_head] [tab]

    Step 1

    Lightly grease a 13×9-inch. baking dish with cooking spray.

    Step 2

    Layer the macaroni, chicken, cheese, celery, onion, green pepper and chestnuts in the baking dish.

    Step 3

    In a large bowl, combine the milk, soups and chicken broth.

    Step 4

    Pour this mixture over the water chestnuts.

    Step 5

    Cover and place in the refrigerator for 8 hours or overnight.

    Step 6

    In a small bowl, toss butter and cracker crumbs.

    Step 7

    Sprinkle crumbs over the casserole.

    Step 8

    Top with cashew nuts.

    Step 9

    Bake, uncovered, at 350 degree F, for 40 minutes or until macaroni is tender. Cashew Chicken Casserole is ready to serve.

    [/tab] [tab]

    • Serve warm.

    [/tab] [/tabs]
    If you like Cashew Chicken Casserole Recipe and make it then let me know your feedback by commenting below.And if you know more innovative ways in which we can utilize this mouth watering Cashew Chicken Casserole, do share with us and we would be glad to give it a try.