Tag: Quick and Easy

  • Bakery Style Chicken Mayo Sandwiches Recipe

    Bakery Style Chicken Mayo Sandwiches Recipe

    Looking for an amazing, delicious and cheap Tea Party recipe for a busy day? Then look no further, these Bakery Style Chicken Mayo sandwiches takes about 15 minutes prep work and it’s flavor is phenomenal.

    Bakery Style Chicken Mayo Sandwiches Recipe

    Bakery Style Chicken Mayo Sandwiches

    Just 4 ingredients and 15 minutes is all it takes to make these Bakery Style Chicken Mayonnaise Sandwiches. The crowd will go crazy over them at your next get together!

    Bakery Style Chicken Mayo Sandwiches

    Bakery Style Chicken Mayo Sandwiches

    These Bakery Style Chicken Mayo sandwiches are loaded with shredded chicken, mayonnaise, lettuce and simple seasoning. Lettuce leaves are optional but I’d say it’s a must, it perfectly compliments all the flavors of the chicken.

    Serve this sandwich with a side of french fries, roasted potatoes and you’ve get a dinner that couldn’t get any simpler. Enjoy!

    Bakery Style Chicken Mayo Sandwiches recipe

    Bakery Style Chicken Mayo Sandwiches

    Chicken sandwiches are eternally popular and often the first item to disappear when handed around. The key is well-toasted bread, which prevents any filling from soaking in and making the bread soggy. 

    Bakery Style Chicken Mayo Sandwiches recipe

    Bakery Style Chicken Mayo Sandwiches

    Very handy and easy to make, these sandwiches are just perfect for picnic, tea time snack, lunch box etc. If you have a tea party at your home and your friends are invited. You can make quick and easy bakery style sandwiches by following this recipe.

    Make it, enjoy the deliciousness and 
    serve it to your family with love

    Bismisllah Let’s Get This Started !

    Bakery Style Chicken Mayo Sandwiches Recipe with Step by Step Pictures

    Ingredients You will Need:

    • 4 bread slices
    • 1/2 cup boiled Chicken, (shredded)
    • 2 lettuce leaves, (optional)
    • 4 tablespoon mayonnaise
    • salt and pepper to taste

    How to make Bakery Style Chicken Mayo Sandwiches

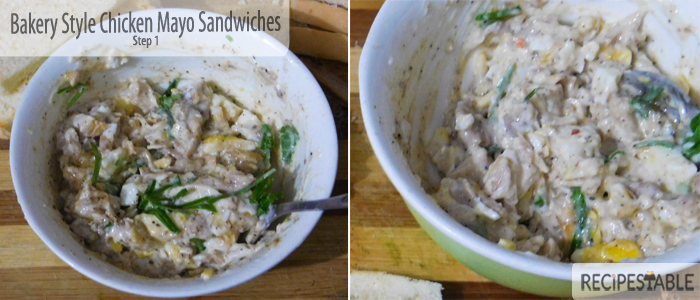
    Step 1: Place shredded chicken in a large bowl. Now add the mayonnaise bit by bit, depending on the consistency you like. Add the lettuce leaves (if using) and season with salt and pepper. Stuffing is ready.

    Bakery Style Chicken Mayo Sandwiches Recipe: Step 1

    Step 2: Toast bread slices and cut out their edges if you want otherwise you can use as it is.

    Bakery Style Chicken Mayo Sandwiches Recipe: Step 2

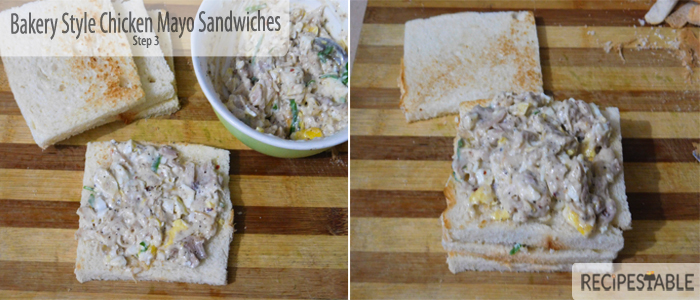
    Step 3:Place a slice bread in a clean-surface and spread the chicken mayo filling on it. Cover the Bread with another piece of the toasted Bread and repeat three layers. Lightly press to complete the sandwich.

    Bakery Style Chicken Mayo Sandwiches Recipe: Step 3

    Step 4:  Now cut the sandwich diagonally and following the same process prepare rest of the Sandwiches.

    Bakery Style Chicken Mayo Sandwiches Recipe: Step 4

    Give it a try and You have bakery-style Chicken mayo sandwiches that will mystify your friends and family as to how you made them. Go you.

    Check it out the Bakery Style Chicken Mayo Sandwiches recipe and printable version here!!

    Bakery Style Chicken Mayo Sandwiches

    Prep Time 10 minutes
    Cook Time 2 minutes
    Total Time 12 minutes
    Servings 2
    Author Bushra Waheed

    Ingredients

    • 4 bread slices
    • 1/2 cup boiled Chicken (shredded)
    • 2 lettuce leaves
    • 4 tablespoon mayonnaise
    • salt and pepper to taste

    Instructions

    • In a large bowl, combine together the shredded chicken and mayonnaise.
    • Now add lettuce leaves.
    • Season with salt and pepper.
    • Mix until well combined.
    • Toast bread slices and cut out their edges if you want otherwise you can use as it is.
    • Place a slice bread in a clean-surface and spread the chicken mayo filling on it.
    • After filling, take another bread slice and put it on the above of filling.
    • Repeat again and make three layers withit.
    • After that, put the forth one slice of bread on the third layer of filling and lightly press to complete the sandwich.
    • Now Secure with wooden picks and cut the sandwich diagonally and following the same process prepare rest of the Sandwiches.
    • Your Bakery Style Chicken Mayonnaise sandwiches are ready to serve. ENJOY!!

    Notes

    Serving Suggestions:
    You can serve with french fries and your favorite dipping sauce.

    Extra Bonus Tips :

    1. This is a good recipe to use the left over Rotisserie or boiled chicken.
    2. It’s very good for outdoor entertaining and picnics.
    3. You can make the filling hours or even a day before and assemble it when needed.
    4.  If making ahead of time, cover with a damp tea towel to ensure they don’t dry out. I have sprinkled a mint leaves over the sandwiches, but this is only for garnish(you can skip it).

    Put your own spin on it. And lemme know how it turns out. Post a photo on Facebook (Recipestable) or  on Twitter so I can see how lovely yours turn out.

    Happy Cooking

    Pin it for Later:

    Bakery Style Chicken Mayo Sandwiches Pinterest
    Pin it for Later

    ATTENTION: All photos and content are copyright protected. Please do not use our photos without prior written permission. If you wish to republish this recipe, please rewrite the recipe in your own unique words and link back to Bakery Style Chicken Sandwiches Recipe on Recipestable. Thank you!

  • The Easiest Bread Pizza Recipe

    The Easiest Bread Pizza Recipe

    No time to make your own dough? Same here. Skip the homemade crust for easy, cheesy love in 10 minutes. Use bread slices for the crust and have dinner ready in no time. Loaded with great taste and ready in under 15 minutes start-to-finish, it’s sure to become a family favorite! A fun and flexible recipe you’re sure to make over and over again!

    The Easiest Bread Pizza Recipe
    Just try saying no to that

    The Easiest Bread Pizza

    I could eat pizza all day, every day. But I don’t always have the time to make my own crust. Delivery adds up, and store bought crusts tend to be pretty low quality. That’s where this bread pizza recipe comes in. It isn’t even so much of a recipe, per se, but a guideline for happiness.

    The Easiest Bread Pizza Recipe

    I love it for many reasons.

    1. First, it fits the quick and easy bill beautifully. Simply places the bread slices, brush with butter, and give it a little broil to create that crunchy-on-the-outside but soft-and-chewy-on-the-inside texture that’s so wonderful in this easiest bread pizza. Then slather on some prepared sauce, load on the toppings, and give it all a quick 6 to 8 minute bake in the oven. Done. Add a side salad or some fresh fruit, and dinner’s served.
    2. Second, it tastes delicious. Before piling on the toppings, the bread itself is seasoned with garlic powder and oregano for a little added flavor touch. And then with the classic “supreme” combination of toppings, how could it not be tasty, right?
    3. Third, it’s versatile. Change up the toppings to suit any personal tastes. Don’t like veggies? No problem … leave them off. Want more cheese? Great! … load it up. Or hey, get totally crazy and prepare each bread toast differently … perhaps Supreme for one slice, and just pepperoni and cheese for the other. Or, if you like more unique pizza flavor combinations, give My Favorite French Bread Pizza a whirl.
    4. Fourth, it reheats well. If you don’t mind soft bread all around, a quick zap in the microwave works great. For that classic bread pizza touch-of-crunch, pop the pizza back in a preheated oven for just a couple of minutes and you’re good to go.
    5. And fifth, The Easiest Bread Pizza isn’t just great for a quick and easy dinner, it’s always fabulous for game-day {or any day} snacking, too. Bake some up and slice into fingers for a tasty treat while you’re cheering on your favorite team.
    The Easiest Bread Pizza
    The Easiest Bread Pizza

    Bread pizza is one of the quickest & easiest snacks that you can make with minimal ingredients. All you need is of course some bread slices, veggies of your choice, pizza sauce, cheese, leftover chicken, and some seasoning. Easy right?

    To make the bread pizza healthier use whole wheat breads or any bread that you fancy. Garlic bread would taste great too. 

    The Easiest Bread Pizza recipe
    The Easiest Bread Pizza

    There are a few tricks to making this bread pizza taste its best. First, you’ll want to toast the bread for about 5 minutes by itself to crisp it up a bit. Then you’ll add the pizza sauce , cheese (a good melty mozzarella) and your favorite toppings (I liked veggie version, but you can add leftover tikka, seekh kebabs,  cooked mince, mushrooms etc choices are endless ) before returning it to the oven to get the cheese melty and the pizza glistening.

    And that’s all there is to it! This is great recipe to make with your kids or better yet, let your kids make themselves.

    So easy, so yummy!

    The Easiest Bread Pizza recipe
    The Easiest Bread Pizza

    Allow to cool for a few minutes, slice and enjoy!

    For dinner, I’ll serve it alongside a big salad. For lunch, I usually put out veggies and hummus to go with it. And for an ea  snack, I cut each toast into fourths and serve it with fruit. They’re easy to make, easy to eat and easy to clean up after. YES!!

    Check it out the The Easiest Bread Pizza recipe and printable version here!!

    Happy Baking!!

    Pin it For Later: 

    The Easiest Bread Pizza Recipe
    The Easiest Bread Pizza Recipe _ Pin it For Later

    I have also posted The Easiest Naan Pizza  and Pizza Sandwiches  which are another easiest & tastiest version of making Pizza at home. Do check it out as well.  It’s finger lickin’ good. You’ll be coming back for more. 


    Put your own spin on it. And lemme know how it turns out. Post a photo on Facebook (Recipestable) or  on Twitter so I can see how lovely yours turn out.

  • Fat Free Chicken Karahi Recipe

    Fat Free Chicken Karahi Recipe

    Starting a healthier diet can be easier than you think. But what happens when you start to get bored with the healthy foods you are eating?  Chicken Karahi in a hurry is a winner for everyone in our house. We all get to enjoy some delicious comfort food and I don’t have to spend long in the kitchen to make it. Hurrah! 


    Today I’am going to share a Clean eating Version of Chicken Karahi. It is very delicious and easy to make. A lighter and healthier version of the Pakistani Chicken Karahi, this tomato-based curry is packed with extra fragrant spices and creamy yogurt. Yummilicious treat that will have you wanting to savor every last bite! 
    Clean Eating Chicken Karahi Recipe
    Clean Eating Chicken Karahi
     If you are following a weight loss plan then take your taste buds on an exotic ride with this Fat Free chicken karahi recipe. This delicious Clean Eating Chicken Karahi recipe will keep you satisfied and still help you lose weight. This recipe is low fat, low sodium, and a good source of protein. 

    I have also posted Salmon Fish Fry recipe  which is another easiest & tastiest Clean Eating version of making Fried Fish. Do check it out as well.


    Put your own spin on it. And lemme know how it turns out. Post a photo on Facebook (Recipestable) or on Twitter so I can see how lovely yours turn out.

    Happy Clean Eating!!


  • Italian Herb Crusted Cheese Pizza Recipe

    Italian Herb Crusted Cheese Pizza Recipe

    Let’s Make Pizza Night Fun!

    After a whole month of no blogging, no cooking and baking I’m back in the biz with this star of a recipe – “Italian Herb Crusted Cheese Pizza!”

    I was extremely busy with my mid terms exams and eid shopping, so I couldn’t get a chance to publish new posts on my blog. Exams were taking priority sadly. But from now till eid, I’ll be try to more regular (InshaAllah)!

    I’m a lover of Italian food and fresh herbs and my family loves pizza in all forms. One of our favorite family meals is homemade pizza. We make regular Homemade pizza, Pan pizza, Pizza Cups, Pizza Rolls, Pizza sandwiches , Pizza Paratha and Pizza fries. One thing we love about it is that you can get really creative with toppings and today’s recipe is one of my recent (and favorite) creations –Italian Herb Crusted Cheese Pizza.

     Italian Herb Crusted Cheese Pizza recipe
    Photo: Italian Herb Crusted Cheese Pizza

    Can you say “Delicioso?”  OMG, this pizza did not disappoint!   This, to me, is the perfect Italian Flavored pizza. The crust is light and crispy. The sauce is thick and tomato-y. The fresh mozzarella is mild and cheesy. The basil leaves are bright and fresh and the herb aroma is amazing. When I bit in and my mouth filled with saucy, cheesy, herby goodness I’m pretty sure I had a pizzagasm.  The cheese melted perfectly into the crust , the flavors being even more dramatic where it had browned into that crunchy, cheesy topping. 

     Italian Herb Crusted Cheese Pizza
    Photo: Italian Herb Crusted Cheese Pizza

    I love eating food where in each bite you get something a little bit different, it makes it all the more interesting and enjoyable to eat and this pizza definitely delivers that… I like the basil leaves to be baked along with the pizza, but you can sprinkle them on top after baking if you prefer them uncooked. This recipe can be done with little effort, but it has a big impact on your taste buds and entire dinner experience.

    Italian Herb Crusted Cheese Pizza recipe
    Photo: Italian Herb Crusted Cheese Pizza

    For this pizza I decided to use the pre-made homemade pizza dough, but feel free to make your own from scratch. It’s very straightforward to make and if you don’t fancy making your own pizza base then you could simply add the toppings to a store bought pizza crust. I always brush my pizza dough with olive oil and herb seasoning to make it even more delicious!
    While my pizza dough was rising in the pan, I prepared the pizza toppings. The pizza crust bakes for about 10-15 minutes in a 200 degree oven (or until crispy and light brown and cheese is melted). The secret to a good Sicilian crust is a nice coating of olive oil on the pan. That helps crisp up the bottom of the crust. A very hot oven is also crucial. The hard part is waiting for this oh so delicious pizza! The wait is definitely worth it, because you are rewarded with an amazingly delicious pizza.

    Photo: Italian Herb Crusted Cheese Pizza
    Photo: Italian Herb Crusted Cheese Pizza

    I’m thinking cheesy flatbread for my next attempt!

    Bismillah, let’s get started!!

    Check it out the Chicken Shashlik Sticks recipe and printable version here!!

    If you make this recipe, be sure to snap a photo and hashtag it #Recipestable & #TastyRecipesbyBushrah. I’d love to see what you cook!

    Happy Pizza Making!!

  • Full-of-Herbs Fish Cakes Recipe

    Full-of-Herbs Fish Cakes Recipe

    Who says making fish cakes is tedious?
    Who says you need some clever work?

    Today, I am going to share My favorite ‘Full-of-Herbs Fish Cakes recipe’ with all of you!!

    Fish cakes are real comfort food and so easy to make with some leftover fish(you can use salmon, tuna cod or haddock etc). Delicious, family-friendly Full-of-Herbs Fish Cakes. Perfect for a quick and healthy dinner.

    Full-of-Herbs Fish Cakes
    Full-of-Herbs Fish Cakes

    Yes, its so easy to make!!
    The process is done in less than 15 minutes with a food processor, plus some manual work.. stirring and forming patties and frying.
    That’s all. 

    Full-of-Herbs Fish Cakes
    Full-of-Herbs Fish Cakes

    This is a full-of herbs fish cakes indeed! The herbs ; dill, coriander, basil, parsley and ginger. The herb mixture is so fragrant, the basil leaves gave a wonderful aroma that no other herbs can give, do not leave it out. I have always used fresh basil leaves for my cooking, a common ingredient over here in my Kitchen. Basil leaves are so fragrant. And I do have many pots of basil plants in my potted garden.

    Full-of-Herbs Fish Cakes
    Full-of-Herbs Fish Cakes

    White-fleshed fish meat (boneless and skinless, I’ve used sole) are cut to chunks and process briefly in the food processor just so they are broken into small pieces. They are then added to the herb mixture, along with chopped green onion, half an egg, cornflour, ground coriander, sauce, lemon zest, and salt. Shape into cakes, flatten a little, and fry in hot oil on both sides until cooked through. Fish meat cooked pretty quickly, So I have cooked the fish cakes on the stove over medium-low heat on both sides, turning them over a couple of times until they are cooked through.

    Full-of-Herbs Fish Cakes
    Full-of-Herbs Fish Cakes: they get a high score on the flavour front.

    Bright, bold and richly flavored, these are not your typical fish cakes. There are a lot of herbs and various other aromatics in these fish cakes, which gets them a high score on the flavour front. That flavor is layered into every step: the fish is mixed with green onions along with vibrant herbs and fragrant lemon zest. If you use less, they will still taste pretty good, and the fish will stand out more. These quantities make 12-16 cakes (depending on size), or enough for four as a first course; or serve as a main with a substantial salad and some good crusty bread.  Serve these crisp-edged cakes with a dollop of garlic mayonnaise — or mayonnaise spiked with garlic sauce or preserved lemons.

    Full-of-Herbs Fish Cakes
    Full-of-Herbs Fish Cakes

    Fish cakes are an economical way of making fish go further. You can, if necessary, replace some of the fish by adding some mashed potatoes but check the seasoning carefully to make sure the finished cakes don’t taste too bland. The addition of herbs gives flavour and also produces attractive green flecks.

    Full-of-Herbs Fish Cakes
    Full-of-Herbs Fish Cakes

    Very tasty and really fragrant from the basil leaves. These fish cakes taste the best when hot (as recommended in the recipe), as when they cool down to room temperature, they do get a little fishy! I ate these with some green salad as part of my dinner dish.

    Extra-Bonus Tip:

    1. You can fry, bake or grill them.
    2. Food processor might smell for sometime. You can remove the smell bu pulsing the food processor with vinegar or lemon juice mixed with some very warm water, and put it out to dry properly.

    If you make this recipe, be sure to snap a photo and hashtag it #Recipestable. I’d love to see what you cook!


    What are your holiday traditions guys? I would love to hear some from you all. Are there recipes passed down to you from your grand mom? Or the one from many generations? Share them all in comments below.

    Happy Cooking!!

  • Super Easy, Super Moist Chocolate Cupcakes Recipe

    Super Easy, Super Moist Chocolate Cupcakes Recipe

    Like the title says, these are the ‘Super Easy,Super Moist Chocolate Cupcakes’. They are perfectly moist and insanely chocolaty, topped with More Chocolate Ganache & Coconut. Royal Treat ♥

    Super Moist Chocolate Cupcakes recipe
    Photo: Super Moist Chocolate Cupcakes

    Looking for the perfect recipe can be exhausting because there are just so many out there. I’ve tried countless cupcakes over the years, but this is my top favorite recipe. I know we all have different preferences when it comes to our taste buds, but I honestly don’t think you can go wrong with this.

    The absolute best recipe to make Chocolate Cupcakes that are super easy, super moist, chocolaty and really delicious. If chocolate is what makes you go weak in the knees, then these are for you. This one is a must try for all Chocolate Lovers out there.

     Super Moist Chocolate Cupcakes
    Photo: Super Moist Chocolate Cupcakes
     
    Super easy, Super Moist Chocolate Cupcakes
    Super easy, Super Moist Chocolate Cupcakes
     
    Super easy, Super Moist Chocolate Cupcakes
    Super easy, Super Moist Chocolate Cupcakes

    One of the great things about this happy little dessert is that it doesn’t take long to make and it doesn’t break the bank!  Not only is the dessert met with smiles and giggles, it’s an easy and inexpensive way to make everyone at the table happy!  And making everyone happy is what its all about.

    Super easy, Super Moist Chocolate Cupcakes
    Super easy, Super Moist Chocolate Cupcakes

    I made the Chocolate Coffee ganache with hot cream, good quality chocolate, butter and coffee extract. The higher the quality of chocolate used, the better the flavor and texture your ganache will have in the end. Coffee and coffee extract enhances the flavor of chocolate. It enhances the chocolate, and brings out the flavors in the chocolate while adding richness to the taste. I love to add coffee to all of my chocolate cakes. Some things are classics.I put chocolate cupcakes in that category. Pillows of rich chocolate cake. Top with chocolate ganache.

    Super easy, Super Moist Chocolate Cupcakes
     Pillows of rich chocolate cake. Top with chocolate ganache.

    Check it out the Super Easy, Super Moist Chocolate Cupcakes recipe and printable version here!!

    Extra Bonus Tips:

    1. If you would like to add coffee to the recipe, either add 1 teaspoon espresso powder or instant coffee granules along with the sifted dry ingredients, or replace the water with room temperature brewed coffee.
    2. Please make sure that you bake these for 20 minutes and not more. Baking timing is the most crucial thing for any cake recipe. A few minutes over and you’ll have a hard rock in the name of muffin. So keep checking!
    3. And yes..no peeking and opening the oven door for the first 15 minutes at  least.
    4. Cupcakes are best the same day they’re made, but can be kept in an airtight container at room temperature for up to 3 days.
    5. Un-frosted cupcakes can be kept in the freezer for up to 2 months. Thaw, still covered, on the counter or overnight in the fridge.

    I have also posted Vanilla Cupcakes with Chocolate Frosting recipe which is another easiest & tastiest version of making cupcakes home. Do check it out as well.  It’s finger lickin’ good. You’ll be coming back for more. 


    Put your own spin on it. And lemme know how it turns out. Post a photo on Facebook (Recipestable) or  on Twitter so I can see how lovely yours turn out.


    Happy Cupcakes Making!!

    ATTENTION: All photos and content are copyright protected. Please do not use our photos without prior written permission. If you wish to republish this recipe, please rewrite the recipe in your own unique words and link back to Super Easy, Super Moist Chocolate Cupcakes on Recipestable. Thank you!

  • Chicken Shashlik Sticks Recipe

    Chicken Shashlik Sticks Recipe

     Delicious, tender, juicy Chicken Shashlik Sticks the whole family loves in less than 40 minutes! These Shashlik Sticks are EASY to make and so versatile.

    Chicken Shashlik Sticks Recipe
    Photo: Chicken Shashlik Sticks

    Chicken Shashlik Sticks

    When a friend blogger posted Chicken Shashlik Sticks recipe on Instagram AND I saw it pinned on Pinterest on the same day, I knew it was a sign that I had to make this. The pictures looked so good, and the recipe seemed too easy to be true (spoiler alert, it isn’t!). So I added it to my weekly meal plan. I finally got a chance to make it yesterday, and I am praising the convenience and tastiness of this dish.

    This is an easy recipe for Tender & Juicy Chicken Shashlik Sticks. The shashlik sticks were loaded with tender pieces of chicken between juicy tomato chunks, sweet peppers and flavorful onions. The chicken was marinated in a sweet and tangy sauce before firing and the sticks were brushed with the leftover marination while they were being cooked. What a great combination of flavors!

    Chicken Shashlik Sticks recipe
    Photo: Chicken Shashlik Sticks

    Remove from the grill or griddle and serve immediately. The combination of the juicy chicken bites and colorful veggies with the Shashlik sauce is fantastic! I loved how juicy they turned out.

    Check it out the Chicken Shashlik Sticks recipe and printable version here!!

    Extra-Bonus Tip: 

    Make sure you don’t use too big of pieces of chicken because you want everything to cook evenly. I have had one too many (okay, two total- but still that is more than necessary) meals ruined because my chicken wasn’t all the way cooked. 


    I have also posted Pineapple Chicken Tenders and Light Chicken Kabobs recipes which are another easiest & tastiest version of making Pasta home. Do check it out as well.  It’s finger lickin’ good. You’ll be coming back for more. 


    Put your own spin on it. And lemme know how it turns out. Post a photo on Facebook (Recipestable) or  on Twitter so I can see how lovely yours turn out.


    Happy Dinner Making!!

  • Vanilla Cupcakes with Chocolate Frosting Recipe

    Vanilla Cupcakes with Chocolate Frosting Recipe

    Happy Monday everyone.

    I hope everyone has a beautiful, positive and productive week. Today starts a new chapter in my life, ‘Uni started again’. Hopefully, I’ll try to update the blog more regularly. (InshaAllah) 

    Vanilla Cupcakes with Chocolate Frosting
    Vanilla Cupcakes with Chocolate Frosting

    Do you find ways to celebrate everyday occasions like me? 

    Let’s Celebrate This Special Day with Vanilla Cupcakes!

    Cupcakes are an easy way to make an beautiful yet tasty dessert without much effort. Today I’m sharing one of my favorite Vanilla Cupcakes recipe. I love this recipe because it includes butter milk to make it lighter and fluffier. The best ever recipe that makes the moistest cupcakes and perfect chocolate on top of it! This recipe is perfect for the upcoming holiday summer season and is sure to become a favorite.

    Vanilla Cupcakes with Chocolate Frosting
    Vanilla Cupcakes with Chocolate Frosting

    I actually made these a long time back but never really got around to editing the pictures which is why I didn’t post them. They look super pretty and I wanted them to look like it in the pictures so I took my time with them.

    Vanilla Cupcakes with Chocolate Frosting
    Vanilla Cupcakes

    These cupcakes are plain vanilla flavored (which is very difficult to get right) and are so moist that they’ll actually dissolve in your mouth the minute you take a bite. Pillowy soft, these cupcakes are topped with favorite chocolate frosting made with unsalted butter and whipping cream which gives it that perfect flavour without making it heavy. 

    Vanilla Cupcakes with Chocolate Frosting
    Vanilla Cupcakes with Chocolate Frosting

    Having a staple recipe is so handy, and this one is great with other flavours added. The frosting.. well it’s a whole other thing! It is divine, and rich, and well, perfect to go with anything.

    Check it out the Vanilla Cupcakes with Chocolate Frosting recipe and printable version here!!

    Extra-Bonus Tip:

    Dark chocolate lovers, be sure to use bittersweet chocolate.


    I have also posted Extra Easy Cupcakes recipe which are another easiest & tastiest version of making cupcakes home. Do check it out as well.  It’s finger lickin’ good. You’ll be coming back for more. 


    Put your own spin on it. And lemme know how it turns out. Post a photo on Facebook (Recipestable) or  on Twitter so I can see how lovely yours turn out.


    Happy Cupcakes Making!!


  • Veggie Pizza Cups Recipe

    Veggie Pizza Cups Recipe

    As a child I was not the veggie lover I am today.When my mommy cooked veggies, I was apprehensive. Vegetables? Ew! A few years have passed since then and I love veggies of all shapes and sizes.  

    This weekend, I had a day off and I decided to cook nothing but finger foods. I knew I wanted veggie pizza, but I wanted something more convenient and easier to eat. I have found that when I make veggie pizza in the flat pizza style, it can be a little messy to eat because the toppings want to fall off. So, I did a quick Youtube search and found the recipe I used as inspiration for my Veggie Pizza Cups.

    Veggie Pizza Cups

    Veggie Pizza Cups recipe
    Photo: Veggie Pizza Cups

    Ramadan is coming and with it comes family get-together’s and parties. And if you need an easy to make appetizer recipe for your next party, then you should try this Veggie Pizza Cups. There’s no reason for buying store made appetizers when they’re so easy to make, fun & cheap and are guaranteed to be a hit at your next party. Don’t slave away in the kitchen when you could be enjoying the party!

     Veggie Pizza Cups recipe

    The idea may seem daunting at first but I hope by now I’ve got you well acquainted with handling different types of pizza’s. Be it: my The Perfect pizza dough recipe used to make not just this beautiful Baby Chicken Bread but also these cute little Mini Pizza Cups. Or this super easy and frugal recipe for Pizza Paratha. And how can we forget, my all-time favorite, the soft puffy Pizza Rolls …O’so good!

     Veggie Pizza Cups recipe
    Cute little Veggie Pizza Cups in Oven

    It’s one of my favorite finger food. It’s amazing that just a few basic ingredients can come together into something so delicious.  For topping, I decided to use mixed veggies (corn, carrot, capsicum, green onion) and mushrooms in these because they’re my favorites veggies, but you could easily mix it up and use any toppings you like. I really do recommend making it as listed though, because these were just perfect. It tastes just like you’re eating a slice of pizza! Don’t skip out on the Italian Seasoning either – I think it adds a lot of flavor.

    They tasted delicious and impressed my family without making a mess. I will definitely be making them again this holiday season.

     Veggie Pizza Cups recipe
    Photo: These bite-sized Veggie Pizza Cups are perfect for picky eaters.

    These Veggie Pizza Cups can be used for appetizers, party snacks, a light lunch, the first course of a dinner. Perfect party for picky eaters.

    It would freeze well if you decided to double the batch. Enjoy 🙂

    Check it out the Veggie Pizza Cups recipe and printable version here!!

    I do hope that your plans for this holiday weekend teeter more to the side of savoring than that of to-doing.


    If you make this recipe, be sure to snap a photo and hashtag it #Recipestable. I’d love to see what you cook!

    Happy Cooking!!

  • Homemade Lamb Burgers with Coleslaw Recipe

    Homemade Lamb Burgers with Coleslaw Recipe

    This homemade Lamb Burgers recipe is so quick and simple to make, with just few ingredients. You won’t want to buy ready-made ever again!

    Homemade Lamb Burgers

    Homemade Lamb Burgers

     Lamb burgers are a wonderful alternative to beef burgers and are incredibly easy to make and the spicy rub gives full-on Asian flavour. They can be served with homemade coleslaw, oven-baked Potato Wedges or with a delicious Homemade Hummus.

     Homemade Lamb Burgers recipe
    Photo: Homemade Lamb Burgers

    The lamb, however lean, is rich, packed with protein and nutrients and earthy in flavor. Lamb and herbs are both champions of spring and when combined into a burger and met with a hot grill or pan it marks the intersection of spring and summer.

    Homemade Lamb Burgers recipe
    Photo: Homemade Lamb Burgers

    The burger is simply adorned with creamy cabbage coleslaw, and a tomato seared over the grill to encourage sweetness and to create a texture that melts into the burger. This is the sort of burger that calls for a soft bun; a brioche or potato roll are both great contenders.

    These burgers do not fall apart. However, if you want them more dense and hard you can use organic cornstarch. Buy organic to stay away from nasty GMOs.

    Homemade Lamb Burgers recipe
    Photo: Homemade Lamb Burgers

    This recipe is really quite simple and can easily be doubled or tripled to feed a crowd. Use whatever mix of fresh herbs you have on hand keeping to mostly the light leafy ones like mint (lamb LOVES mint) parsley, chives, dill, basil, etc. The lamb mince gives these burgers an excellent texture, but the recipe works equally well with minced beef or chicken, turkey.

     Homemade Lamb Burgers recipe
    Photo: Homemade Lamb Burgers

    It actually doubles as the perfect party food because you can prepare and cook the burgers and coleslaw in advance and just heat them up and prepare the burger buns when needed so you spend more time with guests rather than in the kitchen. IMPRESS guests at your barbecue with these succulent Homemade Lamb burgers, also perfect for simple suppers.

    Homemade Lamb Burgers recipe
    Photo: Homemade Lamb Burgers

    Some Tips to make The Tasty Homemade Lamb Burgers

    I’ve added the full recipe below. However here are a few tips…

    1. Keep it simple – There are lots of recipes out there that add all sorts to the burgers. In my opinion it’s just not necessary. I use just few simple ingredients – lamb mince, herb seasoning (my fav seasoning), little cheese, egg and bread crumbs.
    2. That said, once you can make a great basic burger than why not start having a play with flavorings, you can add all sorts of herbs and spices. I even sometimes go for a hidden cheesy center!
    3. Don’t go too lean with your mince. There’s a bit of olive oil added to meat to tenderize and add in a bit of fat. I love the how lean lamb is but for the grill a bit of fat helps to ensure the burgers stay tender and juicy.
    4. In all my other recipes with mince I use extra lean so cut down on the fat. However, when you’re making something so simple a little extra fat tastes better.
    5. The better the mince the better the burger. These burgers are simple lamb mince with herbs to enhance the flavour. If you buy rubbish mince then there’s no disguising it with other ingredients.
    6. Don’t play around with it while it’s cooking. The more you play with it, the more of the juices will flow out and it’ll make your burger drier.

    Check it out the Homemade Lamb Burger with Coleslaw recipe and printable version here!!

    Homemade Lamb Burger Recipe

    For anyone who really likes burgers, try this recipe, you will love these Lamb Burgers, the perfect, protein-packed meal.Lamb burgers make a great change from beef and the spicy rub gives full-on Asian flavour And they’re reliably tender and juicy, even when cooked to well done.
    Prep Time 10 minutes
    Cook Time 20 minutes
    Total Time 30 minutes
    Servings 4
    Author Bushra Waheed

    Ingredients

    For The Burger Patties

    • 500 gm minced lamb
    • 1 small onion minced
    • 1 egg lightly beaten
    • 1 tablespoon tomato ketchup
    • 2 tablspoon choped mint leaves
    • 2 tablespoon chopped freshly parlsey
    • 1/4 cup grated cheddar cheese optional
    • 1/4 cup bread crumbs
    • a pinch Black Pepper
    • 1 teaspoon dried basil
    • 1/2 teaspoon crushed red chili
    • salt to taste
    • 2 teaspoon olive oil

    For The Burger

    • 4 burger buns
    • 1 cup coleslaw salad
    • few tomato slices
    • salad leaves

    For Coleslaw

    • 1 cup shredded cabbage
    • 1/2 cup mayonnaise
    • 1 small carrot grated
    • 1 teaspoon white sugar
    • a pinch of salt and pepper

    Instructions

    To make Coleslaw

    • Make coleslaw by combining all the ingredients in a mixing bowl.
    • Mix until well combined.
    • Top with fresh mint leaves to add a delicious flavour to your lamb burgers.

    To Make Lamb Burgers

    • Preheat the oven to 200 degree C.
    • Lightly grease a baking tray with olive oil.
    • For the dry rub, pound all the ingredients in a pestle and mortar until combined.
    • Take it out in a mixing bowl and divide the minced mixture into 4 pieces.
    • Pat each piece into a ball then squash into a burger, about 1.5 cm thick.
    • Place the burgers on the greased baking tray. Drizzle some olive oil over the burger patties and cook in the oven for 20 to 30 minutes, depending on how well you like your burgers done.
    • You can cook burgers on your barbecue grill or in a griddle pan for 6 to 7 minutes each side, or until done to your liking.
    • Don’t worry if you think they look burnt, that’s just a combination of the spices, the caramelising lamb fat and the smoke.
    • When the burgers are nearly ready, toast the buns on the side of the barbecue or griddle pan.
    • To serve, spread some coleslaw on the toasted buns, top with the burger patties, tomato and olives and squash them into the buns. Enjoy!!

    Notes

    Serving Suggestions:
    Serve this really tasty, easy homemade burger recipe with your favorite toppings.
    Extra-Bonus Tips:
    For the salad, place the lettuce leaves, mint and edible flowers in a bowl, dress with the lemon juice and extra virgin olive oil and tap over the pomegranate seeds to add little capsules of sweetness. Delicious!

     I do hope that your plans for this holiday weekend teeter more to the side of savoring than that of to-doing.


    If you make this recipe, be sure to snap a photo and hashtag it #Recipestable. I’d love to see what you cook!

    Happy Cooking!!

  • Leftover Mashed Potato Pancakes Recipe

    Leftover Mashed Potato Pancakes Recipe

    An essential part of the culinary heritage of Pakistan is the celebration of food with family and friends embedded in the concept of ‘dawat’ (feast). And anyone who hosts a ‘dawat’ (feast) knows that there’s always leftovers to deal with. As delicious as Pakistani Dawats (feast) are, you can only have so much roasted meat and stuffing for a meal. Instead of having the same food for the next day, transform the dishes into new ones!

    Leftover Mashed Potato Pancakes

    Last week, we hosted a ‘Family Dinner’ and made the ‘Roasted Chicken with Mashed Potatoes. We usually use leftover roasted meat for a sandwich or rolls with the apricot or mint chutney (sauce), gravy and stuffing, but what about the mashed potatoes? Add some flour, egg and cheese and turn them into mashed potato pancakes! Great for breakfast, lunch, or as a side dish or light dinner . A Perfect way to enjoy leftover potatoes and the flavor combinations are endless!

    Leftover Mashed Potato Pancakes recipe
    A Perfect way to enjoy leftover potatoes and the flavor combinations are endless!

    I love making these Potato Pancakes whenever I have leftover mashed potatoes so I don’t feel like I’m eating the same thing the next day. Serving size will change depending on how much mashed potatoes you have leftover. This works best with cold mashed potatoes.

    Leftover Mashed Potato Pancakes recipe
    Photo: Leftover Mashed Potato Pancakes

    These are as easy to make as normal pancakes – just mix together the mashed potatoes, flour, eggs, cheese, green onions and seasoning. Then cook the batter in a large pan until golden brown.

    Leftover Mashed Potato Pancakes
    Leftover Mashed Potato Pancakes

    With their crispy exterior and creamy, cheesy center, there’s not much to dislike here. I recommend topping these with a sour cream or garlic mayo. 

    Leftover Mashed Potato Pancakes recipe
    Leftover Mashed Potato Pancakes

    You can really get creative with the seasonings and add ins in this easy recipe!  Pretty much anything in your fridge is game… add some spices & herbs, a little bit of meat/protein and whatever veggies you have on hand!

    Remember to revel in your own amazingness for reducing food waste, saving time and making the best breakfast ever 🙂

    Check it out the Leftover Mashed Potato Pancakes recipe and printable version here!!

    If you make this recipe, be sure to snap a photo and hashtag it #Recipestable. I’d love to see what you cook!


    What are your holiday traditions guys? I would love to hear some from you all. Are there recipes passed down to you from your grand mom? Or the one from many generations? Share them all in comments below.

    Happy Cooking!!

  • The Best and Easiest Spaghetti Meatballs Recipe

    The Best and Easiest Spaghetti Meatballs Recipe

    How are you all doing? Did anything exciting happen lately? I am sorry for my absence, life has kept me, but I have a free few days a head of me to be around more.

    Let’s Start Today’s Post with some Food for the Soul  

    “Expectation is the root of all heartache”.  _William Shakespeare

    quote

    I guess I need not say much about the quote I am sharing with all of you today. I am a person of high expectations – despite trying to develop myself into a better person and having reduced my level of expectation from all around me, I have not reached the level where I would have zero expectation.

    I guess it is not human to reach that kind of a stage, but still I would love to reach a stage where my expectations are so low that it does not guarantee any heartbreaks if things don’t happen just like how I want it to be. I really don’t know whether I will ever reach that situation but yes, I am trying…

    It’s Getting Cold . Now Let’s Have Some Food Talk To Warm & Nourish Our Soul!!

    Today’s Recipe: Spaghetti Meatballs

    What’s better than a warm fire and a big bowl of comfort food on a cold winter night?  Today I want to share a recipe that feels, to me, like the closest you can get to “comfort food” during Whole 30.

    The Best and Easiest Spaghetti Meatballs
    Can’t stop, won’t stop with the Comfort Food recipes this winter. ♡

    For a bowl of Italian comfort, Make my best & Easiest Spaghetti Meatballs! It only takes 35 minutes to make this delicious family favorite, all from scratch, and I promise you will never have leftovers. While the spaghetti sauce cooks, you’ll make the meatballs and while the meatballs cook, you’ll boil your pasta. Makes 16 meatballs, two per person. I made these meatballs with chicken mince , but you can use whatever ground meat you’d like to use, actually(beef, lamb, turkey). They are super soft, tender  and juicy because they cook right in the sauce and I used fresh bread crumbs and not dried ones.The sauce is my Homemade Italian Tomato Sauce and I just add the meatballs (& spaghetti) to make this a complete meal… but don’t forget the salad.

    The Best and Easiest Spaghetti Meatballs
    The Best and Easiest Spaghetti Meatballs

    This is really a quick and easy recipe because the sauce takes 5 minutes of prep and the meatballs take 10 minutes to put together. Then it all cooks in one pot and you have the most delicious spaghetti dinner. 

    The Best and Easiest Spaghetti Meatballs
    The Best and Easiest Spaghetti Meatballs

    Whether you’re having company or a family dinner, you can’t go wrong with Easiest Spaghetti Meatballs. Try my easy recipe and you’ll see why they call it comfort food. They really just melt in your mouth. 

    Here’s your go-to, foolproof, The Easiest Spaghetti Meatballs recipe you’ll never want to be without.

    I have also posted Mince Macaroni which is another easiest & tastiest version of making Pasta home. Do check it out as well.  It’s finger lickin’ good. You’ll be coming back for more. 


    Put your own spin on it. And lemme know how it turns out. Post a photo on Facebook (Recipestable) or  on Twitter so I can see how lovely yours turn out.


    Happy Dinner Making!!

  • Keema Macaroni Recipe (Mince Macaroni)

    Keema Macaroni Recipe (Mince Macaroni)

    Keema Macaroni (Mince Macaroni)

     Pasta, for me, is the ultimate comfort food.  I love anything to do with pasta or macaroni, as they are my go-to on my lazy days. Today i am sharing a super easy Keema Macaroni recipe for busy weeknight Meals. One dish I make quite frequently when I have some mince is this one. Nice and simple, full of flavors.

    Keema Macaroni ( Mince Macaroni)
    Photo: Keema Macaroni ( Mince Macaroni)

    This ain’t your ordinary pasta. With flavors bursting out from every corner, this one is delicious! To make it more unique and give a distinct flavor, I have used my ever favorite Italian Pasta Sauce

    Photo: Keema Macaroni ( Mince Macaroni)
    Photo: Keema Macaroni ( Mince Macaroni)

    You can use any macaroni for this recipe, but I totally recommend trying elbow or something that can help hold all of those tiny pieces of mince. I used my favorite whole wheat pasta. Cook it al dente according to package instructions.

    While the pasta is cooking, saute up an onion and mince until cooked.  Then add in some garlic, herb seasoning and pasta sauce.  And once the pasta is cooked, drain and add it to the saute pan. I would add a dollop cheese or mayonnaise to make it more moist and gulp it down!

    Isn’t that to easy?? Easy enough even for a weekday night? Of Course Yes!!

    Keema Macaroni ( Mince Macaroni)
    Photo: Keema Macaroni ( Mince Macaroni)

    This is a really delicious pasta dish and the taste of the basil really comes through beautifully. The minced meat balances out the starch of the macaroni really well. A perfect dance of herb and spice ensues in your mouth…That you have to experience!

    As you can see, the recipe is just as good and vibrant and delicious as ever.  🙂

    Keema Macaroni ( Mince Macaroni)
    Photo: Keema Macaroni ( Mince Macaroni)

    Some Tips for the Perfectly Cooked Keema Macaroni:

    1. Never cook your macaroni in boiling hot water, it destroys the outer layer of the macaroni however you may not realize it. So, always throw in your macaroni or whatsoever in simmering water, a stage before boiling for best results.
    2. Always add a reasonable amount of salt to water, in which you will be cooking your macaroni.
    3. Once your macaroni has been boiled, strain it, take it out of the hot water and quickly rinse them in cold or regular tap water and the set aside. This stops the macaroni from further cooking, which results in soggy, dull and bland macaroni.
    4. Once you throw macaroni into your dish, let it cook and absorb the wonderful flavours of the dish, by letting it sit in the pan for 2-3 minutes with the lid closed and on slowest flame. Macaroni is bland, has no particular flavour so this step is very critical as well as rewarding.

    Check it out the Keema Macaroni (Mince Macaroni) recipe and printable version here!!

    Recipe Note’s:

    1. You can use any pasta of choice , i like the taste of brown rice pasta compared to others.
    2. You can add veggies e.g. carrots, capsicum, green peas if you like. Everything in this recipe is optional. Go as you please. Play with flavours.

    If you make this recipe, be sure to snap a photo and hashtag it #Recipestable. I’d love to see what you cook!


    What are your holiday traditions guys? I would love to hear some from you all. Are there recipes passed down to you from your grand mom? Or the one from many generations? Share them all in comments below.

    Happy Cooking!!

  • Easy Smooth & Rich Egg Pudding Recipe

    Easy Smooth & Rich Egg Pudding Recipe

    This Egg Pudding. Wow.

    Easy Smooth & Rich Egg Pudding
    Easy Smooth & Rich Egg Pudding

    Egg Pudding

     Have you ever wanted something so bad you think you’d die if you don’t have it? And when you think you’ve finally gotten it, its snatched away from you?

    If yes, then this Egg Pudding is especially for you.

    Easy Smooth & Rich Egg Pudding

    Eat it warm, eat it cold; it provides comfort like no other.

    Egg pudding is just one of those things that never fails to bring a smile on your face or warmth to your toes. Its rich, its smooth, and it is so so SO easy to make even my fogged up brain can whip it up. Just needs a little bit of patience and whole lot of whisking!

    Easy Smooth & Rich Egg Pudding
    Easy Smooth & Rich Egg Pudding

    Egg Pudding was my most favorite treat growing up. This easy dessert can be quickly made for festive occasions. Surprise everyone and get loads of compliments by making this easy egg pudding. 

    Easy Smooth & Rich Egg Pudding
    Easy Smooth & Rich Egg Pudding

    Here’s a recipe for making a easy, simple, yet rich, smooth and satisfying egg pudding. I made this for my family and it totally rocked!! They said it was the most creamiest and richest egg pudding they’ve ever tasted. I never had any leftovers, and it would never be enough for them (lol). The only thing I WOULD get however, would be requests to make more!

    Easy Smooth & Rich Egg Pudding
    Easy Smooth & Rich Egg Pudding

    The creamy texture of this soft-smooth pudding is so inviting, you could call it comfort food. This recipe for egg pudding has a pleasant vanilla flavor complemented by cinnamon or nutmeg. This is the best dessert. I like it most for its sponginess. And it is also very easy to make with in 35 minutes.

    Easy Smooth & Rich Egg Pudding
    Easy Smooth & Rich Egg Pudding

    Some Important Tips to Make Best Egg Pudding: 

    Learn how to make best Egg Pudding by following these tips and tricks.

    1. One-dish Pudding: Recipe can be baked in lightly greased 1-1/2 qt. soufflé or baking dish. Pour hot water to within 1 inch of top of dish. Increase baking time to 35 to 40 minutes.
    2. No-mess pouring: Make pudding in a bowl with a pouring lip, or transfer it to a large glass measure, to make filling pudding cups easier and neater.
    3. For perfectly smooth custard: Strain it through a sieve when filling pudding cups or baking dish to remove any tough egg strands.
    4. Don’t skip the hot-water bath. A hot water bath, insulates the pudding from the direct heat of the oven and promotes even cooking so the edges don’t overcook before the center is done. Very hot tap water will do.
    5. When is it done? Baked Pudding  should be removed from the oven (and water bath) before the center is completely set. The center will jiggle slightly when dish or cup is gently shaken. Pudding will continue to “cook” after it’s removed and center will firm up quickly. Over baked Pudding may curdle.
    6. The knife test: Test for doneness with a thin-bladed knife. Insert knife about 1 inch from the center of the dish. If knife is clean when pulled out, the pudding is done. If pudding clings to the blade, bake a few minutes longer and test again.
    7. Serving Options: You can have this yummy dessert by adding dry fruits, jelly or caramel, but today I am making the basic one. 

    If you are craving for something sweet yet easy dessert in this foggy weather, nothing could be better than this Egg Pudding.  Do try it, your kids are going to fall in love with this proteins and calcium rich dessert. You can also serve this dessert for your next party and this will definitely not going to disappoint your guests.

    Check it out the Easy Smooth & Rich Egg Pudding recipe and printable version here!!

     I have also posted Hot Chocolate Pudding Recipe which is another easiest & tastiest version of making Pudding. Do check it out as well.  It’s finger lickin’ good. You’ll be coming back for more. 


    Put your own spin on it. And lemme know how it turns out. Post a photo on Facebook (Recipestable) or  on Twitter so I can see how lovely yours turn out.


    Happy Baking!!

    If you like this post, Please Subscribe to my blog and let me know your feedback by commenting below.. I have lots more recipes to share with you.

  • Karahi Butter Chicken Recipe (Makhni Karahi)

    Karahi Butter Chicken Recipe (Makhni Karahi)

    Assalam-o-Alaikum, how are you? Yep, it’s been almost a month since we met. First things first…I had my mid-term exams, so I was lil busy with studying and the other stuff in my life.
    However this gap between us wasn’t planned. I was hoping to catch up with you in between, but it didn’t work out.

    My celebration “yay, exam is over!”

    Finally exams are over I’m finally free to do whatever I want (blogging, eating yummy food, spending time with my plants)😌
    Anyways, the first thing I wanted to do was to just pop in here & say a quick hi to you. I hope you roll into the weekend in a joyous mood! May your day be as fantastic as you are!

    Karahi Butter Chicken (Makhni Karahi)

    To release some exams stress, I made this butter karahi by twisting my Father’s recipe…delicious goodness. Can’t wait to share it with you. He used to make the best food. He was an expert on how to make a really good Butter Chicken. Saying that, I’m not too sure how He would feel about this Karahi Butter Chicken version that I’m currently loving.

    Karahi Butter Chicken (Makhni Karahi)
    Karahi Butter Chicken (Makhni Karahi)

    Name me one thing that doesn’t taste better with a few dollops of cream, a knob or so of butter, a splash of milk, lashings of ghee.

    I’ll bet you’re having a hard time thinking up something. It’s a truth of the culinary world that these things all enhance the eating experience of many foods, sweet and savory foods alike and curries are no exception to this.

    Karahi Butter Chicken (Makhni Karahi)
    Karahi Butter Chicken (Makhni Karahi)

    Take this Karahi Butter Chicken ( Makhni Karahi), for example. I’ve taken the traditional Chicken Karahi dish and made it the way we all love, with the very flavours we all adore and then finished it up with a hearty amount of butter. What does this do? This fills every bite with the very same flavours we desire, along with a moreish, rich bite to it. Every bite tastes like a buttery dream, I tell you. This creamy and velvety gravy will melt in your mouth. 

    Karahi Butter Chicken (Makhni Karahi)
    Karahi Butter Chicken (Makhni Karahi)


    Bismillah, let’s begin!

    Check it out the Karahi Butter Chicken (Makhni Karahi) recipe and printable version here!!

     Recipe Note’s

    My final words before I give you the recipe – my Father was an expert at Karahi’s and he always told me what with chicken Karahis, you must work fast. Have all the ingredients chopped up beforehand if you can, and cook the entire thing on high heat. Stirring constantly is imperative, otherwise you risk burning the curry or having it stick to the pan. Skimp on half the oil or butter if  you must, but I wouldn’t recommend it as a Karahi dish isn’t truly a Karahi dish without its butter or oil.


    I have also posted Restaurant Style Lahori Mutton Karahi and Kebab Karahi which are another easiest & tastiest version of making Karahi at home. Do check it out as well.  It’s finger lickin’ good. You’ll be coming back for more. 


    Put your own spin on it. And lemme know how it turns out. Post a photo on Facebook (Recipestable) or  on Twitter so I can see how lovely yours turn out.


    Happy Karahi Making!!

    If you like this post, Please Subscribe to my blog and let me know your feedback by commenting below.. I have lots more recipes to share with you.

  • Mini Pizza Cups Recipe

    Mini Pizza Cups Recipe

    Pizza is always a crowd pleaser, but making your own can be a bit of a headache. This bite-sized alternative is easy to make and healthy (just 150 calories each!) and as much fun to make as they are to eat.

    Mini Pizza Cups
    Mini Pizza Cups

    Mini Pizza Cups

    I’m sure you’ve all heard of or made Pizza Cupcakes or  Pizza Muffins before. But as simple or obvious as this recipe seems, sometimes we need a good reminder of the un-fussy classics. Sometimes you don’t have time or the right ingredients to make an elaborate meal. When this happens, it’s good to have something simple and inexpensive to fall back on.

    Mini Pizza Cups recipe

    Healthy, Budget Friendly Mini Pizza Cups? Yes, Yes, and Yes!

    Mini Pizza Cups recipe
    Mini Pizza Cups

    If you’re crazy about pizza like me, but can’t justify eating it as much as you’d like, this is a great recipe for you. I used leftover pizza dough, chicken, lots of fresh vegetables, and a tablespoon or so of cheese on each mini pizza. Considering each pizza cup base 60 calories, the shredded chicken & cheese about 40 calories, and the rest of the ingredients were vegetables, I’m guessing each pizza had about 150 calories. This is not scientific, but it’s my best guess.

    Mini Pizza Cups
    Mini Pizza Cups

    An interesting and fun way to present your pizzas. These cute little pizza cups will delight anyone, especially kids. Have your children create their own pizzas, and get creative with the toppings. Perfectly shaped and easy to handle, they make for a great addition to lunch boxes or for picnics and road trips.

    mini-pizza-cups
    Mini Pizza Cups

    Hope you will give this a try and let me know how it turns out for you..

    Check it out the Mini Pizza Cups recipe and printable version here!!

    I have also posted My Fav French Bread Pizza Recipe and Pizza Rolls Recipe which are another easiest & tastiest version of making Pizza. Do check it out as well.  It’s finger lickin’ good. You’ll be coming back for more.


    Put your own spin on it. And lemme know how it turns out. Post a photo on Facebook (Recipestable) or  on Twitter so I can see how lovely yours turn out.

    Follow my blog with Bloglovin


    Happy Baking!!

    If you like this post, Please Subscribe to my blog and let me know your feedback by commenting below.. I have lots more recipes to share with you.