In the Name of Allah, Most Gracious, Most Merciful
Almond French Toast Hearts
These Almond French Toast Hearts are easy to make and so delicious. Confectioners’ sugar, and almond butter tastefully top off each bite. Do try it, Your kids will probably get a kick out of heart-shaped french toast.
Photo: Almond French Toast Hearts Recipe
Heart shaped cookie cutters can do more than just make cookies, use them to make a special breakfast for the ones you love most. My brother was not in good mood and lil bit annoyed with me. So when I made these Almond French Toast hearts for breakfast yesterday it completely changed the overall of his mood.
Photo: Almond French Toast Hearts Recipe
Almond French Toast Hearts with Flavored Butter —- A perfect way to say” I Love You Brother ♥♥♥.”
Photo: Almond French Toast Hearts Recipe
Let me tell you a little secret that it’s a really lovely thing, because if you are anything like me, you could eat golden french toast smothered in almond flavored butter every day of the week.
Tools You needed to make this recipe:
A large heart-shaped cookie cutter
A frying pan
A spatula
A Hand- Beater
Let’s get started !
Check it out the Almond French Toast Hearts Recipe and printable version below!!
Recipe Tip’s:
If you do not have a heart-shaped cookie cutter, use a heart-shaped template and sharp knife to cut heart shapes.
Oh yeah, DON’T throw away the extra bread pieces left over from the heart cut-outs. I’ve got something you can do with them. Something tasty. More details later in the week…
If you like this Almond French Toast Hearts Recipe, Please Subscribe to my blog. I have lots more recipes to share with you. And If you make it then let me know your feedback by commenting below.
It’s the key to a sensational profile and an engaged audience. No matter the reason behind your account: to promote your brand, to share inspiration or to gather useful posts, people will follow you more easily if they know you’re posting regularly. They’ll know when to expect which type of content and get their inspiration flooding thanks to your presence on the social media.
2. BE PROUD OF YOUR CONTENT
We all have our favorite topics, our own passions and the Outdoors pictures that make us go wow. If you like Scandinavian interiors, your ‘Home’ board will contain a massive amount of white walls and black and white patterns. Same thing if you like surfing, you’re most likely to have a board called ‘Summer Vibes’.
People with the same hobbies as you will start following you in no time, simply because they want to be able to repin the content they feel close to. Stay focused on your passions, be proud about what you’re sharing: love what you pin, your followers will love it too.
3. BE ATTENTIVE
Analytics are so important when it comes to Pinterest. Whether it’s for your blog or any kind of social media, those little metrics are able to show you the age, gender, and interests of your audience. If you have followers from Canada, how about you start sharing more cool spots in Montreal, Ottawa, and Québec? It could be pretty awesome for them to discover new shops and restaurants thanks to your pins.
To see your Pinterest Analytics, turn your account into a Business by clicking right here.
4. AIM HIGH
I’m sure many people see Pinterest as a cool application you can use whenever you want to find the inspiration, but do not forget it’s a social network. Today, social network rhymes with potential traffic and cool audience. Using your Pinterest profile wisely can help you reach a new niche, so always be sure to set some goals and try to grow the engagement of your followers. However, keep making sure your oldest followers keep returning, it would be too bad to lose an audience, as you get another.
5. IT WORKS BOTH WAYS
While using Pinterest can drive traffic to your website, your website can also help you gain new followers on the network. Pin ahead some inspiration for an upcoming article and design pins to announce a blog post. Are you selling products? Show your Pinterest followers, some of them might be interested. What does all this mean? You can attract new readers and clients just by pinning, and gain new followers while displaying your Pinterest profile or the social media icon on your blog.
6. CONSISTENCY IS THE KEY
If your website is well-rounded and your brand identity on top, make sure to spread it. Use the same fonts and colors as your website when designing a pin and make sure your boards relate the same topics as your articles. That way, you please people who always want more of your rich content and inspiration.
7. KEEP IT COOL
I know I just told you to see Pinterest as a business tool. And yes it can bring new opportunities and potential readers but it’s important for you to remember it’s only just a social media. Do not make it your goal to gain money over Pinterest and let sponsored pins away, just have fun pinning about what you like and stay true to yourself. Do not become one of those people who pin about everything just because a brand said so.
What about you? Which Pinterest strategy do you use to drive traffic to your blog?
Well, as you can read from the title of this post, my Chocolate Marble Cake: Failed Attempt. Looks pretty good doesn’t it? Let’s just drool a little more together before I unveil the whole truth, and nothing but the truth.
Unfortunately I have pictures to prove it. 🙁
Chocolate Marble Cake: FAILED ATTEMPT
If you have been following my blog for a while, you would know that I am not good in making cakes… yet still learning… I’m better at cooking dishes than baking cakes and pastries. They say baking is a science. It works on precise measurements and temperature. Tamper with it, and you will be courting disaster.
I like to tamper. I’m a tamperer. No wonder I cannot bake 😛 But i really wanted to master a couple of easy bakes instead of just throwing in the towel. Marble cake is supposedly one of the easiest cake to make. The first time I attempted this, it turned out like this..
Why this Chocolate cake look so weird? OMG it’s burnt 🙁
Oh God, where do I begin? Well, that was the Sunday. All I wanted was to make the Chocolate Cake I’ve been dreaming for tea time. Moist, almost fudgey centre and a marble like crust on the top. Yes, that piece was a pleasure to eat. Unfortunately the whole cake looked like this. Burnt from bottom 🙁
Burnt From Bottom
When the time came for me to shut off the oven and turn it onto a wire rack, hoping that the cake will gracefully slide out. I should mention that at this point I had turned the oven off an hour before the recipe indicated because I was smelling a slight burning smell in my house (okay it wasn’t slight, but I was firmly planted in denial. Whatever.) and thought maybe that’s long enough. So, I turned it on a wire rack and to my surprise, it did gracefully turned out.
I took the cake out from the pan, stared at it sadly and shook my head. Sliced it and took a bite.
Oh sugar, it tasted WONDERFUL!
The crust top, though semi burnt, had a nice smoky aroma
As absolutely terrible as that looks, all was not totally lost. This side of the cake took the worst of it and was burnt to the bottom. After peeling away the black parts you see, I was actually left with an incredibly moist, smaller, Chocolate Marble cake.
Looks good huh!
Some of you may be wondering why I would even try to salvage this cake, let alone actually eat it, but I couldn’t waste it. I hate just throwing away money, and this cake had time and effort invested in it as well. Don’t get me wrong, I wouldn’t serve this to people at a tea party! But since it’s just the 3 of us( me, mommy and sis) it wasn’t a big deal. I learned a lesson, if I ever do this again, to once in awhile turn the inner container that the cake bakes in. Since just one side of the cake was burned, I’m thinking that was the side where the heating element was, so if I turn it should bake evenly.
It wasn’t the prettiest cake I’d ever seen, but it was mine 🙂 But with a little trimming, the cake was fine!
If you’d like to make this cake and enjoy it all rather than just some of it, here’s my suggestions.
Start with the recipe for Marble chocolate cake from The Bakery Cookbook.
When you add the melted butter and cocoa powder to the egg yolks I urge you to wait for it to cool down, or you will curdle the yolks.
When the recipe says to line the tray with baking paper, do as they say, or you’ll be scraping the cake out of the tin with a spatula.
Check your oven is not too hot if you don’t want the whole thing to souffle up, burn on one side, and then sink to a quarter of its height.
My oven shelf was a little bit too higher hence bottom sides burnt a little.
Last week, I made these Veggie rolls ( Baked Version) to give myself a break from assignment work. They are very easy to prepare and tastes absolutely delicious! I had too much fun making this.
Last week, I made these Veggie rolls ( Baked Version) to give myself a break from assignment work. They are very easy to prepare and tastes absolutely delicious! I had too much fun making this.
Prep Time 15 minutesminutes
Cook Time 20 minutesminutes
Total Time 35 minutesminutes
Servings 16
Author Bushra Waheed
Ingredients
1large carrotcut into julienne
1spring onioncut into julienne
1cupcabbage thinly sliced
1green pepperthinly sliced
1/4cupboiled green peas
1/4cupboiled corns
1/4cupboiled red beansoptional
1tablespoonchopped ginger
1garlic clovecrushed
1tablespoonolive oil
2tablespoonfreshly parsleychopped
1/2teaspoonvinegar
1/2teaspoonpepper
a pinch of crushed red chili
salt to taste
1eggfor brushing
1tablespoonsesame seedsfor sprinkling
16roll wrappers or sheets
Instructions
Directions
Heat oil in a wok over medium heat. Saute giner and garlic till fragrant.
Add green peas, red beans and corns. Cook for 2-3 minutes then add remaining veggies and add vinegar.
Cook and stir for few minutes.
Season with salt , pepper and red chili.
Mix well and cook for 1 more minute. ( Don’t over cook).
Transfer the veggie mixture into a bowl and let it cool completely.
Preheat an oven for 200 degree C and brush a baking sheet with oil.
Place a wrapper like diamond, put 2 tablespoons of filling near corner, tightly roll the wrapper, fold over left side, fold over right side, brush a little water along the edge and close it up.
Put on a lightly oiled baking sheet and repeat this method the rest of your rolls.
Lightly brush the tops of the rolls with egg-wash.
Sprinkle sesame seeds over them.
Bake in the preheated oven for 20 minutes or until they turn crispy and golden brown.
Notes
Serving Suggestions : Serve with sweet and sour sauce.
In the Name of Allah, Most Gracious, Most Merciful
I hope you’re well and have had a good start to the week. I’m sorry to let you worry about me, but these days I’m a bit busy. As you know study study study. lol 😀 I am madly busy with my assignments. Sorry for this post being late.
My class got cancelled today. Glad I get a chance to breathe. So I decide to write a post for my lovely reader’s. Last week, I made these Veggie rolls ( Baked Version) to give myself a break from assignment work. They are very easy to prepare and tastes absolutely delicious! I had too much fun making this.
Take a Break and bake Some Veggie Rolls 🙂
These yummlicious veggie rolls are healthy and very filling. And they smell amazing when they’re baking. They crisped up fine in the oven. The only problem is that three wrappers have 180 calories! What!???? That’s a lot. I ate 3 rolls anyway. 😛 😉 They are ready in only 35 minutes and you can use your favorite veggies.
Photo: Baked Veggie Rolls Recipe
You could fry these, too, but I was trying to keep them healthy. I hope you all give this Baked Veggie Rolls recipe a try and let me know how they turn out!
Baked Veggie Rolls
So let the fun begin!
First Prepare Veggie Filling: Heat a small amount of oil in a wok over medium heat. Add giner and garlic. Saute until fragrant. Might you think, it’s a stupid instruction, isn’t it? Tell you what, just cook your garlic few seconds until they’re soft-ish.
Now add green peas, red beans and corns. Cook for 2-3 minutes or until they are soft.Add remaining veggies and add a splash of vingear. Stir fry for few minutes. You can add soy sauce or any store bought sauce etc. But I didn’t add it. As I try to avoid artifical ingredients to follow my journey towards clean eating. 🙂
Sprinkle black pepper, red chili, and maybe a little salt if you need it. If you want to use fresh herbs then I think that would be lovely.
Stir well and Let everything simmer for a couple of minutes, but don’t let everything get overly soft because you still have to stuff and bake your rolls.
Take the mixture into a bowl and let it cool for few minutes. Once everything is cool, you can either proceed to stuffing the rolls, or cover your bowl and put everything in the fridge overnight. If you do refrigerate the veggie mixture, be sure to bring it room temperature before stuffing your rolls.
When you’re ready to stuff your rolls, be sure your stuffing mixture and wrappers are at room temperature. You’ll want a clean work surface for this part and a bowl of water nearby.
Don’t be intimidated by this part. You just want the rolls to hold the yummy stuffing in. They don’t need to be perfect. And, frankly, if someone is going to judge you on how pretty your spring rolls are, then you probably shouldn’t be feeding them. lol 😛
Preheat an oven for 200 degree C and brush a baking sheet with oil.
Place a wrapper out in a diamond shape on your work surface.Put a tablespoons of filling in the center of the wrapper. I under-stuffed these rolls, so they turned out chewier that I would have liked. However, you don’t want to stuff them so full that they split open. It’s a delicate balance.
Bring the bottom point of your wrapper up over the filling and tuck it under as tight as you can. Fold the sides over and shape into a roll.
Moisten the edges of the top flap slightly with water and roll the roll over, pressing the point on the underside of the roll to seal it.
Put on a lightly oiled baking sheet and repeat this method the rest of your rolls.
Lightly brush the tops of the rolls with egg-wash and sprinkle sesame seeds over them.
Bake in the preheated oven for 20 minutes or until they turn golden brown. This took my oven around 22-25 minutes.
You can eat these veggie rolls with tamari or soy sauce, but we prefer sweet and sour sauce.
Ready !!
Photo: Baked Veggie Rolls Recipe
Sorry I din’t get step by step picture as I was hungry and on in a hurry to eat 😛
Check it out the Baked Veggie Rolls Recipe and printable version below!!
Keep me in your duas please, and have a lovely week,
Wasalaam!
If you like this Baked Veggie Rolls Recipe, Please Subscribe to my blog. I have lots more recipes to share with you. And If you make it then let me know your feedback by commenting below.
Say goodbye to your boring sandwiches. This Chicken Pita Sandwiches recipe is so easy to make and sure to spice up your lunch routine. Twenty minutes is all you need to whip up these simple yet satisfying Chicken Pita Sandwiches. Perfect to pack for school or work!!
Say goodbye to your boring sandwiches. This Chicken Pita Sandwiches recipe is so easy to make and sure to spice up your lunch routine. Twenty minutes is all you need to whip up these simple yet satisfying Chicken Pita Sandwiches. Perfect to pack for school or work!!
Prep Time 5 minutesminutes
Cook Time 20 minutesminutes
Total Time 25 minutesminutes
Servings 4
Author Bushra Waheed
Ingredients
4Pita breads
2boneless chicken breastscut into thin strips
1small green bell pepperthinly sliced
1small yellow bell pepperthinly sliced
1small onion
1cucumberthinly sliced
4olivesthinly sliced
1jalapeño pepperthinly sliced
4tablespoontomato ketchup
2tablespoonmayonnaise
2tablespoonolive oil
1teaspoongarlic powder
1teaspoonblack pepper
salt to taste
1/2cupgrated mozzarella cheese
lettuce leaves
Instructions
Directions
Heat oil in a frying pan.
Stir fry chicken in hot oil for 4-5 minutes or until no longer pink.
season with salt, garlic powder, black pepper and crushed chili.
Cover the pan and let it cook in its own water for 10 minutes or until chicken is tender.
Now add onion and stir fry for 30 seconds.
Now add green pepper, yellow pepper, jalapeno pepper.
Stir fry for 1-2 minutes then stir in the
tomato ketchup.
Turn the heat off.
Now add olives, cheese and mayonnaise.
Adjust seasoning to taste.
Slightly roast pita bread on hot griddle from both sides.
Put some lettuce leaves and cucumber on a pita bread.
Top with chicken mixture.
Generously cover with another pita bread.
Cut each bread into four pieces.
Transfer into a serving platter. Delicious Chicken Pita Sandwiches are ready to serve. ENJOY!!
Need a quick and delicious lunch option? or If you’re looking for fast, easy dishes to bring to a picnic, an Asian twist. Then this Pita Chicken Sandwiches recipe is sure to please you and your family.
Photo: Chicken Pita Sandwiches Recipe
Say goodbye to your boring sandwiches. This Chicken Pita Sandwiches recipe is so easy to make and sure to spice up your lunch routine. Twenty minutes is all you need to whip up these simple yet satisfying Chicken Pita Sandwiches. Perfect to pack for school or work!!
Photo: Chicken Pita Sandwiches Recipe
This mouthwatering sandwiches stuffed with a delicious chicken veggie filling will make mealtime exciting.Ah ___Sounds delish !! This simple Chicken Pita Sandwiches packs a lot of flavor and nutrition, which makes it ideal for an easy weekday meal. They may be tiny in size, but made this way, the lunch or dinner favorite is big on flavor!
Photo: Chicken Pita Sandwiches Recipe
These Pita Chicken Sandwiches will help you enjoy every minute of these glorious warm days. When the weather is beautiful there is nothing better than a picnic. It’s the best appetizer recipe to bring to a picnic that are sure to be a hit! I put Different veggies with roasted chicken, olives and cheese.You Can also stuff Pita Sandwiches with leftover ingredients from previous meals. Simple, fast and satisfying. Who has time for much more? The options truly are endless. Must try it, I hope you enjoy it as much as I did!
Check it out the Chicken Pita Sandwiches Recipe and printable version below!!
If you like this Chicken Pita Sandwiches Recipe, Please Subscribe to my blog. I have lots more recipes to share with you. And If you make it then let me know your feedback by commenting below.
This Walnut rice pudding recipe has been family tested and approved and can be whipped up in no time.
Prep Time 5 minutesminutes
Cook Time 30 minutesminutes
Total Time 35 minutesminutes
Servings 4
Author Bushra Waheed
Ingredients
1cupwalnuts pieces
2tablespoonrice flour
1/2cupwhite sugar
1litre milk
1teaspoonwalnut or almond extract
Instructions
Soak walnuts in hot water for 15 minutes.
Now grind the walnuts into a smooth thick paste.
While grinding add the little milk .
Pour milk in a saucepan.
Add ground mixture, rice flour and sugar.
Mix until no lump remain.
Bring to a boil in medium to low heat. Keep stirring without burning at the bottom.
When it reaches a semi-thick consistency, add the walnut or almond extract.
Stir and cook for few minutes or until thicken.
Turn off the stove.
Dish it out.
Garnish with chopped walnuts. Delicious walnut Rice Pudding is ready to serve.
Notes
Note: Either you can remove the walnut skin or just leave it. I prefer to leave it, the peel too has nutrition.Serving Suggestions: You can serve it chilled or serve warm. But tastes delicious when served chilled after any meal.
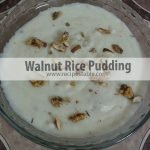
A creamy, high protein rice pudding made with milk and crunchy walnuts. Walnuts are rich source of energy and contain health benefiting nutrients, minerals, antioxidants and vitamins that are essential for optimum health.
Photo: Walnut Rice Pudding Recipe
Today I made a Walnut Rice Pudding for the first time. And this concept was new to me. But I tried it anyway only with 1 litre of milk. Alhamdulillah, it was so yummy and exotic. Totally different but delicious flavour. Its a must try for those of you, who never tasted it.
Photo: Walnut Rice Pudding Recipe
I love the flavorful nutty aroma and exhibits excellent astringent properties of walnuts.I’m always cutting out recipes to try, but always changing them to suit my own taste. I like recipes that use ingredients that you usually have on hand and is fast and easy…and of course taste good!This Walnut rice pudding recipe has been family tested and approved and can be whipped up in no time. Check it out the Walnut Rice Pudding recipe and printable version below!!
If you like this Walnut Rice Pudding Recipe, Please Subscribe to my blog. I have lots more recipes to share with you. And If you make it then let me know your feedback by commenting below.
A delicious and easy tea time snack for your friends and family.
Fresh Parsley makes this traditional Potato Scotch eggs recipe extra special.
Prep Time 20 minutesminutes
Cook Time 10 minutesminutes
Total Time 30 minutesminutes
Servings 6
Author Bushra Waheed
Ingredients
6organic eggs
3medium sized potatoesboiled
2small dried red chiliescruhsed
1tablespoonfresh parsley leaveschopped
1teaspoonsoy sauce
1teaspoonblack pepperfreshly ground
salt according to taste
For Coating
4tablespooncornflour
1/2cupbread crumbs
1egglight beaten
a pinch of salt and pepper
oil for frying
Instructions
Bring a pan of salted water to the boil. Cook 6 of the eggs for 6 minutes.
Strain and leave to cool for 10 minutes in iced water.
Then peel.
Meanwhile, mash potatoes in a large bowl.
Add parsley, soy sauce and red chili.
Season with salt and pepper.
Mix until well combined.
Shape the potato mixture around the boiled eggs; it could be 1 cm thick.
Beat egg with a pinch of salt and pepper.
Now coat the potato covered eggs first in the cornflour, then dip in the egg.
Then coat with bread crumbs.
Heat the oil in a deep pan over medium heat.
Carefully drop the scotch eggs into the hot oil and cook for 3-4 minutes or until crispy and golden.
Remove from the oil and drain on kitchen paper.Cut them in half or quarters.
Drizzle some ketchup before serving. Delicious Potato Scotch Eggs are ready to serve. Enjoy!!
Notes
1. Do not freeze them because potato become soggy and watery if you store them for longer period of time. I myself prepare potato based things fresh always. 2. You can also add any herb seasoning in potato mixture. 3. You can also make it with chicken mince etc.
A delicious and easy tea time snack for your friends and family. Fresh Parsley makes this traditional Potato Scotch egg recipe extra special.
Photo: Potato Scotch Eggs
Scotch eggs are one of those foods that have never gone out of favorite.I really love Scotch Eggs. Believe me this homemade potato scotch eggs are a world away from shop bought versions. They’re worth the effort for a special picnic treat. Packed with protein power, this summer fair favorite is easy to make in your home kitchen. Ready to eat in just 30 minutes, it makes a great start to the day, or a satisfying snack.
Photo: Potato Scotch Eggs Recipe
I have always been fascinated by Scotch eggs. I think they bring a little “wow” factor to any table. Scotch eggs are traditionally made with sausage meat wrapped around a hard boiled egg then breaded and deep fried. I wanted to shake up this UK savory treat with some Asian spices and do my own take on it. I decided instead of using a raw sausage meat, I would make a potato filling to wrap around the egg then bread it and deep fry it. I loved how these came out and they go perfectly with zeera rice and curry meal.
Photo: Potato Scotch Eggs
They also go well with a salad, bread, naan, etc… I think these beautiful eggs dress up any Asian or European table. If you are little worried about the size of the larger scotch eggs, I did make make a smaller version of this fun dish. I think the smaller version is actually a little more manageable to make and serve, although it doesn’t have the show-stopper look as the whole egg version when you cut them. Of course, both are equally tasty and fun and you will love to see them once they sit prettily on your table. Do try it, your kids will love it. Perfect for lunch box.
Note: Make sure you cut the larger scotch eggs in half or quarters before serving so the guests can see the inside because that’s the “wow” factor to the dish. Enjoy.
Check it out the Potato Scotch Eggs Recipe and printable version below!!
If you like this Potato Scotch Eggs recipe, Please Subscribe to my blog. I have lots more recipes to share with you. And If you make it then let me know your feedback by commenting below.
Perfect for week days. It’s a good change in your lunch or dinner. This lip smacking Chicken Shorba Recipe is one of my favorite. It’s prepared in chicken stock with addition of traditional Pakistani ingredients, texture and consistency of an Pakistani Stew and the aroma of Oriental spices.
Perfect for week days. It’s a good change in your lunch or dinner. This lip smacking Chicken Shorba Recipe is one of my favorite. It’s prepared in chicken stock with addition of traditional Pakistani ingredients, texture and consistency of an Pakistani Stew and the aroma of Oriental spices.
Prep Time 5 minutesminutes
Cook Time 1 hourhour10 minutesminutes
Total Time 1 hourhour15 minutesminutes
Servings 6
Author Bushra Waheed
Ingredients
2lbsorganic chickendesi murgh
2medium onionfinely chopped
2tablespoonbutter
2tablespooncooking oil
4clovesgarlicminced
1tablespoonfresh ginger; grated
1/2cuptomato puree
1/2cupplain yogurt
1inchpiece of cinnamon stick
4cloves
7peppercons
1teaspoonpaprika powder
1/2teaspooncardamom powder
1/2teaspooncoriander powder
1/2teaspoonturmeric powder
1/2teaspoongaram masala
1/2teaspooncayenne powder
4cupschicken stock
salt according to taste
For Garnishing
few coriander leaves
Instructions
Directions
Take a large pot, melt the butter over medium heat.
Now add oil and chopped onions, cinnamon stick, peppercorns, and cloves.
Stir and fry until the onion turns translucent and lightly browned.
Stir in the garlic and ginger and the dry masala, blending well.
The aroma coming from your kitchen will be amazing.
Add chicken. Stir and cook for 15 minutes or until chicken is no longer pink.
Now add tomato puree and yogurt.
Cover with a lid and let it simmer on low heat for 40 minutes or until chicken is almost tender and all water dries up.
Remove the lid and cook on hight heat for few minutes or until oil come on top.
Now add the chicken stock.
Bring to the boil, then lower heat and simmer 10 minutes.
If you’re not in a hurry or for a more intense flavour, let the soup simmer for longer.
Transfer into a serving bowl.
Garnish with fresh coriander leaves. Delicious Chicken Shorba is ready to serve. ENJOY!!
Notes
Make sure always to buy fresh chicken & which is hormone free.Serving Suggestions: Serve with Tandoori Roti.
Looking for a simple meal? Then try this Chicken Shorba Recipe, you will like the taste of Chicken Shorba._ perfect for week days. It’s a good change in your lunch or dinner. This lip smacking Chicken Shorba Recipeis one of my favorite. It’s prepared in chicken stock with addition of traditional Pakistani ingredients, texture and consistency of an Pakistani Stew and the aroma of Oriental spices.
After a weekend of delicious excesses, I’m ready for a healthy alternative. This weekend I’ve eaten like a queen –fried food, buttery paratha’s, creamy curries, biryani’s, naan, and more units of chocolates than I really care to count. So today I’decide to make light and nutritious meal. Weather is quite rainy so relaxing with this warming and nutritiousChicken Shorba –Chicken Curry– will be something to look forward to when I get home back from Uni. I made this Chicken Shorba last night and it only took 1 hour to prepare and cook. It’s in the fridge now and can be warmed up in few minutes. Normally I would serve this tangy and satisfying Chicken Shorba (chicken soup) with steamed rice but to make it easy, I served it with tandoori roti.
Photo: Chicken Shorba Recipe
Almost every country has their own version of chicken soup. I hope you like and enjoy this version as much as I do! If you like this Chicken Shorba Recipe, Please Subscribe to my blog. I have lots more recipes to share with you.
Check it out the Chicken Shorba Recipe and printable version below!!
Put your own spin on it. And lemme know how it turns out. Post a photo on Facebook (Recipestable) or on Twitter so I can see how lovely yours turn out.
Happy Cooking!!
If you like this post, Please Subscribe to my blog and let me know your feedback by commenting below.. I have lots more recipes to share with you.