A simple and nutritious snack, chapati (flatbread) stuffed with spicy mince filling, salad and chutney, perfect for busy morning breakfast and also lunch.
Heat oil or butter in a large pan over medium high heat.
Saute onion for 2-3 minutes. When the onions have softened up but not yet golden in colour add ginger and garlic, and cook for 1 minute.
Then add mince and let it drain out most of the moisture for about 4-5 minutes.
Add green chilies, red pepper and salt.
Reduce the heat on low and cover the pan. Let it simmer for 25 minutes or until mince is cooked thorough and all water dries up.
Remove the lid and cook on high flame for 3-4 minutes then add chili garlic sauce and soy sauce.
Cook 2 minutes longer then turn the heat off.
Sprinkle mint and coriander leaves.
To Assemble Chapati Rolls
Reheat chapati’s.
Place chapati on a clean board, spread 1 tablespoon mayonnaise on it. Then add the mince stuffing across the center.
Drizzle some mint chutney.
Sprinkle veggie salad and roll up the chapati.
Secure with toothpick. Don’t worry if it gets a little messy eating that’s just a art of the fun of eating a roll. ENJOY 🙂
Notes
Serving Suggestions: Serve with salad, french fries and chutney. Or you can serve everything separate and let your guests or family prepare their own stuffed chapati rolls.
I was chilling with my grandparents, stuffing my tummy with yummy food, filling up my body with awesomeness. Nice relaxing day. I spent a quality time with my grandparents, did lots of cooking for them and made a full use of everything in the fridge, make them laugh, smile and collected their countless dua’s. My grandparents were happy to see me with them. I Love both of them. They puts a smile on my face and giggle in my heart.
As much as I adore my grandparents, they do treat me like I’m still 6 years old.🤔🤔 I love staying with my grandparents they treat me like I’m royalty, but in reality they are my King & Queen😍
The King and Queen of my Heart (My Grandparents)
Grandma’s Favorite Chicken Stir Fried Noodles
My Grandma’s Favorite Chicken Stir Fried Noodles
Stop and wait a minute. This post is special.
Because today I’ m sharing a family favorite recipe.{Especially, my grandma’s(nano)}. I’ve made these noodles countless times; in exchange of favors, to impress certain people. My GrandMa Loves to eat Chinese Food. Just this weekend, I cooked it on my nano’s request. Nana abu loved it so much and he rewarded me with cash. $_$ 💰 💰
Cooking is an art ! I believe it- My favorite moments are the looks of appreciation my family and loved ones give me when they tastes my food.
Chicken Stir Fried Noodles
A simple to make Chicken Stir Fried Noodles recipe, but big on flavors. The perfect balance of spiciness, tanginess and saltiness. The vibrant mix of fresh vegetables paired with the saltiness of the stir fry noodles, the tanginess of soy sauce, and the heat from the sesame oil and the acclaimed chili sauce; all worked out so well. These Grandma’s favorite Chicken Stir Fried Noodles will be a hit with the whole family.
Vibrant mix of fresh vegetables paired with the saltiness of stir fry noodles
Bismillah, let’s begin!
Check it out the Chicken Stir Fried Noodles recipe and printable version below.
A simple to make Chicken Stir Fried Noodles recipe, but big on flavors. The perfect balance of spiciness, tanginess and saltiness. The vibrant mix of fresh vegetables paired with the saltiness of the stir fry noodles, the tanginess of soy sauce, and the heat from the sesame oil and the acclaimed chili sauce; all worked out so well.
Prep Time 10 minutesminutes
Cook Time 20 minutesminutes
Total Time 30 minutesminutes
Servings 6
Author Bushra Waheed
Ingredients
2boneless chicken breastcut into cubes
2tablespoonsesame Oil
2tablespoonvegetable oil
2clovegarlicminced
2green onionscut into strips
2carrotspeeled and cut into strips
1/2red bell peppercut into strips
1/2green bell peppercut into strips
1/4cupdark soy sauce
1/4cupchili garlic sauce
1packet spaghetti noodles or egg noodles
salt and pepper to taste
Instructions
Method
Cook the noodles in a large pan of boiling water for 2-3 minutes until Soft.
Once the noodles are cooked.
Drain and return to the saucepan.
Toss well in vegetable oil and set aside. Cover with a tea towel.
Heat a wok until very hot, then add remianing vegetable and sesame oil. Add 1 chopped garlic clove after 30 seconds.
Add the chicken and stir-fry for 3 minutes or until it loses its colour.
When the chicken is ready add the vegetables and stir-fry for another 30 seconds.
Add a splash of Soy sauce and stir fry for 1-2 minute.
Stir in the Soy sauce and chili garlic sauce.
Add noodles and cook for 30 seconds, stirring constantly and serve immediately.
Enjoy!
Recipe Note’s:
You can also add lamb, beef to this stir fry noodles, or just filled up with colorful veggies like I loved to eat. Either way, it’s finger lickin’ good. You’ll be coming back for more :’)
I had made many yummy dishes there and in upcoming posts I’d love to share those recipes with you. So Stay tuned.
I have also posted Keema Noodles Recipewhich is another easiest & tastiest version of making noodles. Do check it out as well.
Put your own spin on it. And lemme know how it turns out. Post a photo on Facebook (Recipestable) or on Twitter so I can see how lovely yours turn out.
Happy Cooking!!
If you like this post, Please Subscribe to my blog and let me know your feedback by commenting below.. I have lots more recipes to share with you.
A simple to make Chicken Stir Fried Noodles recipe, but big on flavors. The perfect balance of spiciness, tanginess and saltiness. The vibrant mix of fresh vegetables paired with the saltiness of the stir fry noodles, the tanginess of soy sauce, and the heat from the sesame oil and the acclaimed chili sauce; all worked out so well.
Prep Time 10 minutesminutes
Cook Time 20 minutesminutes
Total Time 30 minutesminutes
Servings 6
Author Bushra Waheed
Ingredients
2boneless chicken breastcut into cubes
2tablespoonsesame Oil
2tablespoonvegetable oil
2clovegarlicminced
2green onionscut into strips
2carrotspeeled and cut into strips
1/2red bell peppercut into strips
1/2green bell peppercut into strips
1/4cupdark soy sauce
1/4cupchili garlic sauce
1packet spaghetti noodles or egg noodles
salt and pepper to taste
Instructions
Method
Cook the noodles in a large pan of boiling water for 2-3 minutes until Soft.
Once the noodles are cooked.
Drain and return to the saucepan.
Toss well in vegetable oil and set aside. Cover with a tea towel.
Heat a wok until very hot, then add remianing vegetable and sesame oil. Add 1 chopped garlic clove after 30 seconds.
Add the chicken and stir-fry for 3 minutes or until it loses its colour.
When the chicken is ready add the vegetables and stir-fry for another 30 seconds.
Add a splash of Soy sauce and stir fry for 1-2 minute.
Stir in the Soy sauce and chili garlic sauce.
Add noodles and cook for 30 seconds, stirring constantly and serve immediately.
Summer has been kicking into high gear and the temperatures have been climbing here, and everyone wants to keep cool on hot summer days. So today, I have a recipe for a simple, classic and very popular sandwiches: “Egg and Cucumber Sandwiches”.
Photo: Egg and Cucumber Sandwiches
Egg and Cucumber Sandwiches
Egg and Cucumber sandwiches are the most delicious, easiest finger foods to make. All you need is sliced white bread, boiled eggs, mayonnaise and of course, cucumbers. To enhance the flavor, I also spread a thin layer of dill with cream cheese spread.
Photo: Egg and Cucumber Sandwiches
I love adding cucumbers to egg mayonnaise. And sometimes different herbs too (especially dill goes very well with eggs and cucumbers). The cucumber can either be chopped finely and mixed into the egg mayonnaise or sliced thinly , I like the latter since it adds a nice fresh crunch to the sandwich. This can be made in advance and keeps well, so is perfect for tea parties.
Photo: Egg and Cucumber Sandwiches
What are your favorite foods for a tea time snack or tea party? For me, the food are simple to prepare and easy to eat (and not so messy), preferably something we can eat using our hands or toothpicks.
Photo: Egg and Cucumber Sandwiches
If you’re looking for an extremely quick and easy recipe for a lunch box, or a tea party, or a picnic, or you just so happen to have an extra cucumber lying around, then give these egg and cucumber sandwiches a try. They’re deliciously light and fresh, and I love the crunch of the cucumber. These delicious, easy-to-assemble sandwiches are great for a quick summer meal.
Bismillah let’s get started.
Check it out the Egg and Cucumber Sandwiches recipe and printable version below!!
I have also posted Zinger Club Sandwicheswhich is another easiest & tastiest version of making sandwiches. Do check it out as well.
Put your own spin on it. And lemme know how it turns out. Post a photo on Facebook (Recipestable) or on Twitter so I can see how lovely yours turn out.
Happy Sandwiches Making!!
If you like this post, Please Subscribe to my blog and let me know your feedback by commenting below.. I have lots more recipes to share with you.
Egg and Cucumber sandwiches are the most delicious, easiest finger foods to make. All you need is sliced white bread, boiled eggs, mayonnaise and of course, cucumbers. To enhance the flavor, I also spread a thin layer of dill with cream cheese spread.
Prep Time 10 minutesminutes
Cook Time 5 minutesminutes
Total Time 15 minutesminutes
Servings 12
Author Bushra Waheed
Ingredients
For Egg Salad
3hard boiled eggs
1/2cupmayonnaisemayo with olive oil is my favorite
1tablespoonfresh dillchopped
1/4teaspoongarlic powderoptional
1/4teaspoonpepper
salt to taste
For Sandwiches
3tablespooncream cheese spread
1large cucumberpeeled and thinly sliced
12sliced white sandwich bread
Instructions
Method
In a medium bowl, mix together the eggs and mayonnaise until completely incorporated.
Add garlic powder, salt, pepper and chopped dill. Mix until well combined.
Set aside.
Toss bread slices on both sides.
Spread egg spread mixture on 4 bread slices.
Cover with another four bread slices.
Top with cheese spread and cucumber strips, then close sandwiches with remaining bread slices.
Cut crusts from bread, forming finger sandwiches. Cut each sandwich into three, creating 3 rectangle mini-sandwiches each. Enjoy!
Notes
Serving Suggestions: Serve with tea or you can enjoy with finger chips and chili garlic sauce.
A MUST-TRY : Trending in LAHORE – Thai-Style Ice Cream Rolls
Move over fro-yo! There’s a new dessert in town. Forget crazy flavors or over-the-top ice cream sandwiches, this summer’s hottest dessert is a frozen treat that’s made its way to Lahore by way of Thailand. Popular on the streets of Thailand, ice cream rolls have finally made their debut in Lahore and are a street treat not to be missed.
Chaudary Ice Rolls
Trending in LAHORE Thai-Style Ice Cream Rolls, but what exactly makes this chilled specialty different from your typical scoop? It’s made to order, for one.
Here’s how it works:
An ice cream base and your choice of add-ins are poured onto an anti-griddle, a metal plate that can get as cold as -4 degrees Fahrenheit. Then, in Cold Stone-esque fashion, the staff chops and smashes the ingredients together with metal paddles as they start to freeze. In just minutes, the cream firms up and it’s spread into a thin layer, then scraped into the chubby rolls that we’re seeing all over Instagram.
They made Ice cream live upfront of you within a minute with purest milk and zero preservatives and topped with Fruits and favorite toppings, that is the most amazing thing that has ever happened! You can add different brownies and cream and other toppings as well with it. No ice cream can be as fresh and delicious as this!
It’s fun to watch your ice cream being made right in front of you, which also provides obvious Snap chat opportunities. Not only does it taste good, but it is visually appealing; good enough to be ‘grammed!
Location: DHA, Lahore.
Price range: Rs.400 – 500 per cup with free extra toppings. 😛
Cell No: 0321 6063739
Foodies rejoice, this new dessert is nothing short of revolutionary! You can learn more about them here.
Fish n chips is the most popular English fast food. Traditionally battered fried fish is served with delicious potato chips, tartar sauce, mushy peas and lemon quarter to spice up the meal.
Prep Time 20 minutesminutes
Cook Time 20 minutesminutes
Total Time 40 minutesminutes
Servings 3
Author Bushra Waheed
Ingredients
For Fish
500gm cod fish fillets
1egglightly beaten
1/2cupplain flour
1/2cuprice flour
1cupchilled water
1tspvinegar
1/2tspblack pepper
1/4tspbaking powder
salt to taste
Oil for frying
For Potato Chips
500gm potatoes
1/4cornflour
salt to taste
Instructions
For Fish
Season the fish fillets with vinegar, salt and pepper and leave it for 10 minutes.
In a mixing bowl, whisk together the rice flour, baking powder, 1/4 cups of the plain flour, and 1 teaspoon of salt. Pour in the egg, lemon juice and sparkling water, and mix just to combine everything – you do not need to over-mix. Refrigerated this batter until ready for use.
Place the remaining cup of flour in a wide bottomed bowl and dredge the fillets through the flour, coating them well on all sides. Then dip them into the batter, turning and swishing, to again ensure they are well coated all over.
Deep fry fish fillets for 8-10 minutes or until golden brown and puffed off.
Once all the fillets are cooked, transfer them to a paper towel-lined large platter and pat them dry with more paper towels. Sprinkle with more salt, if desired.
For Chips
Peel potatoes then cut into 1/4-inch thick chips.
Blanch the potato sticks, in batches if necessary, in the boiling water. About 2 minutes should do it.
Strain well and pat dry on paper towel.
Sprinkle cornflour over them and season with some salt.
Heat oil in a deep pan over medium heat. Fry potato chips for 10 minutes or until crispy ad golden. Fish n Chips are ready to serve. ENJOY!!
Notes
Serving Suggestions: Serve Fish and Chips with lemon wedges along with tarter sauce.
In the Name of Allah, Most Gracious, Most Merciful
When you’re home alone and nobody has made dinner, what do you usually make for yourself to eat? To me dining alone, at home means you can really break all the rules. You Make Fish and Chips And go a bit overboard and make pasta salad. Cooking is my therapy and my cure all. Whipping up ingredients, the aroma of food, that first bite, the feeling that it has all come together just right is a balm like no other.
Photo: English-Style Fish and Chips
English-Style Fish and Chips
Fish n chips is the most popular English fast food. Traditionally battered fried fish is served with delicious potato chips, tartar sauce, mushy peas and lemon quarter to spice up the meal.
Photo: English-Style Fish and Chips
That fateful day, I craved some kind of fast foodwith all my being. I opened my freezer and was looking around for inspiration when some fish fillets caught my eye and I knew what was coming next. So, I decided to make Fish and Chips, and they turned out awesome! This English-Style Fish and Chips is gloriously indulgent. It is so good on it’s own, but I suspect it would be even better paired with some kind of salad. Super filling; a complete balanced meal all in one platter. Save yourself some time and money, and try this English-Style Fish and Chips, and quell those cravings!
Photo: English-Style Fish and Chips
The condiments are all up to you. You can serve it with any sort of sauce, however much you like.But I enjoyed it with veggie pasta salad.
If you want, I can put up a detailed post on this Veggie Pasta Salad next. Just let me know in the comments box below.
Super filling; a complete balanced meal all in one platter.
Bismillah, let’s begin!
Check it out the English-Style Fish and Chips recipe and printable version below.
I have also posted Crumb Fried Fish Recipewhich is another easiest & tastiest version of making Fried Fish. Do check it out as well.
Put your own spin on it. And lemme know how it turns out. Post a photo on Facebook (Recipestable) or on Twitter so I can see how lovely yours turn out.
Happy Cooking!!
If you like this post, Please Subscribe to my blog and let me know your feedback by commenting below.. I have lots more recipes to share with you.
Need a great recipe for just the ingredients you have on hand? Then try this one. Your kids will love opening their lunch boxes to enjoy these “Mince Stuffed Cutlets”.
Prep Time 10 minutesminutes
Cook Time 35 minutesminutes
Total Time 45 minutesminutes
Servings 8
Author Bushra Waheed
Ingredients
For the Mince Stuffing
1/2kglamb or mutton mince
1large onionminced
1teaspoongarlic paste
1teaspoonginger paste
1teaspooncumin powder
1teaspoonred chili powder
1teaspooncoriander powder
1/2teaspoongaram masala powder
salt to taste
1tablespooncooking oil
2green chilieschopped
2tablespoonmint and coriander leaves
For Potato Filling
4potatoesboiled and mashed
1/2teaspooncrushed red chili
1/2teaspooncumin seeds
1/4teaspoonblack pepperfreshly ground
salt to taste
mint and coriander leavesfinely chopped
For Cutlets
1cupbread crumbs
2eggslightly beaten
oil for shallow frying
Instructions
Method
Heat oil in a saucepan or pot over medium heat.
Saute onion, for 5 minutes or until transculent.
Now add ginger garlic paste and cook for 30 seconds.
Now add the mince and season with red chili, cumin powder, coriander powder and salt.
Stir well.
Cover and let it simmer for 25 minutes on low heat.
No need to add extra water. Cook meat in its own juices.
Remove the lid and cook meat on high flame or until it dries out and smells cooked and gets slightly brown, keep moving around and fry by adding about 1 tbsp of oil.
Now add the green chilies, coriander leaves, mint leaves.
Turn the heat off and do not cook further.
Keep aside and let it cool down.
To Make Potato Filling
Mash potatoes in a large bowl. Add the salt, cumin seeds, red chilli, black pepper and coriander mint leaves.
Mix until well combined.
To Make Mince Stuffed Cutlets
Make patti of potato mixture and spread mince mixture over it and cover with another pattie.
Seal edges and flatten it into a round shape.
Keep making until mixtures are used up.
Beat eggs in a small bowl.
Dip cutlets in egg then coat in crumb mixture.
Heat oil in a shallow pan over medium heat.
Fry for 2 minutes on each side or until light brown.
Remove from the oil and absorbent on kitchen paper.
Mince Stuffed Cutlets are ready to serve. Enjoy!
Notes
Serve immediately with green coriander chutney or ketchup or by themselves!
In the Name of Allah, Most Gracious, Most Merciful
Need a great recipe for just the ingredients you have on hand? Then try this one. Your kids will love opening their lunch boxes to enjoy these “Mince Stuffed Cutlets”.
Photo: Mince Stuffed Cutlets Recipe
Mince Stuffed Cutlets
When I was in college, these “Mince Stuffed Cutlets” was one of the first recipes I ever added to my regular rotation.
Mince Stuffed Cutlets is a great appetizer that involves soft delicate potato patties stuffed with seasoned cooked mince. Delicious and crispy patties that can be made in just 35 minutes. These make a great snack or appetizer or even a starter for parties or perfect for weekend meals.
Photo: Mince Stuffed Cutlets
I used to fill my cutlets with spinach, broccoli, cheese, or whatever ingredients I have in my hand. It’s so fun to experiment with different ingredients, home cooking should be easy and fun! Although I enjoyed a lot of combinations, mince stuffed cutlets was always my favorite (and cheese, too).
I know it seems quite far apart but when you take a bite it taste very close to the potato chops.
Photo: Mince Stuffed Cutlets Recipe
There are many variations I have seen online. Some use a little flour mixed with the potato mash, an egg wash, bread crumbs and cornflour. You can make it vegetarian by using cooked peas and carrots in garam masala with some onions and fresh coriander then mixed with the mashed potato and shallow fried. You can replace the lamb mince with cooked ground chicken or beef, or fish. Try getting more creative: This is great fun – keep adding different ingredients to taste the different flavors.
Photo: Mince Stuffed Cutlets
Bismillah, let’s begin!
Check it out the Mince Stuffed Cutlets recipe and printable version below.
Recipe Note’s:
You can use Chicken /Mutton /Beef mince as on your choice.
These freeze quite well so you can pop them in the freezer before frying them and then completely defrost and then coat and fry.
I have also posted Sesame Potato Cutlets Recipe which is another easiest & tastiest version of making Cutlets. Do check it out as well.
Put your own spin on it. And lemme know how it turns out. Post a photo on Facebook (Recipestable) or on Twitter so I can see how lovely yours turn out.
Happy Cooking!!
Keep remember me in your Dua’s and Stay tuned for new content on the blog 🙂
If you like this post, Please Subscribe to my blog and let me know your feedback by commenting below.. I have lots more recipes to share with you.
In the Name of Allah, Most Gracious, Most Merciful
Good Afternoon
It is the middle of March and spring is here and in full bloom, budding flowers, chirping birds, and plenty of new activities to do.
With spring here in full bloom, I try to get out for daily walks, which is a joy. With the earth greening, trees budding, flowers blossoming and songbirds chirping, hope and renewal fill every living thing. (inshaAllah)
The days are getting much warmer now and my family always looks forward for light and comforting food. Dinner is the only time when everybody gets to gather around and have meal as a family. So I always plan to cook something simple and most importantly light and healthy.
The Best Meatballs You’ll Ever Have
Last week, I made the world’s most amazing Meatballs in a tomato sauce with garlic bread on the side – where’s my invitation to go on Masterchef?? 💁🏻 lol 😛
I like to cook meatballs in sauce! These Italian flavored meatballs in tomato sauce are my new favorite! 😀 ☺
These meatballs are light, tender, and bursting with juicy flavor.You can just mix all the ingredients together, roll them and cook them and the best part of all, you can have these on your dinner table in less than 45 minutes.
The Best Meatballs You’ll Ever Have
They would be great over pasta, mixed with tomato sauce as an appetizer or on their own, But I served these meatballs over some veggie noodles tossed in olive oil along with garlic bread. A recipe must try! The BestMeatballsYou’llEverHave!
I have also posted Meatball and Pea Pulaowhich is another easiest & tastiest version of making Dinner. Do check it out as well.
Put your own spin on it. And lemme know how it turns out. Post a photo on Facebook (Recipestable) or on Twitter so I can see how lovely yours turn out.
Happy Meatballs Making!!
Keep remember me in your Dua’s and Stay tuned for new content on the blog 😉
If you like this post, Please Subscribe to my blog. I have lots more recipes to share with you. And If you make it then let me know your feedback by commenting below.
These meatballs are light, tender, and bursting with juicy flavor.You can just mix all the ingredients together, roll them and cook them and the best part of all, you can have these on your dinner table in less than 45 minutes.
Prep Time 10 minutesminutes
Cook Time 40 minutesminutes
Total Time 50 minutesminutes
Servings 6
Author Bushra Waheed
Ingredients
For the Meatballs
1poundhigh-quality lamb mince
1small oniondiced
1/2cupseasoned breadcrumbs
2tablespooncream
2garlic cloveschopped
1large egg
3tablespoonsfresh parsleychopped
3tablespoonParmesan cheesegrated
3tablespoonMozarella Cheesegrated
1teaspoonfreshly ground pepper
1/2teaspoonsmoked paprika
1/2teaspooncayenne
salt to taste
2tablespoonbutter or oil
For the Sauce
1tablespoonextra virgin olive oil
2garlic clovesminced
1/2small onionchopped
1/2cuptomato thick puree
1red peppercrushed
2tablespoonsfresh parsleychopped
1/2teaspoonred pepper
1/4teaspoonsalt
Instructions
Method
Preheat oven to 200 degree C.
Prepare the meatballs: Put all ingredients into a food processor or chopper.
Process until well combined.
Note; Texture should be soft, but not sopping wet. If it’s not soft enough, add 1 tablespoon of milk.
Now take it out in a mixing bowl.
Shape into egg size balls by pushing them into the shape softly in your hands.
Place meatballs on a baking tray and brush with melted butter or olive oil.
Bake for 30 minutes or until they are just barely cooked through and no longer pink inside. (To keep them tender, do not overbake).
Remove and reserve.
To Make the Sauce
Heat oil in a large saucepan over medium heat.
Add the garlic and onion, and sprinkle the salt over them to bring out their flavor.
Add red pepper. Cook and stir occasionally for 5 minutes or until the onion is translucent.
Now add the tomato puree.
Bring to a boil.
Add parsley and reduce the heat to medium-low.
Let it simmer for 5 minutes or until nicely blended.
Now carefully add the baked meatballs to the pan.
Simmer for 20 minutes or until they are soaked in sauce.
ENJOY!!
Notes
Serving Suggestions: Serve meatballs and sauce over spaghetti. Or healthy alternative serve them over veggie noodles.
Hope all of you are doing well and are leading happy, healthy lives. It seems such a long time since I’ve updated the blog. Well, ’seems’ is probably not the correct word to use, and I am promptly changing it to ‘has really been’! But thanks for being patient and still showering the blog with love during my absence. Sorry for that as I haven’t been feeling good these days.
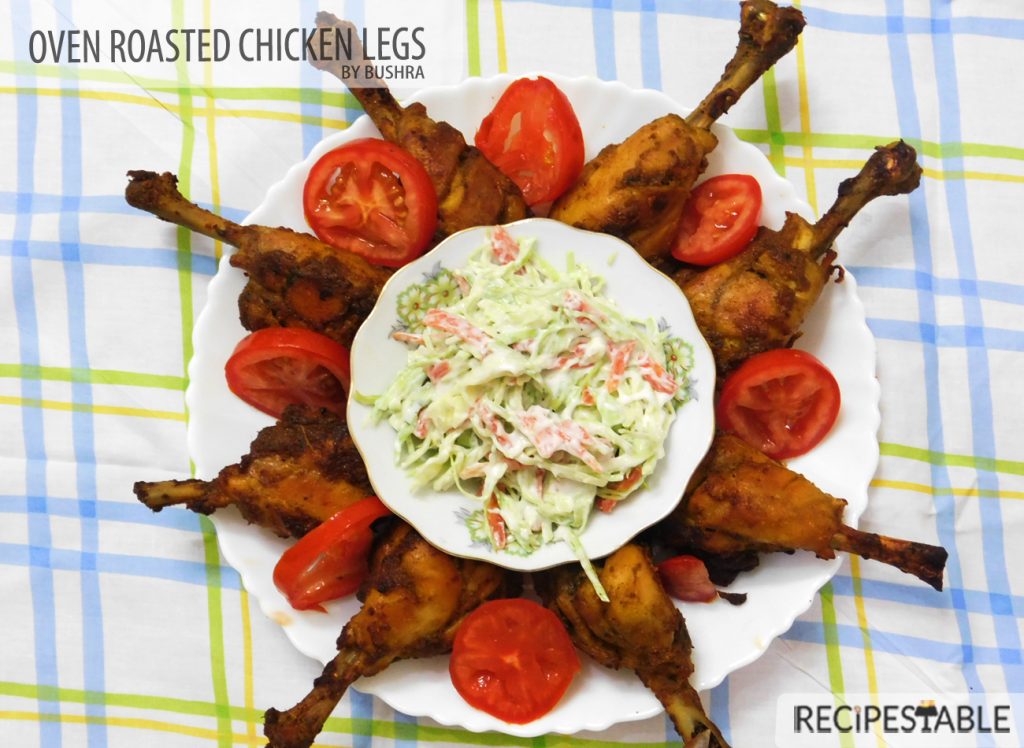
Oven Roasted Chicken Legs Recipe
A few weeks ago, We had a party on home. And I made Oven Roasted Chicken Legs on my brother request. He’s a Drumsticks Lover. It was a great evening, with plenty of food and some great company. That evening also made me realize how many more wonderful dishes I have yet to celebrate on this blog.
Photo: Oven Roasted Chicken Legs
So, today I come up with a new recipe of Oven Roasted Chicken. Sounds YUM YUM!!
Oven Roasted Chicken Legs Recipe Oven Roasted Chicken Legs Recipe
Oven Roasted Chicken Legs
If you’re obsessed with bakedchicken drumsticks? Or If you love eating crispy chicken legs and you love easy meals. This one checks all the boxes. Make these Oven Roasted Chicken Legs for dinner soon, you won’t be disappointed.
Oven Roasted Chicken Legs Recipe
Crispy and juicy oven roasted chicken legs that will satisfy even the most die-hard fried chicken fan. For a simple, yet delicious evening meal, serve this chicken alongside ovenroasted veggies or green salad.
So Let’s begin!
Check it out the Oven Roasted Chicken Legs recipe and printable version below!!
Recipe Note’s:
Do not place the seasoned chicken pieces directly on the baking sheet. Instead, place a wire cooling rack on top of the cookie sheet and place the chicken pieces on the rack, this will allow air to circulate around the chicken, resulting in perfectly crispy chicken without the soggy bottoms.
If you like the chicken drumsticks nice and browned, place them under the broiler for few minutes after they are baked.
If you prefer cheese, you can sprinkle 1/4 cup of freshly grated Parmesan cheese over them.
I have also posted Chili Chicken Legswhich is another easiest & tastiest version of making Drumsticks. Do check it out as well.
Put your own spin on it. And lemme know how it turns out. Post a photo on Facebook (Recipestable) or on Twitter so I can see how lovely yours turn out.
Happy Cooking!!
Keep remember me in your Prayers and Stay tuned for new content on the blog 😉
If you like this Oven Roasted Chicken Legs, Please Subscribe to my blog. I have lots more recipes to share with you. And If you make it then let me know your feedback by commenting below.
If you're obsessed with baked chicken drumsticks? Or If you love eating crispy chicken legs and you love easy meals. This one checks all the boxes. Make these Oven Roasted Chicken Legs for dinner soon, you won’t be disappointed.
Prep Time 10 minutesminutes
Cook Time 40 minutesminutes
Total Time 50 minutesminutes
Servings 10
Author Bushra Waheed
Ingredients
10chicken legs or drumsticks
2tablespoonmelted butter
1tablespoonlemon juice
1teaspoongarlic powder
1teaspoononion powder
1teaspooncumin powder
1teaspoonred chili powder
1teaspoonherb seasoning
salt to taste
Instructions
Method
The most important thing about oven roasted chicken legs is to rinse and pat dry the chicken. The chicken needs to be as dry as possible before we bake, this way the skin will crisp up.
Preheat oven at 200 degree C.
Now rub the chicken legs with melted butter,lemon juice, garlic powder, onion powder, red chili, salt, cumin and herb seasoning.
Place chicken pieces on wire rack and set into a baking sheet.
Bake the chicken legs in the preheated oven for 30 minutes then use tongs to rotate each drumstick and bake until done.
Remove from oven and allow to rest for 10 minutes before serving (this little step is very important if you like juicy chicken.
Oven Roasted Chicken Legs are ready to serve. Enjoy!!
I always tempted to try popular dishes at home, and perfecting it as possible as I could. One among them was this “Restaurant Style Lahori Mutton Karahi”.It is one of most popular Pakistani dish that you will come across almost every Pakistani restaurant menu anywhere in the world.
Prep Time 10 minutesminutes
Cook Time 1 hourhour30 minutesminutes
Total Time 1 hourhour40 minutesminutes
Servings 8
Author Bushra Waheed
Ingredients
1-1/2kglamb or mutton
1/2cuppure butter
1/2cupplain yogurt
3 tomatoescut into four pieces
3onionsthinly sliced
4green chilieschopped
2tablespoonginger garlic paste
1/2cupgarlic watermix 1 tsp garlic paste with 1 tsp lemon juice in 1/2 cup of water
1-1/2teaspoonred chili peppercrushed
1/2teaspoonturmeric powder
1teaspoondried fenugreek leavesoptional
2tablespooncumin seedsroasted & crushed
2tablespooncoriander seedsroasted & crushed
1/4teaspoonblack pepper
1-1/2teaspoonsalt or to taste
For Garnishing
1/2teaspoongaram masala powderfor sprinkling
fresh coriander leaveschopped
gingercut in julienne
lemonthinly sliced
tomatothinly sliced
For Serving
naan or butter naan
Instructions
Method
Melt butter in a deep wok or pan over medium heat.
Fry onions for 3-4 minutes or until transculent.
Add ginger garlic paste and meat. Cook for 5-8 minutes or until meat change its color.
Mix well and don’t add any water.
Meat cooked in its own juice
Cover with lid and cook for 45 minutes on medium heat.
Now add tomatoes, cover it again and cook for another 10 minutes.
Add all spices excpet black pepper, mix well.
Cook on high heat for 4-5 minutes then add yogurt, green chilies and black pepper.
Cook for another 15 minutes or until oil comes on top.
Now add garlic water and cook for 10 more minutes or until meat is tender and gravy is thickened.
Sprinkle garam masala over it.
Garnish with coriander leaves, green chilies, lemon slices, and ginger.
Restaurant Style Lahori Mutton Karahi is ready to serve. ENJOY!!
Notes
Serving Suggestions: Serve with butter naan along with raita and ring onions.
Isn’t the Title Interesting?Look down at the Picture just scrumptious and believe me the recipe is so simple.
Photo: Restaurant Style Lahori Mutton Karahi
Restaurant Style Lahori Mutton Karahi
Today, I come up with a new recipe: “Restaurant Style Lahori Mutton Karahi “. It is one of most popular Pakistani dish that you will come across almost every Pakistani restaurant menu anywhere in the world.
Lahore is famous for its culturally enriched food items.. impossible to be on diet there 😛 lol. People here in Lahore are known as food lover, which is why many new restaurants are constantly opening.
As all of you know, I always tempted to try popular dishes at home, and perfecting it as possible as I could. One among them was this “Restaurant Style Lahori Mutton Karahi”.
Photo: Restaurant Style Lahori Mutton Karahi
Mutton Karahi is a specialty of Lahori food, this dish is made by stir-frying small cubes of lamb or mutton with tomatoes, green chilies, ginger, and garlic in a karahi, the wok-like pan that gives the dish its name.I made it with a less fat. But taste was so good and excellent. Meat was so tender, juicy, deeply marinated in the masala (gravy) and uniformly cooked.
Photo: Restaurant Style Lahori Mutton Karahi
Very simple and lip smacking dish for anyone who love to have spicy treat occasionally. Its so simple that if you have ingredients in hand then Ready get set go.
Photo: Restaurant Style Lahori Mutton Karahi
It pairs the best with butter naan, or simply plain naan and may be served along with rice, tandoor roti and even homemade chapati’s along with zeera or mint raita and onion rings.
Let the meat eating begin!
Check it out the Restaurant Style Lahori Mutton Karahi recipe and printable version below!!
I have also posted Chicken Karahiand Kebab Karahi which are another easiest & tastiest version of making karahi. Do check it out as well.
Put your own spin on it. And lemme know how it turns out. Post a photo on Facebook (Recipestable) or on Twitter so I can see how lovely yours turn out.
Happy Cooking!!
If you like this Restaurant Style Lahori Mutton Karahi, Please Subscribe to my blog. I have lots more recipes to share with you. And If you make it then let me know your feedback by commenting below.