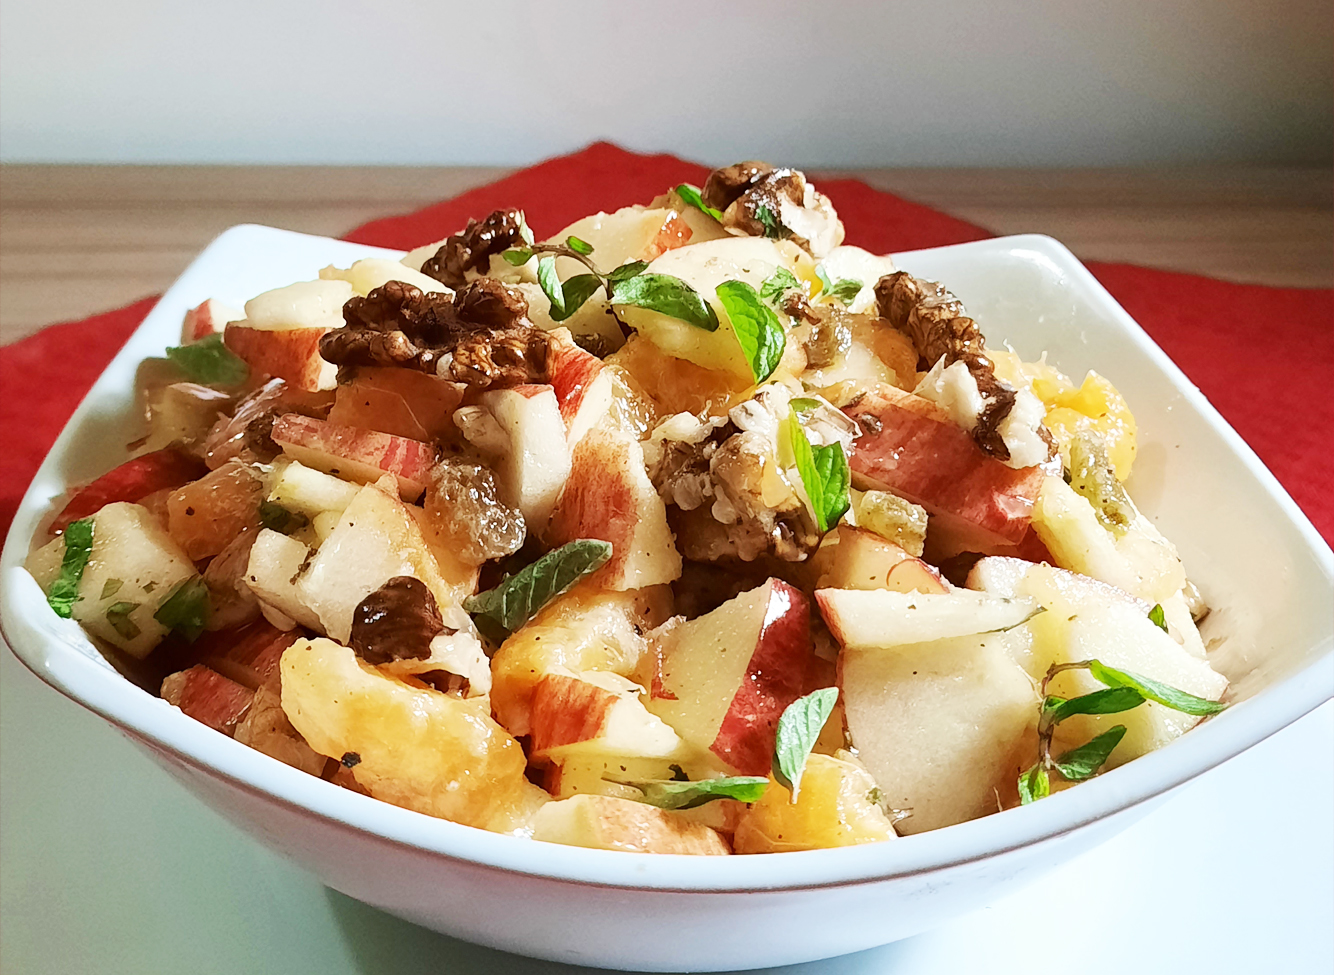
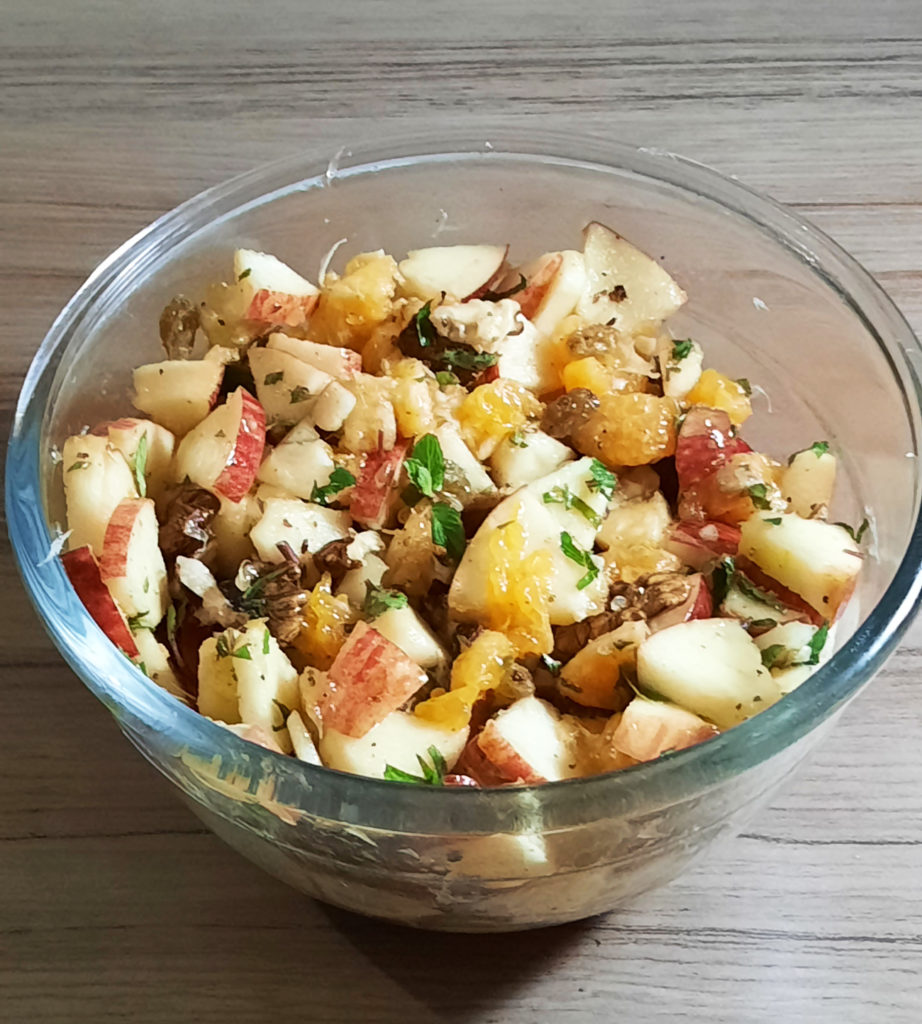
A light, refreshing Apple and Orange Salad recipe loaded with apples, oranges, raisins and walnuts with a flavorful dressing – perfect as an appetizer or entree!The flavors of the apples, oranges, walnuts and raisins are so clean and fresh. It never fails to please.
This year, I decided to try more salad recipes to stick to healthy diet. This was the first one on the list and it turned out excellent. Although I had it for lunch, I don’t know if I would recommend this for a main course, but definitely a great dinner salad.
Feel-Good Apple and Orange Salad Recipe
Ingredients in Apple and Orange Salad Recipe?
With only few ingredients, it’s quick and easy to make. The only tricky part is cutting the oranges.
Fruit: Apples & Oranges
Dry Fruit: Raisins & Walnuts
For Garnishing: Mint Leaves
For dressing: Vinegar, Olive Oil, Orange or mosambi juice salt and pepper
Feel-Good Apple and Orange Salad Recipe
How to Make this Apple and Orange Salad:
This apple and orange salad is super easy to make. To make this salad, simply:
Prepare the salad dressing: To make the salad dressing recipe, just whisk all of the ingredients together in a bowl (or shake them up in a mason jar) until combined.
Fruit Cutting: Next you need to peel an orange and cut it in small pieces. Then Core the apples and cut them in small pieces as well, equal to the orange pieces.
Toss all of your salad ingredients together: Add the oranges and apples to the bowl with raisins and add about 2/3 of a cup of roughly chopped walnuts to the salad. Drizzle evenly with the dressing, then toss lightly until combined and voila!!
And…serve! Sprinkle fresh mint leaves and enjoy! 🙂
Feel-Good Apple and Orange Salad Recipe
Other variations to this Apple and Orange Salad recipe
You can add Pecan or roasted almonds in place of Walnuts.
You can use ground Cinnamon to spice up your Salad.
You can also add some honey to sweeten your Salad as per your taste.
Apple and Orange Salad Recipe
Bismillah let’s get started. Check it out The Simple & Refreshing Apple Orange Salad Recipe and printable version here!!
A light, refreshing Apple and Orange Salad loaded with apples, oranges, raisins and walnuts with a flavorful dressing – perfect as an appetizer or entree!
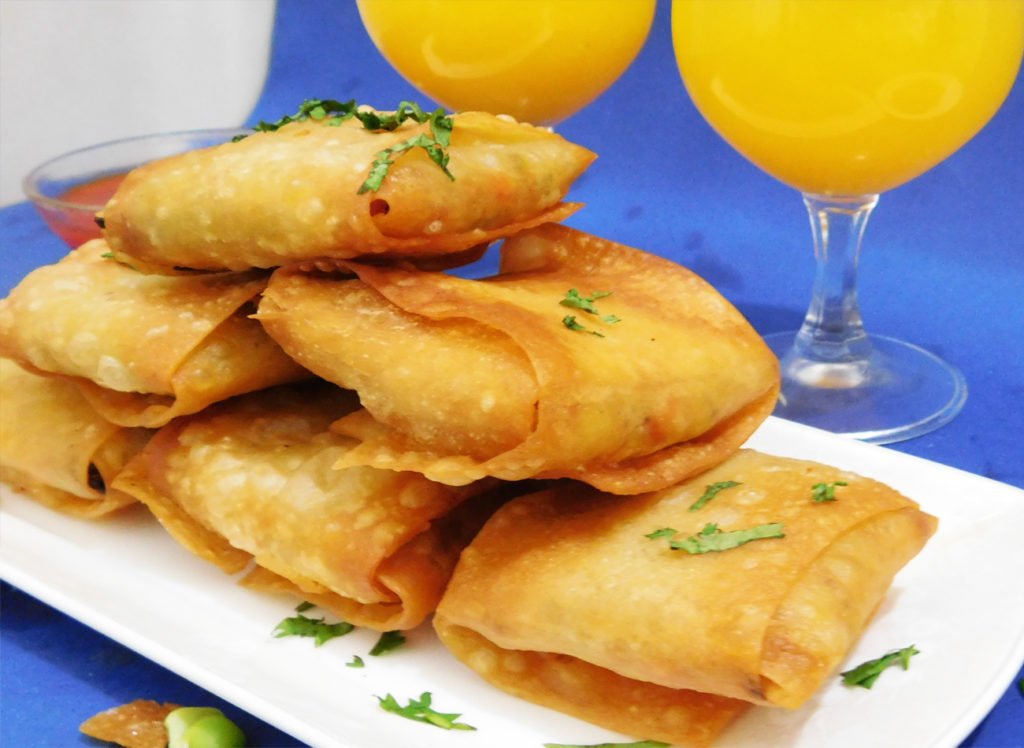
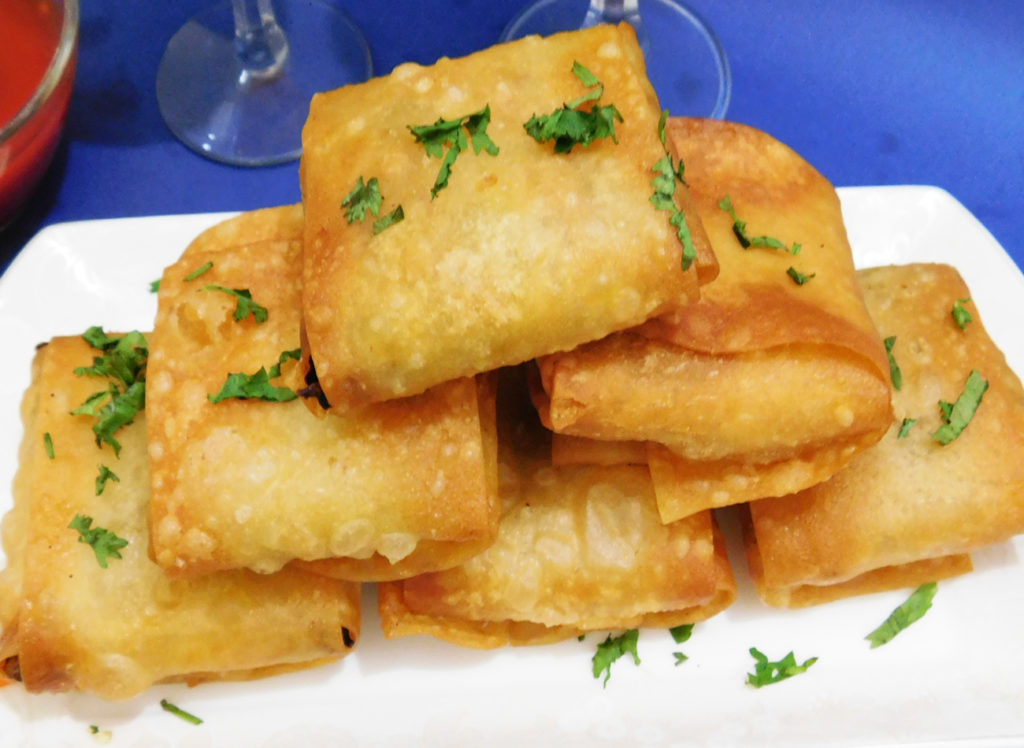
Very Veggie Box patties, the name itself rings in your ear, doesn’t it? You must be wondering is it a box or a patty 😉
The unique and interesting name is because of the way the these patties are folded and made, like wrapping a box. A savory veggie filling is put inside samosa wrappers and then deep fried.
If you are not familiar with box Patties, they are a deep-fried Pakistani pastry snack usually filled with something savory. They are called box patties because their shape resembles a square box which is made by overlapping two samosa wrapper sheets. They are loved all throughout the year but they become almost a staple in every household during Ramadan on the Iftar tables.
Very Veggie Box Patties Recipe ~ Ramadan snack doesn’t get better than this!
Ingredients in This Very Veggie Box Patties?
Not only are these simple to make (they require nothing more than few veggies, seasoning and samosa sheets), but the stuffing possibilities are endless!
Veggies: I used carrots, green peas, sweet corn, capsicum, boiled potatoes, cabbage.
Olives: Green and Black Olives
Seasoning: Black pepper, red Pepper flakes, salt
Sauce: red chili Sauce and soy sauce
That’s all you need to make this Very Veggie Box Patties ! Surprisingly simple ?
How to Make this Veggie Box Patties:
This Very Veggie Box Patties recipe is so easy to make and simple that definitely it’s worth trying.
Prepare the Filling: I start off with sautéing veggies to which I add boiled green peas, potatoes, carrot, capsicum, cabbage and sweet corn and olives. Then season it with salt, black pepper, red chili flakes, soy sauce and for an extra kick red chili sauce .
2. Prepare the Box Patties: Then put two samosa sheets in a cross pattern, one over the other so they make a + (plus) sign. Then put some veggie filling in the middle. Fold each of the edges one by one over each creating a parcel. 3. Frying: Then deep fry on medium flame till crispy and golden. You can fry these in advance and keep them in the oven on warm mode and serve when required.
Very Veggie Box Patties Recipe
Can I play around with the filling?
Yes, you can! In this recipe, I have used vegetables carrot, cabbage, capsicum, corn and olives. Some options that I suggest are:
For a meaty version use chicken or beef instead of veggies or use shredded cottage cheese (paneer) instead of meat for a vegetarian option. Just make sure that the protein in the filling is cooked through. As the box patties are only fried for a few minutes, I wouldn’t suggest to put raw meat.
Skip the vegetables, or add more vegetables. Such as French beans carrots, black olives, green chilies, mushrooms or broccoli.
If you are using large vegetables like broccoli or carrots, make sure they are finely chopped. Pulsing them in the processor for a few seconds will work.
Add some taco seasoning for a Mexican twist or experiment with other spice blends. 😛
To give a different taste to the patties box, you can also add pizza seasoning or Oregano and Chili Flakes to the vegetable stuffing.
Very Veggie Box Patties Recipe
Other variations to this Very Veggie Box Patties?
Healthy Alternative: These square shaped patties are filled with a flavorful veggie filling. The chewiness of the veggie stuffing and the crunchiness of the covering, is a delicious combination. There are two options, baking or frying. If you do not like oil, you can bake it in pre-heated oven for 15 minutes or until crispy and golden brown. Deep frying obviously gives best results but they can also be baked or air-fried.
Wrappers: If you do not get samosa sheets , then cut the spring roll sheets into strips. The trimmings you can fry and keep them to garnish your soups or salads.
Extra Crispness: For extra crispiness, roll them with Bread Crumbs before frying.
Very Veggie Box Patties Recipe
Can I freeze them?
Definitely!
Grease a tray (can be plastic or a baking tray) and lay out the box patties one by one on it, making sure there is space between each one of them.
Keep them in the freezer for an hour or so till they are partially frozen. Once they are frozen, carefully remove them from the tray and place them in a plastic box or zip lock bags.
To make the box patties, just take them out of the freezer, thawed and deep fry on medium heat until crispy and golden brown.
This recipe actually makes a large batch that can be easily frozen and is just the thing to have on hand for impromptu guests or if you are in the mood for a light snack to enjoy with your evening tea.
Bismillah let’s get started. Check it out Very Veggie Box Patties Recipe and printable version here!!
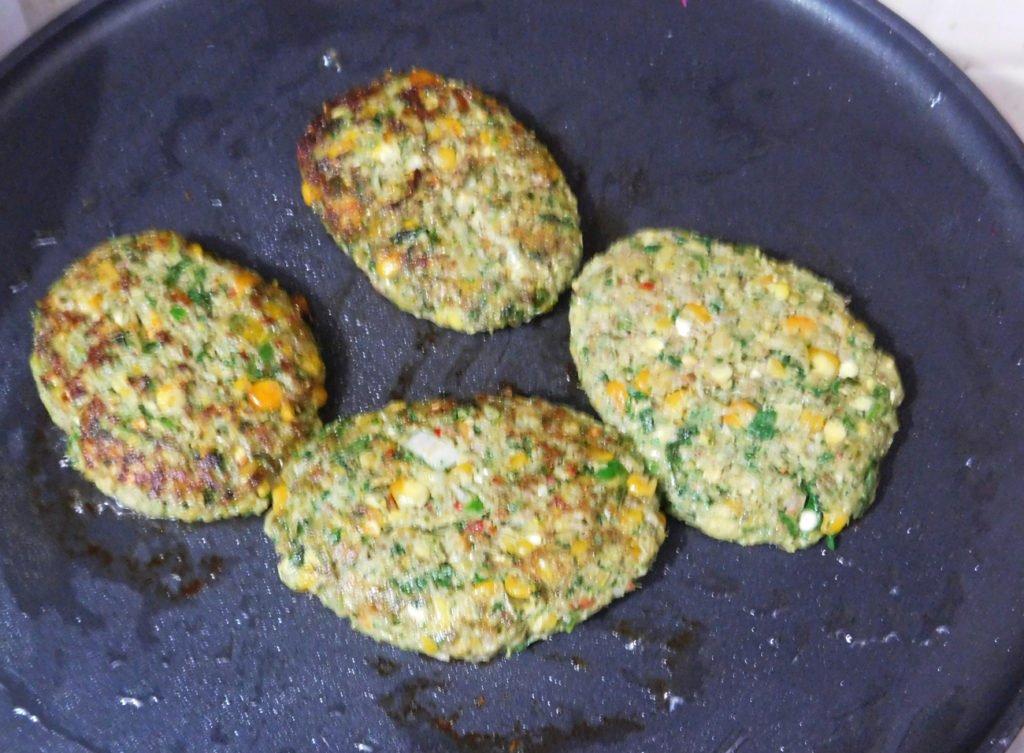
Imagine if you will that a lamb meat patty married a corn fritter and they had babies = Lamb corn Fritters. I’m not sure why I hadn’t thought of this sooner. They are healthier than regular lamb fritters; being half meat and half veggie and they are super juicy and flavorful.
Here’s a healthy recipe for Lamb Corn Fritters – without deep frying! Because nobody likes soggy fritters. And nobody wants to deal with a vat of oil tonight! Dinner really doesn’t get any easier than this! These Lamb Corn Fritters are so easy, you can practically whip up these juicy fritters in no time!
These fritters are ideal to make with fresh corn cut off the cob, but can be made with canned or frozen corn. Serve for breakfast, lunch, dinner!
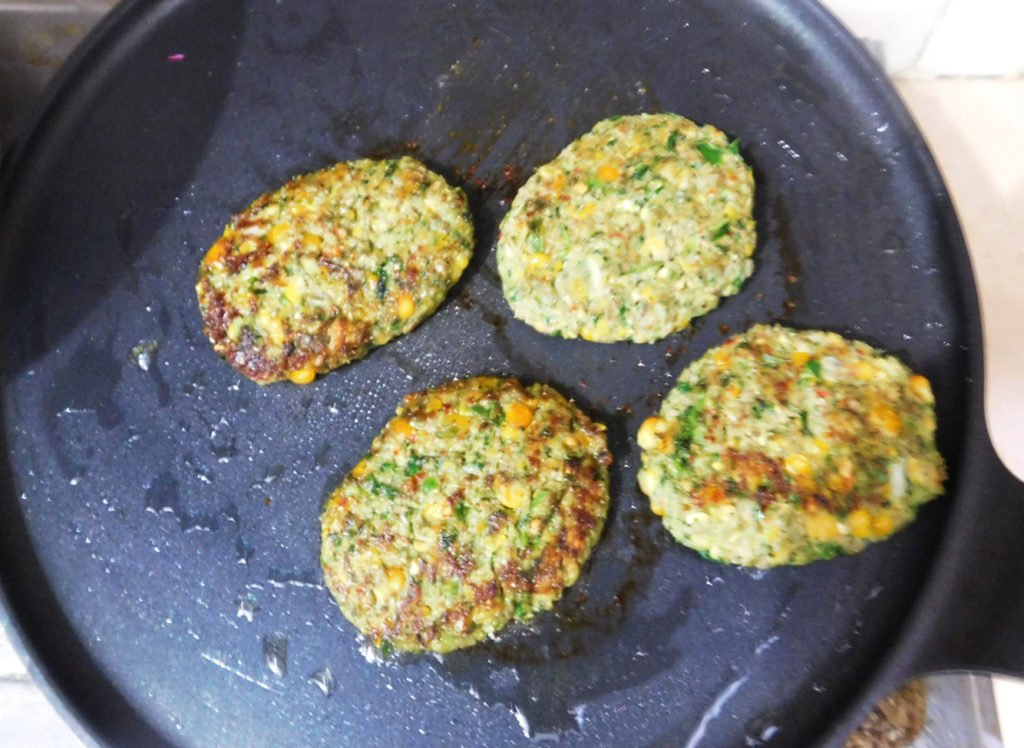
Lamb Corn Fritters Recipe
What you need to make really great, Lamb Corn Fritters
Here’s what you need to make these Lamb Corn fritters:
Ground Lamb: I like to grind my lamb at a ratio of about 80% lean. I feel this brings out the most flavor. The best places to buy fresh ground lamb is your local butcher shop. If you want to use lamb, ask your butcher to grind it for you or, to make your own ground lamb, start with a lean cut. You can also use lean ground beef or turkey instead. Corn: as noted above, fresh is better for both flavor and crispiness. But canned and frozen work too, you just need to make an effort to dry it out as much as you can. Egg: egg to bind the meat and corns. It will help to get mince to stick together better. Ricotta Cheese: – for a good hit of savory flavor AND to make the fritters extra juicy and flavorful! Green Masala: Green onion, green chilies and coriander – for a hit of freshness. Seasoning: salt, black pepper and red pepper flakes (my fav) Olive oil: to sauté
Lamb Corn Fritters Recipe
How to make Lamb Corn Fritters
And here’s how to make them.
Mixing: Place lamb mince and corn in a bowl. Then add 1 lb fresh ground lamb. 1 egg, finely sliced green chilies, green onions, fresh coriander, salt, black pepper, red pepper and 1 cup ricotta cheese. Mix until well combined. Let it rest for 15 minutes.
Cooking: Heat a large non-stick skillet over medium heat and add 2 Tbsp. extra light olive oil. Place a heaping tablespoon of the mixture into your hand and form a oval or round shaped patty about 1/3-inch thick. Cook over medium heat uncovered for 5-7 minutes, then flip, cover and cook for another 5 minutes more or until meat cooked through. Add more oil to the pan as needed for subsequent batches.
The fritters take a good 12-15 minutes to cook so they’re golden on the outside and for the raw meat to cook through (remember, these are fritters so they are not very thick).
Pro Tip: You can use an ice cream scooper with a lever to scoop the batter into the pan. Then flatten using a greased spatula! But don’t crowd the skillet, adding more oil to pan if required.
Lamb Corn Fritters Recipe
How to serve corn fritters
Corn fritters is one of those rare foods that truly spans the breakfast-lunch-dinner spectrum! Here’s how to serve it.
stack of 4 corn fritters topped with poached or pan fried egg (runny yolks of course!)
Though having suggested those various ways to serve it, the reality is that you will want to snatch them fresh off the stove, before you’ve even had a chance to plate them up properly. And that’s totally ok too! – Bushra
Lamb Corn Fritters Recipe
Bismillah let’s get started. Check it out The Lamb Corn Fritters Recipe and printable version here!!
Want more Fritters recipes?
If you’re looking for more fritters inspiration, here are a few more of my faves:
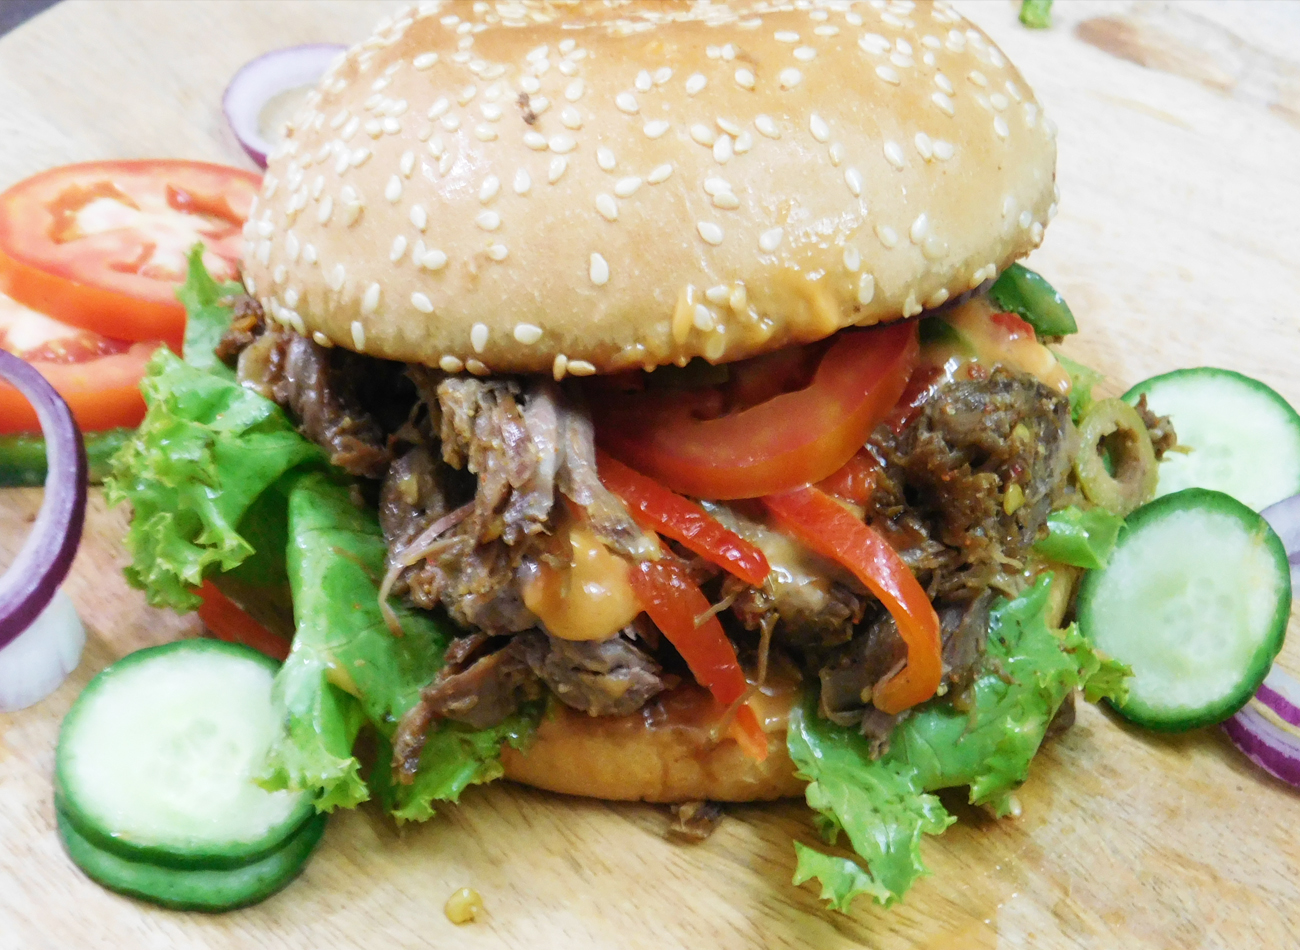
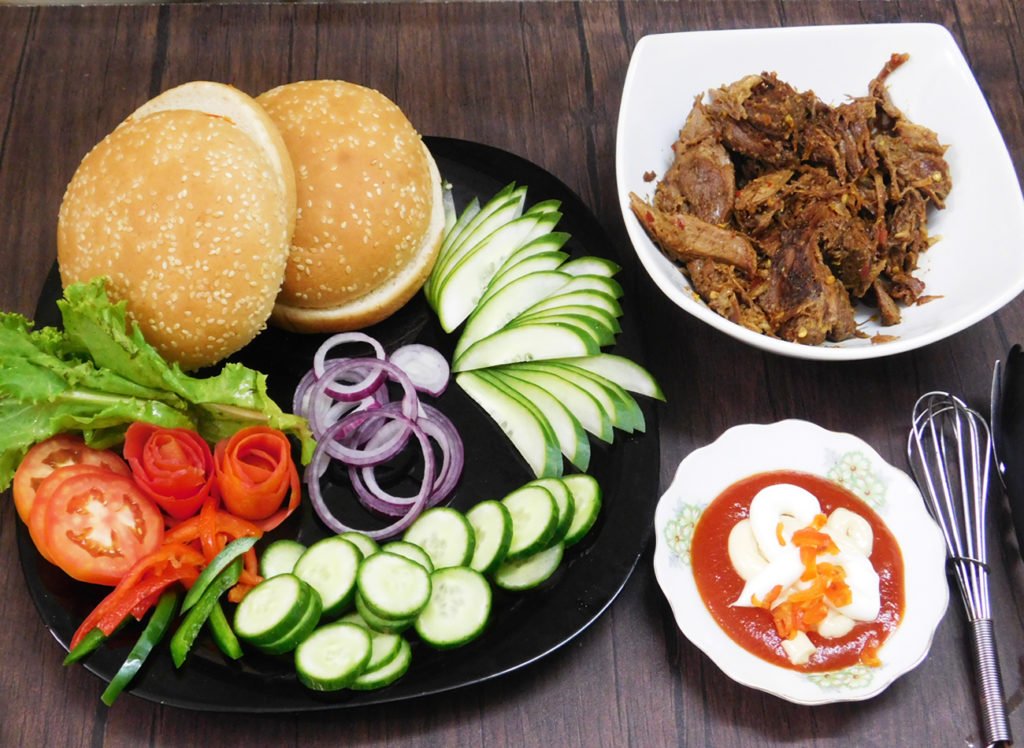
Do something different on burger night…take it to another level ! If you’ve made roast lamb but don’t know what to do with the leftovers, then make this best Ever Roasted Lamb Burgers Recipe. This burger is next-level!
Who said that roasted lamb is just a one-hit wonder, right? You can pretty much reuse the leftovers from a roasted lamb dinner for a couple or more days in the week. There are plenty of fantastic ways to revamp leftover roast and give them delicious, new life! The simplest way to revamp leftover roast is to make tasty Roasted Lamb Burgers!
In essence, some of the leftover roasted lamb might get a bit dry if you don’t use the leftovers immediately. So shoving those pieces of meat into a burger with a rich sauce is the perfect solution. With this roasted lamb burger recipe, you’ll feel like you’re having a cosy Sunday meal any day of the week you want.
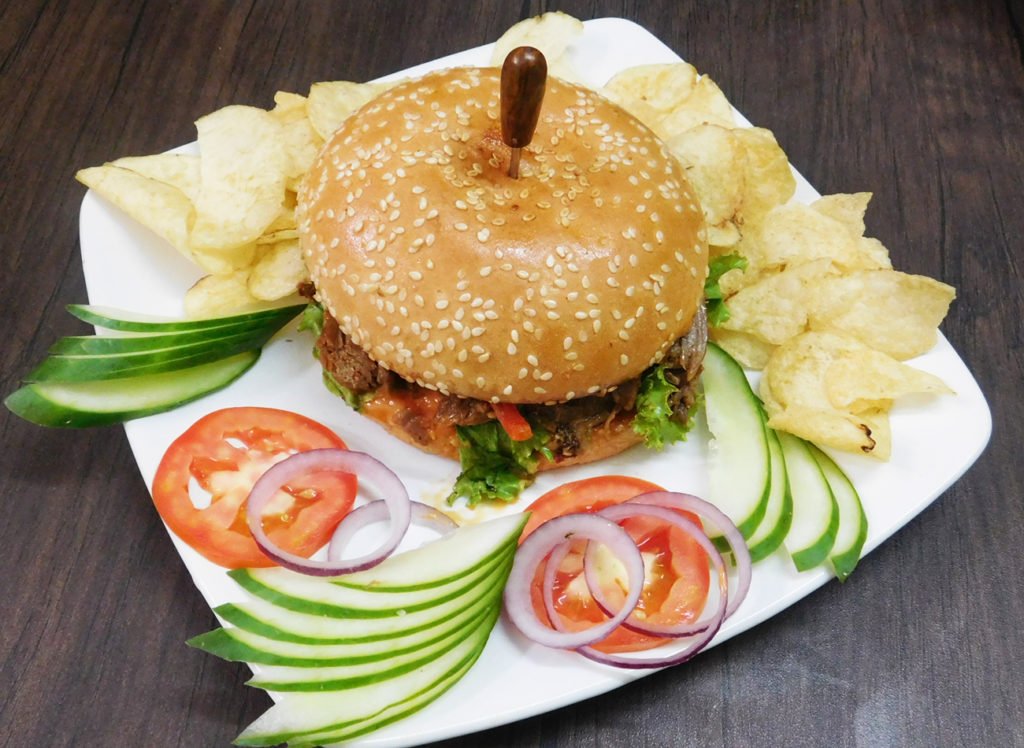
Best Ever Roasted Lamb Burgers Recipe
There’s nothing more satisfying than making a delicious roasted lamb burger. You know the kind….fluffy bun topped with a juicy meat that’s piled high in flavorful toppings?
Best Ever Roasted Lamb Burgers Recipe
Ingredients in Roasted Lamb Burgers?
Take your burger night to the next level with homemade lamb burgers! Not only are these simple to make (they require nothing more than leftover roasted lamb, burger buns, sauce and salad leaves), but the topping possibilities are endless, ensuring a little something for every member of your family!
That’s all you need to make this Best Ever Roasted Lamb Burgers ! Surprisingly simple ?
This Best Ever Roasted Lamb Burgers Recipe is the EASIEST way to transform your leftover roast into a hearty, scrumptious breakfast/brunch sandwich recipe the next day. Experiment with different sauces or fillings and put your own twist on these burgers. Just make sure that you guard it well if you happen to take it to work. It’s a total standout burger and other colleagues will be eyeing it. Yes, it’s that good!
How do you make Roasted Lamb Burgers?
Best Ever Roasted Lamb Burgers Recipe
Dry meat isn’t going to make this roasted lamb burger particularly appetizing. Sure, gravy can fix it to an extent, but not really. Your tender, juicy, succulent meat roast from the previous day quickly turns dry and insipid the next day as you reheat it, and that’s enough to ruin a great burger. So here’s the secret to keeping that lamb roast juicy the following day as well – steam the leftover roast in the oven so that the meat stays tender and juicy without drying up!!
Gently reheating the lamb roast wrapped in foil or parchment paper is a simple way to ensure that your leftover lamb roast tastes just as good as it did the previous day. These Best Ever Roasted Lamb Burgers are juicy, flavorful and super easy to make. Unexpected, yet super homey and familiar! You’ll love every bite! Be sure to grab my tips below.
Best Ever Roasted Lamb Burgers Recipe
What To Serve With Roasted Lamb Burgers?
These roasted lamb burgers don’t require a whole lot else to serve along, but if you’re stuck for what to serve alongside your roasted and pulled masterpiece? Don’t worry… here’s some delicious recipes for a little divine inspiration:
Crunchy Pickled Kachumber Salad– a sumptuous side dish that’s incredibly easy to whip up, pickled salad take minutes to make and taste amazing
Smiley Face Fries – serve these wonderful smiley face fries alongside your roasted classic burger. It’s a very easy side to prepare and tastes fantastic.
Creamed peas – these are no ordinary peas. If you want your peas to pack a punch, make these creamy peas. Add them to the side of any roast recipe and you won’t go wrong.
Roasted Lemon Potatoes – another easy sweet potato side that would make a perfect pairing with this roast recipe
Other Extra Additions for this Burger
Egg (fried, poached, scrambled, omelet – whatever you like!)
Cheese (I didn’t want cheese in mine, but a slice of cheddar would be delicious too)
Ice burg leaves
carnalized onions
jalapeno
But the bottom line is that you just can’t go wrong with this leftover roasted lamb burger! Steam the meat so that it retains that tender, juicy texture, and then go ahead and add whatever you want to add!
Best Ever Roasted Lamb Burgers Recipe
So, are you ready for the tastiest, most tender melt in your mouth Lamb Burger you’ve ever had? These Roasted Lamb Burgers are, quite simply, sensational.
And that’s it! This Best Ever Roasted Lamb Burgers Recipe is just awesome!
Bismillah let’s get started. Check it out The Best Meatball Pizza Recipe and printable version here!!
Got a taste for lamb? Check out some more incredible recipes that get the best out of this underrated meat:
Roasted Leg of Lamb – fast cooking doesn’t get better than this! Cook up these sensational steaks in less than 20 minutes for a quick and easy Sunday lunch
Lamb Karahi – if you’ve never had lamb karahi, you’re in for a treat. It’s a spicy slow-cooked masterpiece!
Kashmiri Lamb Curry – a heavenly Kashmiri style curry that’s hearty and intensely flavored, yet mildly spiced with cumin, cardamom, cinnamon and curry powder.
Lamb Champ Pulao – this lamb champ pulao recipe is the ultimate Sunday lunch comfort food!
Lamb Leg with Hara Masala – just one mouthful of this amazing recipe will be enough to have you hooked. When it comes to taste, smoked meat is in a different league and this is the perfect recipe for smoking newbies and experts alike.
Easy Lamb Jalfrezi – traditional curry recipes like lamb jalfrezi are the perfect way to use up leftover lamb
Lamb Cashew Korma – a hearty, nutty stew-like curry that’s super comforting, the lamb is simmered in until tender.
Juicy Lamb Tikka Boti – can you believe that you can make a healthy kebab? Here’s the proof. The whole family will love these quick and easy, incredibly tasty kebabs
Lamb Kebab Karahi – Have you ever made a kebab karahi? If not, this succulent lamb kebab karahi is soon to become a firm favorite of yours!
What are your favorite burger toppings? Leave me a comment below to inspire my next burger recipe!
Put your own spin on it. And lemme know how it turns out and do take a few seconds to rate it! I would love to see your recreations so tag me on instagram @recipestable or Facebook (Recipestable) or on Twitter so I can see how lovely yours turn out.
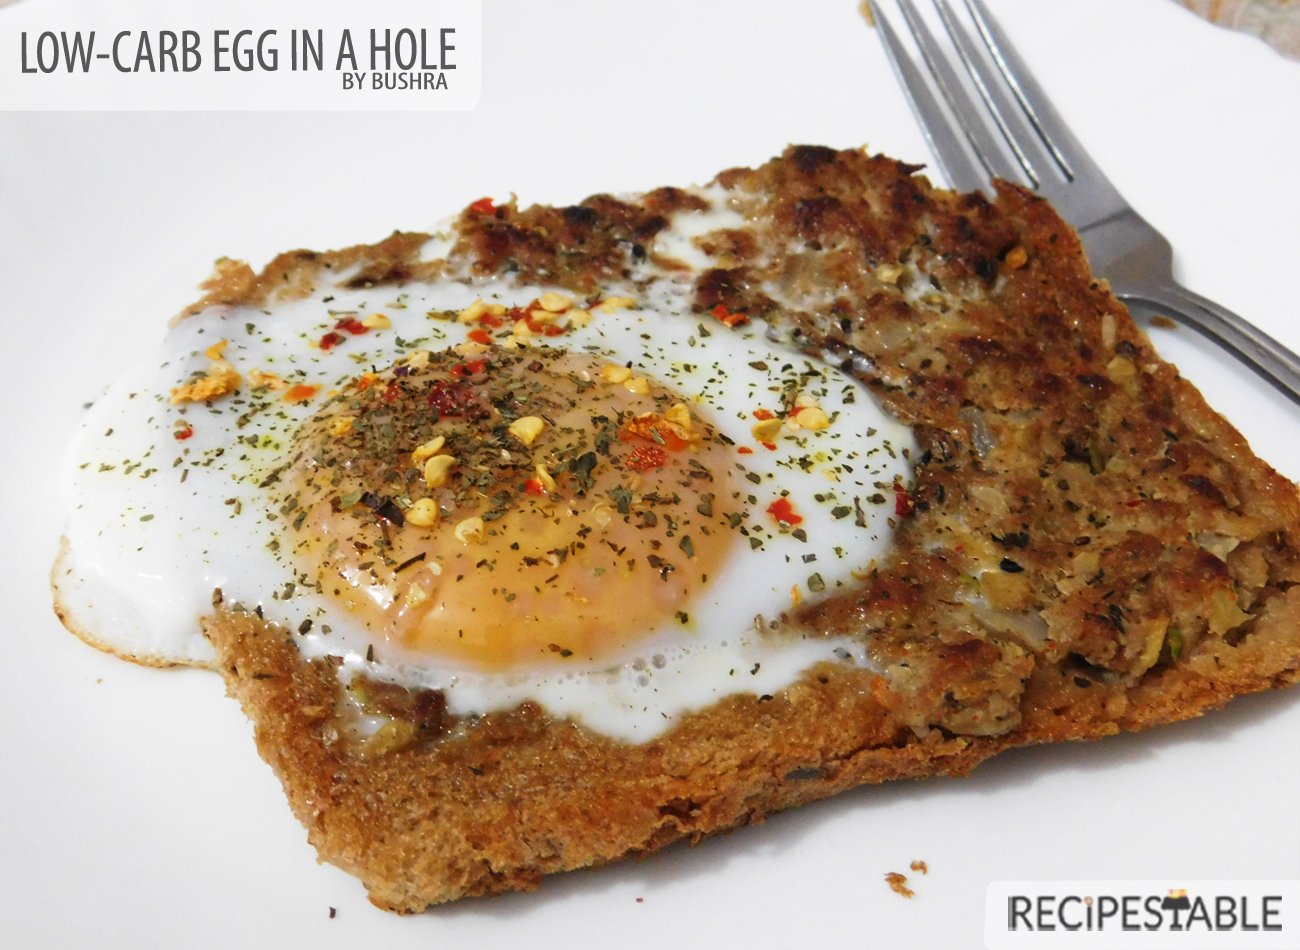
Can’t decide whether to make a grilled kabab or an egg in a hole? Make both! Two of my favorite food groups—eggs and toast—unite in this take on the playful dish also known as egg in a hole, Egg in a Basket or Egg in a Boat or, more simply, egg in toast. I fancy it up by filling the bread center with mince crust and topping with basil or chili flakes. And It came out so delicious!
Egg in-a-hole – Look at that perfect texture !!
For this recipe, I used a normal mince kabab mixture for filling the bread , to keep it low carb. The outside was crunchy and crispy and inside was so juicy and tasted so good with the egg in the middle. A nice way to add some more protein to a sandwich, while also providing something of a sauce from the egg yolk (depending on how you cook your egg). It’s adds just a little oomph of flavor to the sandwich.
Watch carefully as you cook the mince crust, and don’t raise the heat higher than medium: The goal is for the mince crust to brown and the egg to set simultaneously. Save the crust center for making breadcrumbs.
Also how well the eggs must be cooked is a personal choice. Some like over easy, sunnyside up or completely cooked through. No matter how you make it, this will remain a favorite breakfast option passed on for many generations to come. When you make this cute breakfast-for-dinner recipe, you can vary it by using cheese, vegetables or sauteed Spinach in place of the mince filling.
This Low-Carb Solution to Egg in a Hole Recipe can be an excellent addition to a healthyweight loss diet. They’re not only low-carb and low in calories but also high in protein and fiber that keep you feeling full.
I’m really excited to share this recipe with you. So, Bismillah let’s get started and Check it out Low Carb Egg in a Hole Recipe and printable version here!!
Put your own spin on it. And lemme know how it turns out. Post a photo on Facebook (Recipestable) or Instagram on Twitter so I can see how lovely yours turn out.
Happy Healthy Eating!! Do you have another name for this classic breakfast? Please leave a comment below, and let me know!
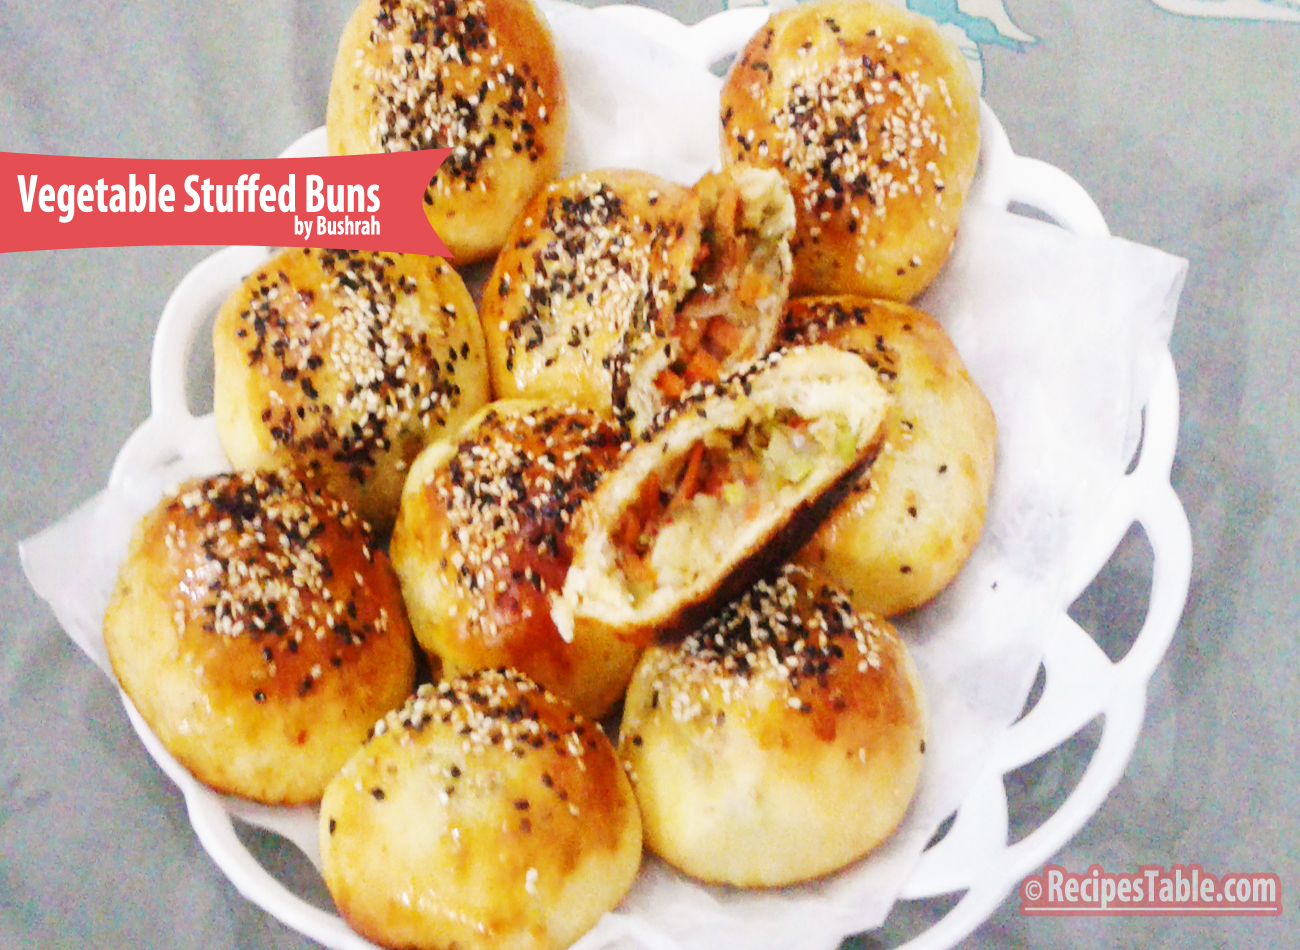
Homemade Vegetable Stuffed Buns? These Stuffed buns are loaded with veggies and are topped with two types of sesame seeds. So warm, soft, Fluffy, fragrant and stuffed with fresh veggies – no can or frozen veggies, all real – totally yummy ( + point is it contains only 200 calories). Try making these if you’re looking for the ultimate comfort food.
Photo: Vegetable Stuffed Buns
This.
I’ve made it twice in the last week, once for bringing life to the original recipe concept and taking some photos, and once for “recipe testing”. Aka licking the filling and testing the dough. Again. More. Soft Buns In my mouth. I like this recipe a lot, you guys.
Unlike store bought buns, these are healthy and homemade, and can be packed with any filling of your choice, be it cheese, chicken, lamb or mutton, mushrooms (choices are endless). These vegetable stuffed buns are a fun way of using leftover dough and any stuffing of your choice. These can be eaten for tea or breakfast or a satisfying meal with some salad. It works well as a snack for children to take to school, or to simply enjoy with a favorite drink at any time of the day.
These stuffed buns succeeds in titillating your senses with its soft, tenderness, and that fresh sesame-ish flavour makes these buns more appetizing. Bake Stuffed buns not because you must but because it tastes so yummy that you would regret not making it at your earliest once you devour its first bite! Having said that, I am not dropping more clues, get ready with some all purpose flour and some basic ingredients (filling of your choice) and get ready to bake fresh stuffed buns this weekend! So, are you ready to read the recipe?
Photo: Vegetable Stuffed Buns
When you make these Vegetable Stuffed Buns, all you have to do is open your windows and let the divine baking aromas drift and I will come to you. My nose can find these things. Okay? See you soon.
Check it out the Vegetable Stuffed Buns recipe and printable version here!!
Extra Bonus Tips:
It can last for a week in an air tight container in the refrigerator or it can be frozen for longer. Any time you wish to serve these heat them in the microwave for 15-20 seconds or preheat in the oven for 2-3 minutes and enjoy the warm, soft vegetable-y stuffed buns!
What I really love is that once you have this basic idea, the variety of stuffing you can make for these buns is absolutely endless.
I have also posted Baby Chicken Bread recipewhich is another easiest & tastiest version of making stuffed bread at home. Do check it out as well. It’s finger lickin’ good. You’ll be coming back for more.
Put your own spin on it. And lemme know how it turns out. Post a photo on Facebook (Recipestable) or on Twitter so I can see how lovely yours turn out.
As a child I was not the veggie lover I am today.When my mommy cooked veggies, I was apprehensive. Vegetables? Ew! A few years have passed since then and I love veggies of all shapes and sizes.
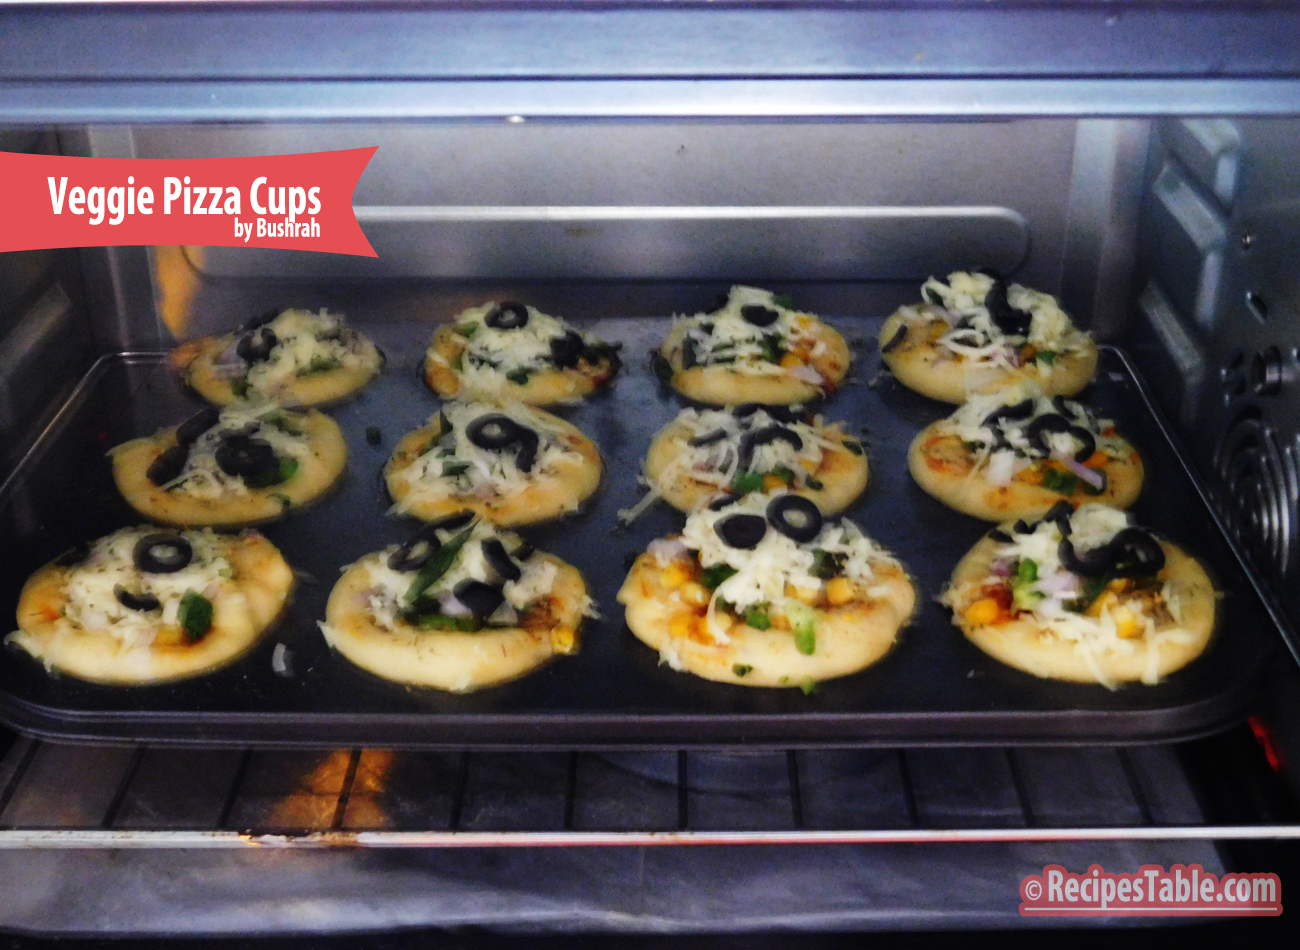
This weekend, I had a day off and I decided to cook nothing but finger foods. I knew I wanted veggie pizza, but I wanted something more convenient and easier to eat. I have found that when I make veggie pizza in the flat pizza style, it can be a little messy to eat because the toppings want to fall off. So, I did a quick Youtube search and found the recipe I used as inspiration for my Veggie Pizza Cups.
Veggie Pizza Cups
Photo: Veggie Pizza Cups
Ramadan is coming and with it comes family get-together’s and parties. And if you need an easy to make appetizer recipe for your next party, then you should try this Veggie Pizza Cups. There’s no reason for buying store made appetizers when they’re so easy to make, fun & cheap and are guaranteed to be a hit at your next party. Don’t slave away in the kitchen when you could be enjoying the party!
The idea may seem daunting at first but I hope by now I’ve got you well acquainted with handling different types of pizza’s. Be it: my The Perfect pizza dough recipe used to make not just this beautiful Baby Chicken Bread but also these cute little Mini Pizza Cups. Or this super easy and frugal recipe for Pizza Paratha. And how can we forget, my all-time favorite, the soft puffy Pizza Rolls…O’so good!
Cute little Veggie Pizza Cups in Oven
It’s one of my favorite finger food. It’s amazing that just a few basic ingredients can come together into something so delicious. For topping, I decided to use mixed veggies (corn, carrot, capsicum, green onion) and mushrooms in these because they’re my favorites veggies, but you could easily mix it up and use any toppings you like. I really do recommend making it as listed though, because these were just perfect. It tastes just like you’re eating a slice of pizza! Don’t skip out on the Italian Seasoning either – I think it adds a lot of flavor.
They tasted delicious and impressed my family without making a mess. I will definitely be making them again this holiday season.
Photo: These bite-sized Veggie Pizza Cups are perfect for picky eaters.
These Veggie Pizza Cups can be used for appetizers, party snacks, a light lunch, the first course of a dinner. Perfect party for picky eaters.
It would freeze well if you decided to double the batch. Enjoy 🙂
Check it out the Veggie Pizza Cups recipe and printable version here!!
I do hope that your plans for this holiday weekend teeter more to the side of savoring than that of to-doing.
If you make this recipe, be sure to snap a photo and hashtag it #Recipestable. I’d love to see what you cook!
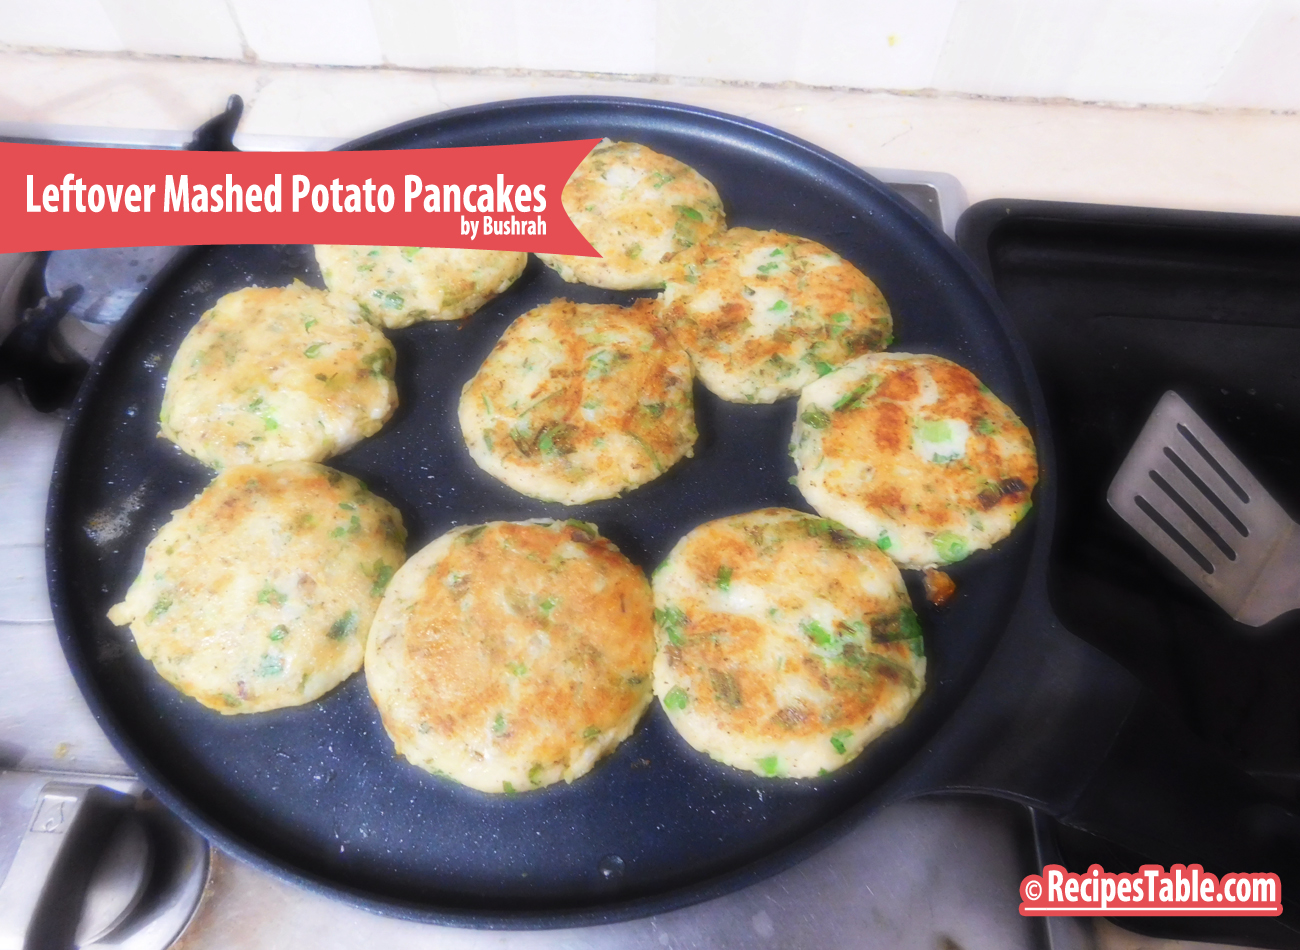
An essential part of the culinary heritage of Pakistan is the celebration of food with family and friends embedded in the concept of ‘dawat’ (feast). And anyone who hosts a ‘dawat’ (feast) knows that there’s always leftovers to deal with. As delicious as Pakistani Dawats (feast) are, you can only have so much roasted meat and stuffing for a meal. Instead of having the same food for the next day, transform the dishes into new ones!
Leftover Mashed Potato Pancakes
Last week, we hosted a ‘Family Dinner’ and made the ‘Roasted Chicken with Mashed Potatoes. We usually use leftover roasted meat for a sandwich or rolls with the apricot or mint chutney (sauce), gravy and stuffing, but what about the mashed potatoes? Add some flour, egg and cheese and turn them into mashed potato pancakes! Great for breakfast, lunch, or as a side dish or light dinner . A Perfect way to enjoy leftover potatoes and the flavor combinations are endless!
A Perfect way to enjoy leftover potatoes and the flavor combinations are endless!
I love making these Potato Pancakes whenever I have leftover mashed potatoes so I don’t feel like I’m eating the same thing the next day. Serving size will change depending on how much mashed potatoes you have leftover. This works best with cold mashed potatoes.
Photo: Leftover Mashed Potato Pancakes
These are as easy to make as normal pancakes – just mix together the mashed potatoes, flour, eggs, cheese, green onions and seasoning. Then cook the batter in a large pan until golden brown.
Leftover Mashed Potato Pancakes
With their crispy exterior and creamy, cheesy center, there’s not much to dislike here. I recommend topping these with a sour cream or garlic mayo.
Leftover Mashed Potato Pancakes
You can really get creative with the seasonings and add ins in this easy recipe! Pretty much anything in your fridge is game… add some spices & herbs, a little bit of meat/protein and whatever veggies you have on hand!
Remember to revel in your own amazingness for reducing food waste, saving time and making the best breakfast ever 🙂
Check it out the Leftover Mashed Potato Pancakes recipe and printable version here!!
If you make this recipe, be sure to snap a photo and hashtag it #Recipestable. I’d love to see what you cook!
What are your holiday traditions guys? I would love to hear some from you all. Are there recipes passed down to you from your grand mom? Or the one from many generations? Share them all in comments below.
Pizza is always a crowd pleaser, but making your own can be a bit of a headache. This bite-sized alternative is easy to make and healthy (just 150 calories each!) and as much fun to make as they are to eat.
Mini Pizza Cups
Mini Pizza Cups
I’m sure you’ve all heard of or made Pizza Cupcakes or Pizza Muffins before. But as simple or obvious as this recipe seems, sometimes we need a good reminder of the un-fussy classics. Sometimes you don’t have time or the right ingredients to make an elaborate meal. When this happens, it’s good to have something simple and inexpensive to fall back on.
Healthy, Budget Friendly Mini Pizza Cups? Yes, Yes, and Yes!
Mini Pizza Cups
If you’re crazy about pizza like me, but can’t justify eating it as much as you’d like, this is a great recipe for you. I used leftover pizza dough, chicken, lots of fresh vegetables, and a tablespoon or so of cheese on each mini pizza. Considering each pizza cup base 60 calories, the shredded chicken & cheese about 40 calories, and the rest of the ingredients were vegetables, I’m guessing each pizza had about 150 calories. This is not scientific, but it’s my best guess.
Mini Pizza Cups
An interesting and fun way to present your pizzas. These cute little pizza cups will delight anyone, especially kids. Have your children create their own pizzas, and get creative with the toppings. Perfectly shaped and easy to handle, they make for a great addition to lunch boxes or for picnics and road trips.
Mini Pizza Cups
Hope you will give this a try and let me know how it turns out for you..
Check it out the Mini Pizza Cups recipe and printable version here!!
I have also posted My Fav French Bread Pizza Recipe and Pizza Rolls Recipe which are another easiest & tastiest version of making Pizza. Do check it out as well. It’s finger lickin’ good. You’ll be coming back for more.
Put your own spin on it. And lemme know how it turns out. Post a photo on Facebook (Recipestable) or on Twitter so I can see how lovely yours turn out.
We’ve entered the season of warm comfort food. Soups, Stews, roast meat, etc. And sometimes all that heavy food seems . . . well . . . heavy.
Homemade Veggie Pizza
Just about everyone loves pizza, myself included. However, traditional restaurant pizza is generally made with refined (white) flour, and loaded with saturated fat and sodium – things that can quickly lead to weight gain and harm your health. To make pizza something I can feel good about eating regularly, I’ve found ways to make my own healthier versions. The key is using whole grains, less cheese and loading up on lots of healthy veggies and herbs. Also eating produce that’s in season helps you save money and also ensures you are getting a good variety of foods and nutrients.
This pizza included some of my favorite veggies and herbs: carrots, red onion, broccoli, corn, green or red pepper, olives and fresh basil. The ingredients only required about 20 minutes of prep time, starting with chopping the veggies and tossing them in a little olive oil for roasting. Adding a fresh herbs to the veggies adds nice flavor (and makes your kitchen smell amazing during cooking!).
In addition to its great taste, winter veggies especially broccoli is the good sources of dietary fiber and rich in magnesium. Broccoli is loaded with antioxidants, fiber, and numerous vitamins and minerals including magnesium, fol-ate and fiber which are good for health.
While my super-food veggies were roasting I gathered and prepped my other ingredients. The dough only required a thin spread of pizza sauce and cheese to provide creamy texture and cheesy flavor.
The veggies were done once they were slightly crisped and fork-tender, and I spooned them over the dough. I finished the pizzas off by topping them with the Mozzarella cheese, olives and a sprinkle of herbs.
Photo: Homemade Veggie Pizza
The last step involves popping the pizzas in the oven – I chose to make veggie pizzas in individual mini pizza pans. They only needed about 15 minutes to cooked the dough and for the cheese to melt. I loved the contrast of the cheese, olives and herbs with the crunch from the veggies on this flavorful pizza!
Photo: Homemade Veggie Pizza.. Yum
If you need a lighter dish, that doesn’t skimp on flavor, try this Homemade Veggie Pizza recipe. It’s fresh, full of flavor, and won’t weigh you down like the winter comfort food can. Pizzas like this can be enjoyed as a quick and easy lunch or dinner, and make a tasty addition to a healthy diet. Enjoy!
Photo: Pizza loaded with cheese and veggies ♥
Recipe Tip’s:
Feel free to play around a bit with the ingredients in this recipe if you make it yourself.
Add nuts (walnuts, pumpkin seeds), more veggies, would be great, and you could also skip the cheese all-together and instead use the ricotta cheese as the sauce/base.
Bismillah, Let’s get started!
Check it out the Homemade Veggie Pizza Recipe and printable version below.
What other winter-veggies would you try on a pizza?
Put your own spin on it. And lemme know how it turns out. Post a photo on Facebook (Recipestable) or on Twitter so I can see how lovely yours turn out.
Happy Cooking!!
If you like this post, Please Subscribe to my blog and let me know your feedback by commenting below.. I have lots more recipes to share with you.
I think it’s time that I take a quick break from the highly caloric Iftar snacks I’ve been posting about recently, and share a favorite healthy recipe. This Spicy Chickpea Salad (Chana Chaat) is a traditional Pakistani Iftar Staple. We love munching on it throughout the year, but it’s especially nice in the summer after a long day of fasting. Known as a salad in the West and a savory snack or “Chaat” in the East. This low-fat dish has traveled a long way from Pakistan to make its way onto Iftar tables in South Asia and lunch/dinner tables across the rest of the world.
Spicy Chickpea Salad (Chana Chaat)
The acidic and tart flavors of tamarind chutney, the sweetness of the apricot chutney and the cooling taste of mint chutney balances the palette out immaculately. A well made Spicy Chickpea Salad (or Chana Chaat) will enable you to taste all these flavors independently with each spoonful.
Spicy Chickpea Salad (Chana Chaat) with Tamarind and Apricot Chutney
Playing around with food textures is also an important part of cooking, and creating this dish gives you that freedom with the crunchy onions, juicy tomatoes and soft chickpeas. Explore the art of South Asian cooking with this simple, low fat yet palette-exciting recipe.
Spicy Chickpea Salad (Chana Chaat)
Bismillah, let’s get started!
Check it out the Spicy Chickpea Salad (Chana Chaat) recipe and printable version below.
I have also posted Garbanzo Beans Chaat Recipe and Lobia Chaat which are another easiest & tastiest version of making Chana Chaat. Do check it out as well. It’s finger lickin’ good. You’ll be coming back for more.
Put your own spin on it. And lemme know how it turns out. Post a photo on Facebook (Recipestable) or on Twitter so I can see how lovely yours turn out.
Happy & Productive Ramadan!!
If you like this post, Please Subscribe to my blog and let me know your feedback by commenting below.. I have lots more recipes to share with you.
A simple and nutritious snack, chapati (flatbread) stuffed with spicy mince filling, salad and chutney, perfect for busy morning breakfast and also lunch. Plain chapati’s can often come across as boring and many people turn up their noses at the mere mention of them! So Today, I come up with an innovative way to present chapati’s, that’s filling, nutritious and super yummy.
Photo: Chapati Rolls Stuffed with Mince
One of my favorite things to eat is a roll stuffed with goodies.I enjoy food that I can eat with my hands and this dish is no exception. It’s very easy to make and delicious to eat. These chapati rolls is excellent for suhoor meals that can be made quickly with the left over chapati’s.
Photo: Chapati Rolls Stuffed with Mince
Also Perfect to bring on a trip or a picnic as they are easy to wrap and taste just as great when eaten lukewarm or chilled. Give a try and enjoy.
Bismillah, let’s get started!
Check it out the Chapati Rolls Stuffed with Mince recipe and printable version below.
A simple and nutritious snack, chapati (flatbread) stuffed with spicy mince filling, salad and chutney, perfect for busy morning breakfast and also lunch.
Heat oil or butter in a large pan over medium high heat.
Saute onion for 2-3 minutes. When the onions have softened up but not yet golden in colour add ginger and garlic, and cook for 1 minute.
Then add mince and let it drain out most of the moisture for about 4-5 minutes.
Add green chilies, red pepper and salt.
Reduce the heat on low and cover the pan. Let it simmer for 25 minutes or until mince is cooked thorough and all water dries up.
Remove the lid and cook on high flame for 3-4 minutes then add chili garlic sauce and soy sauce.
Cook 2 minutes longer then turn the heat off.
Sprinkle mint and coriander leaves.
To Assemble Chapati Rolls
Reheat chapati’s.
Place chapati on a clean board, spread 1 tablespoon mayonnaise on it. Then add the mince stuffing across the center.
Drizzle some mint chutney.
Sprinkle veggie salad and roll up the chapati.
Secure with toothpick. Don’t worry if it gets a little messy eating that’s just a art of the fun of eating a roll. ENJOY 🙂
Notes
Serving Suggestions: Serve with salad, french fries and chutney. Or you can serve everything separate and let your guests or family prepare their own stuffed chapati rolls.
Recipe Note’s:
You can also stuff these chapati rolls with chicken or beef mince, or colorful veggies.
If you prepare the chapatis ahead make sure to store them in an airtight container. If not they will become very hard and dry.
I have also posted Shami Kabab Paratha Rolls Recipewhich is another easiest & tastiest version of making Paratha Rolls. Do check it out as well. It’s finger lickin’ good. You’ll be coming back for more.
Put your own spin on it. And lemme know how it turns out. Post a photo on Facebook (Recipestable) or on Twitter so I can see how lovely yours turn out.
If you like this post, Please Subscribe to my blog and let me know your feedback by commenting below.. I have lots more recipes to share with you.
Summer has been kicking into high gear and the temperatures have been climbing here, and everyone wants to keep cool on hot summer days. So today, I have a recipe for a simple, classic and very popular sandwiches: “Egg and Cucumber Sandwiches”.
Photo: Egg and Cucumber Sandwiches
Egg and Cucumber Sandwiches
Egg and Cucumber sandwiches are the most delicious, easiest finger foods to make. All you need is sliced white bread, boiled eggs, mayonnaise and of course, cucumbers. To enhance the flavor, I also spread a thin layer of dill with cream cheese spread.
Photo: Egg and Cucumber Sandwiches
I love adding cucumbers to egg mayonnaise. And sometimes different herbs too (especially dill goes very well with eggs and cucumbers). The cucumber can either be chopped finely and mixed into the egg mayonnaise or sliced thinly , I like the latter since it adds a nice fresh crunch to the sandwich. This can be made in advance and keeps well, so is perfect for tea parties.
Photo: Egg and Cucumber Sandwiches
What are your favorite foods for a tea time snack or tea party? For me, the food are simple to prepare and easy to eat (and not so messy), preferably something we can eat using our hands or toothpicks.
Photo: Egg and Cucumber Sandwiches
If you’re looking for an extremely quick and easy recipe for a lunch box, or a tea party, or a picnic, or you just so happen to have an extra cucumber lying around, then give these egg and cucumber sandwiches a try. They’re deliciously light and fresh, and I love the crunch of the cucumber. These delicious, easy-to-assemble sandwiches are great for a quick summer meal.
Bismillah let’s get started.
Check it out the Egg and Cucumber Sandwiches recipe and printable version below!!
I have also posted Zinger Club Sandwicheswhich is another easiest & tastiest version of making sandwiches. Do check it out as well.
Put your own spin on it. And lemme know how it turns out. Post a photo on Facebook (Recipestable) or on Twitter so I can see how lovely yours turn out.
Happy Sandwiches Making!!
If you like this post, Please Subscribe to my blog and let me know your feedback by commenting below.. I have lots more recipes to share with you.
In the Name of Allah, Most Gracious, Most Merciful
Its been a long time since I’ve posted something here, its has been a busy month.Actually I was really busy in my studies…..Sorry, I didnt get time to post anything.
Chocolate Banana Filled Pancake Rolls
Looking for a nice relaxing breakfast or dessert. Pancake Rolls? Today, I’ll share another pancake rolls recipe ~ “Chocolate and Banana Filled Pancake Rolls”,I made this a while back, clicked pictures but never got around to posting it. The recipes are piling up ! I’ll post a lot more soon, InshAllah.
Photo: Chocolate and Banana Filled Pancake Rolls
I made plain pancakes and spread generously with choco bliss and topped further with honey but it really is like a plain canvas for your imagination to run wild with flavours! So I decided to give my simple pancakes a new twist. Roll-up in banana slices and topped with chocolate curls.
Photo: Chocolate and Banana Filled Pancake Rolls
You can add strawberries, apples, dried fruits and berry compote in the mixture! It’s up to you take pleasure in feeling like a domestic queen. A perfect way to start a day.
Photo: Chocolate and Banana Filled Pancake Rolls
Check it out the Chocolate and Banana Filled Pancake Rolls recipe and printable version below!!
Recipe Note’s:
In this recipe, I made the batter a little thin because I wanted the pancakes to thin, more like crepes. For more traditional pancakes, use only about 1/2 cup milk.
Put your own spin on it. And lemme know how it turns out. Post a photo on Facebook (Recipestable) or on Twitter so I can see how lovely yours turn out.
I have also posted Chocolate Chip Pancakeswhich is another easiest version of making tea time snack or lunch box item . Do check it out as well.
Happy Pancakes making!!
If you like this Chocolate and Banana Filled Pancake Rolls, Please Subscribe to my blog. I have lots more recipes to share with you. And If you make it then let me know your feedback by commenting below.
In the Name of Allah, Most Gracious, Most Merciful
Hope, you are doing splendidly and enjoying the season. Well I’m in the middle of work, and anxiety has begun to sink its sharp little claws into my brain. It’s almost the final month of my training and I’m already drowning under a sea of coding assignments and project.
Ahhh I love to code even though it makes me want to tear my eyes out every 10 minutes. Crying Out Loud ;( I have constant fears that I’ve forgotten the code, functions, or left something somewhere blah blah blah. Problem is I love it but I have too much code to write though… ugh. This assignment is really doing my nut in!
I’ m carving chocolate soo bad while coding up my project and backing up files. Every time I write a code, I delete it again. Almost time for a pancake break 😛 Anyhow before going back to coding, I decided to update you guys with this short post.
If there’s one thing you should know about me right up front it’s that I love Chocolate and pancakes, always have. Chocolate chips, Pancakes, foggy weather and coding are the reasons I love life. Sounds super yummy!
Pancakes are probably in my Top 10 favorite foods. But they need chocolate chips. 🙂
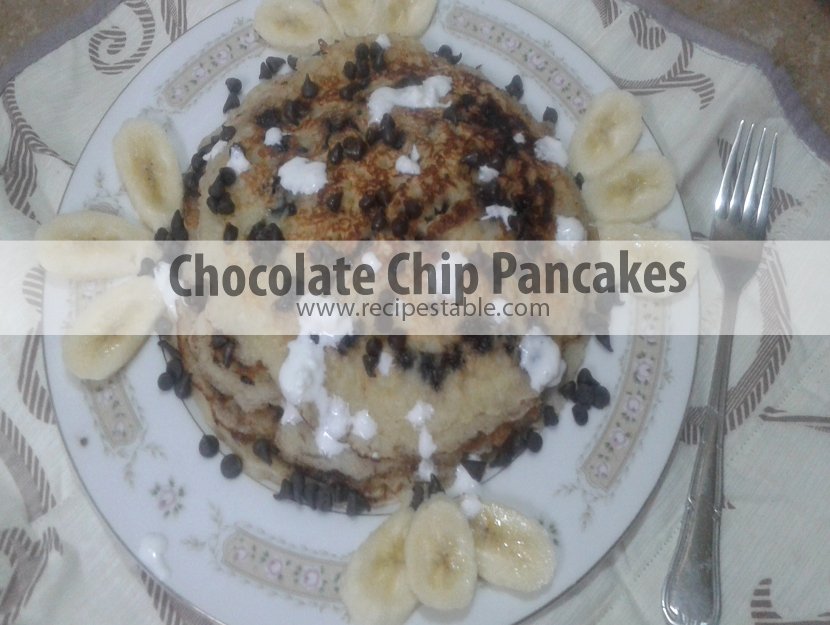
Time for a Chocolate Chip Pancakes Break.
No matter how difficult life gets, just remember, there’s always time for a Pancakes break. 😀 These Chocolate Chip Pancakes have been a blessing while trying to write my final coding project. lol. They simple to make, so comforting, and lightened up with a few delicious tweaks.
Photo: Chocolate Chip Pancakes
This Chocolate Chip Pancakes recipe is a favorite of mine to make for special occasions or holidays. Eat while hot so the chocolate is all gooey. If you want to make it extra special, serve the pancakes with berries and whipped cream
Photo: Chocolate Chip Pancakes
It was love at first bite, I’m telling you. The texture is fluffy but hearty and slightly dense, and plenty moist from the butter. They’re perfectly sweet even without any additional sugar – the chocolate chips provide a touch of decadence.
Photo: Chocolate Chip Pancakes
They’re super tasty, easy to make, and use regular everyday ingredients.
Ingredients You will Need to Make These Pancakes
Ingredients You will Need:
Flour
Sugar
Baking Powder
Cinnamon Powder
Salt
Eggs
Milk
Butter
Vanilla Essence
Chocolate Chips
Tools You needed to make this recipe are:
A pan or griddle
A Spatula
A Mixing Bowl
Hand Beater
Check it out the Chocolate Chip Pancakes Recipe and printable version below!!
Tips For Diet Version Pancakes (Clean Eating):
You can make gluten free Pancakes by using gluten-free oats and flour.
For Sweeting: Add 1 Tablespoons of honey, apple syrup, or nectar is optional for extra sweetening, but I didn’t find it necessary.
Don’t add butter. Mash very ripe banana with baking powder. It gives
them a moist and fluffy texture.
Serve plain or with a small drizzle of honey and a few additional chocolate chips for melting.
Put your own spin on it. And lemme know how it turns out. Post a photo on Facebook (Recipestable) or on Twitter so I can see how lovely yours turn out.
Happy Chocolate Pancakes making!
If you like this Chocolate Chip Pancakes Recipe, Please Subscribe to my blog. I have lots more recipes to share with you. And If you make it then let me know your feedback by commenting below.
In the Name of Allah, Most Gracious, Most Merciful
GOOD MORNING MY LOVELY READERS!!
Good morning my fellow readers
I hope you are well and happy today. The sun is shining brightly here this morning and the air is crisp. I need a little sun today and wireless signals are surprisingly good :P. So right Now, sitting in my roof top garden with my lappy writing today’s blog post and enjoying my morning tea. And beautiful pairs of sparrows and pigeons are also enjoying the morning sun with me. I love to hear the birds chirping in the morning – sweet songs of nature ♥☺
Great start to the day.
Trying to decide what to make for Quick Breakfast or Brunch, OR Snack? No worries, I’ve got you covered in today’s all new post.
Today’s Recipe: Chocolate Date Bars
SUPER healthy, naturally sweetened Chocolate Date Bars!! Just 7 ingredients to a snack that tastes more like a candy bar!! YUM YUM. The result is a simple, naturally-sweetened, healthy Date bars that is a little on the decadent side – just the way I like it.
Photo: Chocolate Date Bars Recipe
They taste like Supreme awesomeness. They’re rich, dense, moist, super chocolaty, nutty, slightly crunchy and perfectly sweet and very filling.
Photo: Chocolate Date Bars Recipe
These Chocolate Date Bars DO indeed taste like a raw brownie. 😛
They require just 7 ingredients.
They’re no bake, aside from toasting your nuts (an optional step).
They’re loaded with antioxidants, protein and healthy fats.
They’re incredibly satisfying.
They’re perfect for breakfast, dessert or a quick snack.
They’re freezer-friendly.
They’re uber chocolatey.
They’re really just kind of perfect.
I did have one for breakfast and found it quite filling. But for the most part I ate these as a healthy dessert. I’d go to the freezer, break off 1/3 and snack. Then repeat for the next 30 minutes until it was gone. Self control comes in waves, people, especially with these bars. 😛 ☺
Really I should stop praising and tell you the recipe. So Let’s get started !
Tools You needed to make this recipe are:
A cookie sheet
A frying pan
A Spatula
Check it out the Chocolate Date Bars Recipe and printable version below!!
You MUST try these Date bars and let me know what you think! Post a photo on Facebook (Recipestable) or on Twitter so I can see how lovely yours turn out.
Happy Chocolate Date Bars making!
If you like this Chocolate Date Bars Recipe, Please Subscribe to my blog. I have lots more recipes to share with you. And If you make it then let me know your feedback by commenting below.


