Tag: Winter Recipes

  • Easy Smooth & Rich Egg Pudding Recipe

    Easy Smooth & Rich Egg Pudding Recipe

    This Egg Pudding. Wow.

    Easy Smooth & Rich Egg Pudding
    Easy Smooth & Rich Egg Pudding

    Egg Pudding

     Have you ever wanted something so bad you think you’d die if you don’t have it? And when you think you’ve finally gotten it, its snatched away from you?

    If yes, then this Egg Pudding is especially for you.

    Easy Smooth & Rich Egg Pudding

    Eat it warm, eat it cold; it provides comfort like no other.

    Egg pudding is just one of those things that never fails to bring a smile on your face or warmth to your toes. Its rich, its smooth, and it is so so SO easy to make even my fogged up brain can whip it up. Just needs a little bit of patience and whole lot of whisking!

    Easy Smooth & Rich Egg Pudding
    Easy Smooth & Rich Egg Pudding

    Egg Pudding was my most favorite treat growing up. This easy dessert can be quickly made for festive occasions. Surprise everyone and get loads of compliments by making this easy egg pudding. 

    Easy Smooth & Rich Egg Pudding
    Easy Smooth & Rich Egg Pudding

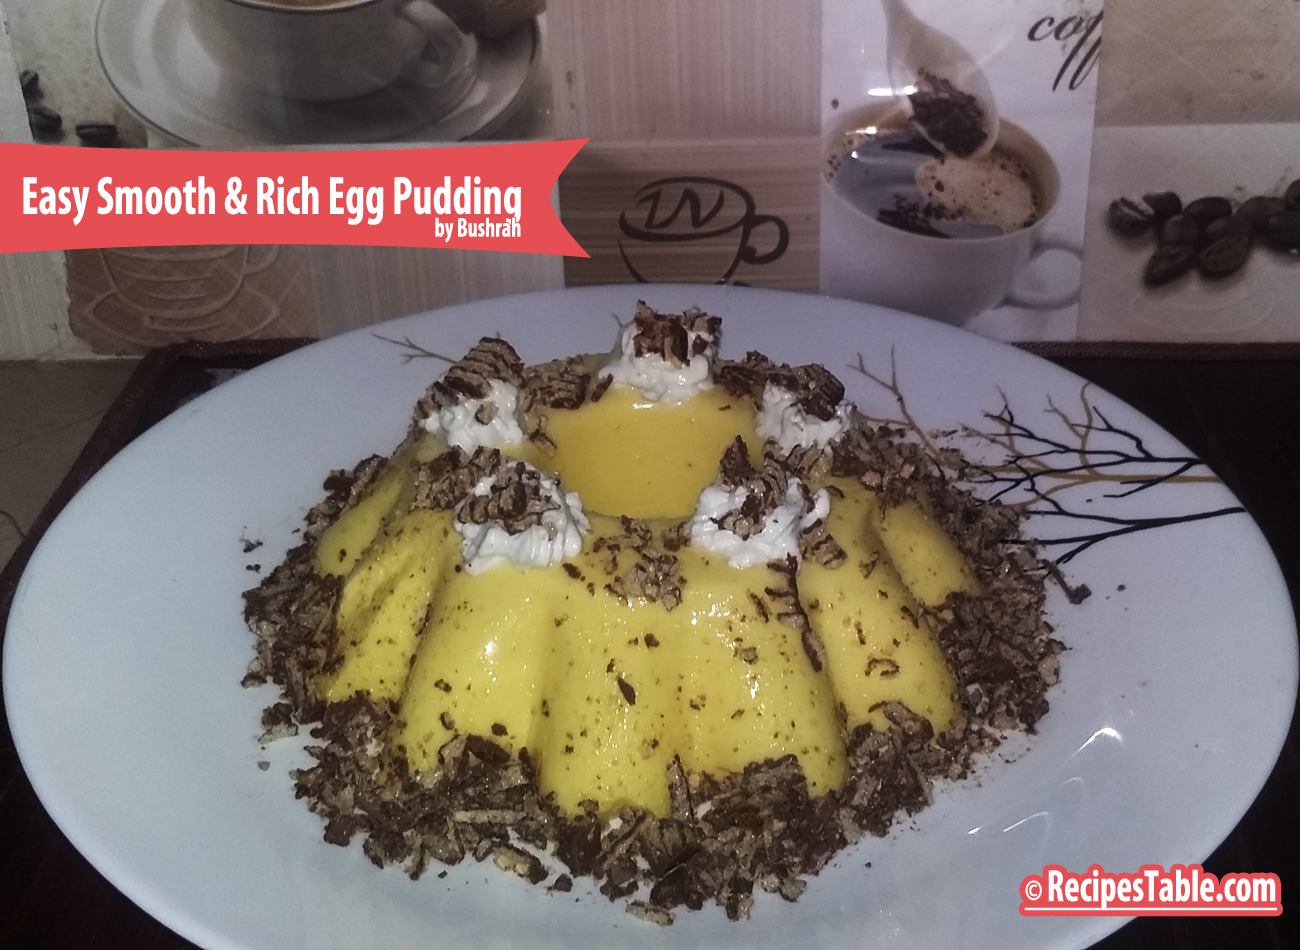
    Here’s a recipe for making a easy, simple, yet rich, smooth and satisfying egg pudding. I made this for my family and it totally rocked!! They said it was the most creamiest and richest egg pudding they’ve ever tasted. I never had any leftovers, and it would never be enough for them (lol). The only thing I WOULD get however, would be requests to make more!

    Easy Smooth & Rich Egg Pudding
    Easy Smooth & Rich Egg Pudding

    The creamy texture of this soft-smooth pudding is so inviting, you could call it comfort food. This recipe for egg pudding has a pleasant vanilla flavor complemented by cinnamon or nutmeg. This is the best dessert. I like it most for its sponginess. And it is also very easy to make with in 35 minutes.

    Easy Smooth & Rich Egg Pudding
    Easy Smooth & Rich Egg Pudding

    Some Important Tips to Make Best Egg Pudding: 

    Learn how to make best Egg Pudding by following these tips and tricks.

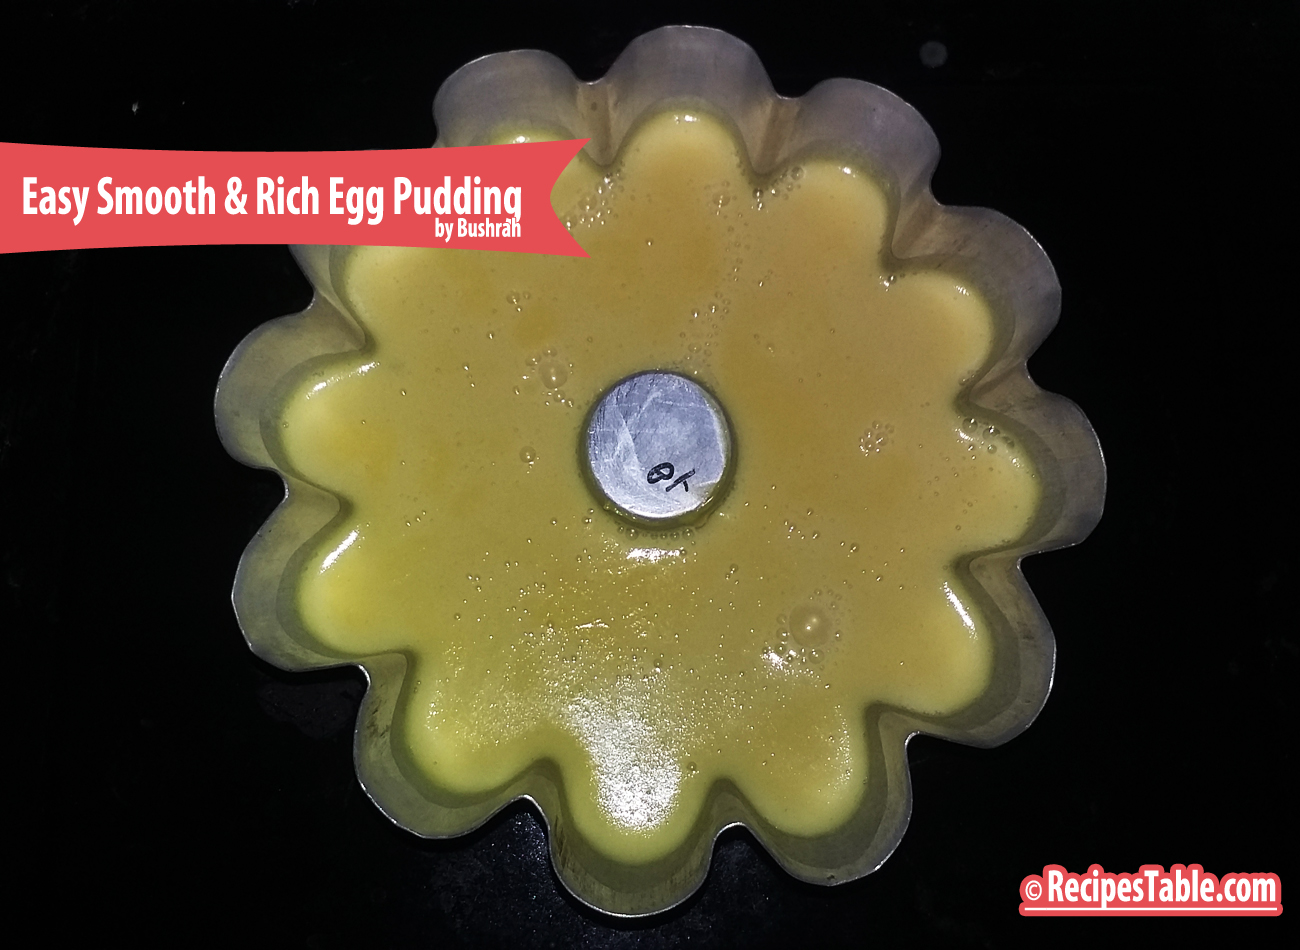
    1. One-dish Pudding: Recipe can be baked in lightly greased 1-1/2 qt. soufflé or baking dish. Pour hot water to within 1 inch of top of dish. Increase baking time to 35 to 40 minutes.
    2. No-mess pouring: Make pudding in a bowl with a pouring lip, or transfer it to a large glass measure, to make filling pudding cups easier and neater.
    3. For perfectly smooth custard: Strain it through a sieve when filling pudding cups or baking dish to remove any tough egg strands.
    4. Don’t skip the hot-water bath. A hot water bath, insulates the pudding from the direct heat of the oven and promotes even cooking so the edges don’t overcook before the center is done. Very hot tap water will do.
    5. When is it done? Baked Pudding  should be removed from the oven (and water bath) before the center is completely set. The center will jiggle slightly when dish or cup is gently shaken. Pudding will continue to “cook” after it’s removed and center will firm up quickly. Over baked Pudding may curdle.
    6. The knife test: Test for doneness with a thin-bladed knife. Insert knife about 1 inch from the center of the dish. If knife is clean when pulled out, the pudding is done. If pudding clings to the blade, bake a few minutes longer and test again.
    7. Serving Options: You can have this yummy dessert by adding dry fruits, jelly or caramel, but today I am making the basic one. 

    If you are craving for something sweet yet easy dessert in this foggy weather, nothing could be better than this Egg Pudding.  Do try it, your kids are going to fall in love with this proteins and calcium rich dessert. You can also serve this dessert for your next party and this will definitely not going to disappoint your guests.

    Check it out the Easy Smooth & Rich Egg Pudding recipe and printable version here!!

     I have also posted Hot Chocolate Pudding Recipe which is another easiest & tastiest version of making Pudding. Do check it out as well.  It’s finger lickin’ good. You’ll be coming back for more. 


    Put your own spin on it. And lemme know how it turns out. Post a photo on Facebook (Recipestable) or  on Twitter so I can see how lovely yours turn out.


    Happy Baking!!

    If you like this post, Please Subscribe to my blog and let me know your feedback by commenting below.. I have lots more recipes to share with you.

  • Homemade Veggie Pizza Recipe

    Homemade Veggie Pizza Recipe

    We’ve entered the season of warm comfort food. Soups, Stews, roast meat, etc. And sometimes all that heavy food seems . . . well . . . heavy. 

    Homemade Veggie Pizza

    Just about everyone loves pizza, myself included. However, traditional restaurant pizza is generally made with refined (white) flour, and loaded with saturated fat and sodium – things that can quickly lead to weight gain and harm your health. To make pizza something I can feel good about eating regularly, I’ve found ways to make my own healthier versions. The key is using whole grains, less cheese and loading up on lots of healthy veggies and herbs. Also eating produce that’s in season helps you save money and also ensures you are getting a good variety of foods and nutrients.

    homemade-veggie-pizza3

    This pizza included some of my favorite veggies and herbs: carrots, red onion, broccoli, corn, green or red pepper, olives and fresh basil.  The ingredients only required about 20 minutes of prep time, starting with chopping the veggies and tossing them in a little olive oil for roasting.  Adding a fresh herbs to the veggies adds nice flavor (and makes your kitchen smell amazing during cooking!).

    In addition to its great taste, winter veggies especially broccoli  is  the good sources of dietary fiber and rich in magnesium. Broccoli is loaded with antioxidants, fiber, and numerous vitamins and minerals including magnesium, fol-ate and fiber which are good for health.

    Homemade Veggie Pizza

    While my super-food veggies were roasting I gathered and prepped my other ingredients. The dough only required a thin spread of pizza sauce and cheese to provide creamy texture and cheesy flavor.

    The veggies were done once they were slightly crisped and fork-tender, and I spooned them over the dough. I finished the pizzas off by topping them with the Mozzarella cheese, olives and a sprinkle of herbs.

    Homemade Veggie Pizza
    Photo: Homemade Veggie Pizza

    The last step involves popping the pizzas in the oven – I chose to make veggie pizzas  in individual mini pizza pans. They only needed about 15 minutes to cooked the dough and for the cheese to melt. I loved the contrast of the cheese, olives and herbs with the crunch from the veggies on this flavorful pizza!

    Homemade Veggie Pizza
    Photo: Homemade Veggie Pizza.. Yum 

    If you need a lighter dish, that doesn’t skimp on flavor, try this Homemade Veggie Pizza recipe. It’s fresh, full of flavor, and won’t weigh you down like the winter comfort food can.  Pizzas like this can be enjoyed as a quick and easy lunch or dinner, and make a tasty addition to a healthy diet. Enjoy! 

    Photo: Homemade Veggie Pizza
    Photo: Pizza loaded with cheese and veggies ♥

    Recipe Tip’s:

    1. Feel free to play around a bit with the ingredients in this recipe if you make it yourself.
    2. Add nuts (walnuts, pumpkin seeds), more veggies, would be great, and you could also skip the cheese all-together and instead use the ricotta cheese as the sauce/base.

    Bismillah, Let’s get started!

    Check it out the Homemade Veggie Pizza Recipe and printable version below.

    What other winter-veggies would you try on a pizza?

    Put your own spin on it. And lemme know how it turns out. Post a photo on Facebook (Recipestable) or  on Twitter so I can see how lovely yours turn out.


    Happy Cooking!!

    If you like this post, Please Subscribe to my blog and let me know your feedback by commenting below.. I have lots more recipes to share with you.


  • Broccoli Spaghetti Soup Recipe

    Broccoli Spaghetti Soup Recipe

    Aslam-o-Alakaum My Lovelies !!

     In the Name of Allah, Most Gracious, Most Merciful

    Broccoli Spaghetti Soup ( Clean Eating Version)

    I have slacked off a little on my health and I am working to reclaim it. This month, I am working on my diet and working on improving my all round health and fitness levels. I will NOT let this chronic illness get the best of me. InshaAllah.

    During the winter months, I find myself craving soup time and time again. So Today, I’m sharing an easy and healthy recipe for Broccoli Spaghetti Soup (Clean Eating Version). A simple soup that nourishes the body and soul. 

     Broccoli Spaghetti Soup Recipe
    Photo: Broccoli Spaghetti Soup (Clean Eating Version)

    I Picked these beauties from my Kitchen Garden yesterday. Not bad for the last day of the year and unseasonably cold weather!  Wishing you all Happy Harvesting ♥

    Beatuies from my garden
    Beatuies from my garden

    Oh ya, this is the good stuff. I mean,  spaghetti and broccoli are such a wonderful, comforting combination anyway. But turn that into soup and you’ve got a wonderful meal for a cold winter night! 

    Broccoli Spaghetti Soup (Clean Eating Version)
    Broccoli Spaghetti Soup (Clean Eating Version)

    In the last week, I seriously made four different types of soups. This Broccoli Spaghetti Soup was my favorite of the four, and surprisingly, the healthiest as well!

    The recipe starts with crisp stalks of organic broccoli. I am making the organic distinction here, because the main flavor of this soup comes from the broccoli, so it’s got to be top notch.  That means organic and preferably local.First tossed broccoli with olive oil until tender, caramelized and aromatic.  Then stir in born broth and cooked spaghetti. It’s chunky, brothy savory, and just the right balance of pasta and green veggie. I love the aroma of parsley and chunky broccoli in this soup.

    Broccoli Spaghetti Soup (Clean Eating Version)
    Broccoli Spaghetti Soup (Clean Eating Version)
    Do try it, Great for a busy weeknight too. It cooks up in jus 15 minutes (pretty quick). The ingredients are very basic, you probably have most of them on hand already, and if not, a quick trip to any grocery store will quickly get you what you need.

    Ingredients You will Need:

    1. Organic Broccoli Florets 
    2. Born Broth
    3. Seasoning 
    4. Spaghetti 

    Tools You needed to make this recipe are:

    1. A deep soup pot
    2. A wooden spoon
    3. A Strainer 
    4. Soup Bowls

    Check it out the Broccoli Spaghetti Soup (Clean Eating) recipe and printable version below!!

    Put your own spin on it. And lemme know how it turns out. Post a photo on Facebook (Recipestable) or  on Twitter so I can see how lovely yours turn out.

    Happy Soup making!

    If you like this Broccoli Spaghetti Soup, Please Subscribe to my blog. I have lots more recipes to share with you. And If you make it then let me know your feedback by commenting below.


  • Quick & Easy Gajar Halwa:

    Instant Gajar Halwa (Carrot Halwa)

    Gajar Halwa is a must have dessert in winter season. Everyone love to eat it. It is unbelievable how the combination of carrots, milk, sugar can end up tasting so divine, khoya is added to give and extra luscious flavor to this halwa.

    Instant Gajar Halwa Recipe
    Photo: Instant Gajar Halwa Recipe

    It’ very simple to make and my family(especially my lil bro)loves it. This Instant gajar halwa recipe is very good especially for those who want to make scrumptious dessert in hurry.

    Instant Gajar Halwa Recipe
    Photo: Instant Gajar Halwa Recipe

    This Instant Gajar Halwa recipe is also good for people of those areas where you cant find khoya (ricotta cheese) immediately. Must try my  recipe, hope you will enjoy and do let me know how it was.

    Check it out the  Instant Gajar Halwa Recipe here!!

    [divider]

    [one_fourth]Prep Time:10 minutes[/one_fourth] [one_fourth]Cook Time:30 minutes[/one_fourth] [one_fourth]Servings: 6[/one_fourth] [one_fourth_last]Difficulty Level: Very Easy[/one_fourth_last]

    [divider]

    [tabs type=”horizontal”] [tabs_head] [tab_title]Ingredients[/tab_title] [tab_title]Nutrition[/tab_title] [/tabs_head] [tab]

    • 2 kg carrots (gajar), peeled and grated
    • 1/2 kg sugar
    • 1 cup desi ghee or clarified butter
    • 1 cup dry milk powder
    • 1/2 cup khoya (ricotta cheese), grated
    • 4 cardamom pods

    For Garnishing

    • 1 boiled egg, cut into slices
    • 4 tablespoon chopped nuts ( pistachio, walnuts or almonds)
    • silver paper.

    [/tab] [tab]Yield: 6 servings

    Nutritional information is not yet available. [/tab] [/tabs]

    Directions:
    [tabs type=”horizontal”] [tabs_head] [tab_title]Step by Step Method[/tab_title] [tab_title]Recipe Note’s[/tab_title][tab_title]Serving Suggestions[/tab_title][/tabs_head] [tab]

    Step 1

    Heat oil in a large skillet or wok over medium heat.

    Step 2

    Add cardamom pods in it. When they crackle, add the grated carrots (gajar) and cook on a medium heat so that the water is evaporated and the color is slightly changed.

    Step 3

    Add sugar and keep stirring once in a while.

    Step 4

    Cook for about 5 more minutes until ghee comes on top.

    Step 5

    Now add dry milk powder and stir well.

    Step 6

    Sprinkle khoya over it.

    Step 7

    Turn the heat off. and dish it out.

    Step 8

    Granish with nuts, silver paper and boiled egg.Instant Gajar Halwa is ready to serve. ENJOY!!

    [/tab] [tab]

    • If you don’t have khoya (ricotta cheese) increase the amount of dry milk powder , it will eventually turn in to khoya or you can also use evaporated milk.

    [/tab][tab]

    • Serve hot as a dessert after any meal or you can enjoy as a tea time snack with kashmiri chai.

    [/tab] [/tabs]
    If you like Instant Gajar Halwa Recipe and make it then let me know your feedback by commenting below.And if you know more innovative ways in which we can utilize this sweet and mouth watering Instant Gajar Halwa , do share with us and we would be glad to give it a try.

  • Tandoori Moti Tikka Recipe: A Step-by-Step Guide to Cheesy Delight!

    Tandoori Moti Tikka

    Chicken Tikka with rich taste texture with cheese, fresh cream and yogurt. You can make this as starter or as main dish with coriander chutney and parathas. This tikka can be grill or bbq instead of baking.

    Tandoori Moti Tikka
    Photo: Tandoori Moti Tikka Recipe

    Check it out the Tandoori Moti Tikka Recipe here!!

    [divider]

    [one_fourth]Prep Time:10 minutes + marination[/one_fourth] [one_fourth]Cook Time:25 minutes[/one_fourth] [one_fourth]Servings: 4[/one_fourth] [one_fourth_last]Difficulty Level: Easy[/one_fourth_last]

    • 1 kg Boneless chicken, cubed
    • 1/2 cup plain Yoghurt
    • 1/4 cup cheddar cheese, grated
    • 2 egg whites, lightly beaten
    • 4 tablespoon fresh cream
    • 2 tablespoon lemon juice
    • 2 tablespoon ginger garlic paste
    • 1 teaspoon crushed black pepper
    • 1 teaspoon crushed red chilli
    • 1 teaspoon green chili paste
    • 1 teaspoon cumin powder
    • 1/2 teaspoon garam masala powder
    • Salt to taste
    • oil or melted butter for brushing

    [/tab] [tab]Yield:4 servings

    Nutritional information is not yet available. [/tab] [/tabs]

    Directions:
    [tabs type=”horizontal”] [tabs_head] [tab_title]Step by Step Method[/tab_title] [tab_title]Serving Suggestions[/tab_title][/tabs_head] [tab]

    Step 1

    Put chicken in a large bowl. Add alll ingredients except oil. Mix well

    Step 2

    Cover and marinate for at least 2 hours to blend flavors.

    Step 3

    Preheat oven at 180 degree C.

    Step 4

    Thread chicken pieces on metal skewers and grill in the pre heat oven for 20 mins or until chicken is tender and all juices run clear.

    Step 5

    Turn and basting occasionally with butter and left over marination after every 5 minutes.

    Step 6

    Remove from the oven. Transfer into a serving platter.Tandoori Moti Tikka is ready to serve. ENJOY!!

    [/tab] [tab]

    • Serve with onion rings, chutney and puri paratha.

    [/tab] [/tabs]
    If you like Tandoori Moti Tikka Recipe and make it then let me know your feedback by commenting below.And if you know more innovative ways in which we can utilize this  mouth watering Tandoori Moti Tikka, do share with us and we would be glad to give it a try.

  • RECIPE: Mooli Paratha (Radish Paratha)

    Mooli Paratha (Radish Paratha)

    Mooli Paratha is one whole meal by itself it is sure to win everyone’s heart, serve this delicious paratha with chutney, yogurt or just a little pat of butter.They are best enjoyed hot and crisp straight from the tava (griddle).Give it a try!!

    Mooli Paratha Recipe
    Photo: Mooli Paratha Recipe

    Check it out the Mooli Paratha Recipe here!!

    Prep Time:30 minutes

    Cook Time:20 minutes

    Servings:6

    Difficulty Level: Medium

    Ingredients

    • 3 cups of Whole Wheat Flour
    • 2 cups grated White Radish
    • 1 medium Onion , finely chopped
    • 1/4 cup fresh coriander leaves, finely chopped
    • 1 tsp red chilli powder
    • 1 tsp carom seeds (Ajwain)
    • 1/2 tsp garam masala
    • salt to taste
    • 2 tbsp Butter
    • 1/2 cup Butter or Cooking Oil

    Directions:

    Step 1

    Mix together the flour, butter, and salt thoroughly in a bowl.

    Step 2

    Then add sufficient water to make a dough, knead for 5 minutes, cover and set aside for 15 minutes.
    Wash the radish well and grate it using a vegetable grater.

    Step 3

    Add a teaspoon of salt to the grated radish, mix well and set aside for 3-5 minutes.

    Step 4

    Now squeeze out the water.

    Step 5

    To the squeezed radish, add garam masala , red chilli powder, onions, coriander leaves, and carom seeds.

    Step 6

    And mix well.

    Step 7

    Divide this mixture into 1 inch sized balls. And set aside.

    Step 8

    Divide the dough into slightly larger than 1 inch size balls, flatten each ball into a circle.

    Step 9

    Place the grated radish balls at the center of the flattened dough.

    Step 10

    Then, gently stretch the dough to envelope the mixture completely, such that all the edges meet at the top of the dough ball.

    Step 11

    Using your fingers seal the dough well so that all the stretched up edges blend into one.

    Step 12

    Dust with some flour and roll out the dough into a circle.

    Step 13

    Heat a frying pan and when frying pan is very hot, place the rolled out dough on it.

    Step 14

    Leave dough for a minute and turn over.

    Step 15

    After a minute or so the paratha will slowly start to bubble up.

    Step 16

    Now drizzle one teaspoon of melted butter or cooking oil on top of the paratha and turn over.

    Step 17

    The paratha immediately starts to rise.

    Step 18

    Repeat the drizzling with melted butter or cooking oil on the other side as well.

    Step 19

    Turn over again and let it rise once more.

    Step 20

    When golden brown on both sides, remove from frying pan. Mooli Paratha is ready to serve.

    • Serve with yogurt or mint raita.

    If you like Mooli Paratha Recipe and make it then let me know your feedback by commenting below.And if you know more innovative ways in which we can utilize this mouth watering Mooli Paratha, do share with us and we would be glad to give it a try.

  • Restaurant Secret Revealed: Make Restaurant-Style Hot and Sour Soup at Home!

    Learn how to make restaurant-style Hot and Sour Soup with this quick and easy recipe.  It’s easy to adapt to your personal taste preferences, and so delicious!

    Hot and Sour Soup

    Delicious hot and sour soup does not need to be complicated. This Hot and Sour Soup recipe is quick and easy to make, SO tasty and flavorful, and tastes just like the Chinese restaurant version! 

    And today’s recipe is one that I’ve been meaning to share with you on the blog for years, after literally dozens and dozens of you have requested it. (apparently many of you usually opt for the hot and sour soup at your favorite Chinese restaurants and have wanted to learn how to make it!)

    Well, good news, friends! Traditional hot and sour soup is actually incredibly easy to make as well. And the bonus of making it at home is that it’s also incredibly easy to customize to your taste. Like it extra hot? Add in more chili garlic sauce. Like it extra sour? Add in more rice wine vinegar. Like it vegetarian? Make it with tofu. Like the meat version? Just add in some chicken.

    Trust me, this is one of those restaurant recipes that will taste just as good at home. And on chilly winter weeks like this one that we’re having here in Lahore, it’s guaranteed to warm you up in the most delicious of ways.

    Really, traditional hot and sour soup is just a hotter and sour-er version of egg drop soup, with some mushrooms and chicken (or tofu) thrown in. Oh, and bamboo shoots. Although I’m not really a fan of those, so I left them out in the version above (and included instructions in the recipe for how to add them if you’d like).I highly recommend using shiitake mushrooms for this recipe if you want it to taste ultra-authentic. But if you can’t find any, baby bella or white button mushrooms will totally work too.

    Winters’s most favorite mouth watering hot and sour soup, You can serve as appetizer to your guests in special dinner or lunch. Serve very hot to enjoy it’s real taste.

     Hot and Sour Soup with lots of veggies has a wonderful blend of hot and sour flavours, this is the perfect choice for a lazy winter evening. I love hot n sour soup especially if I have one of those really bad sinus or chest colds. Try this Hot and Sour Soup Recipe, and don’t forget your experience with us !!

    Then just follow the instructions and bring everything to a simmer, drizzle in those eggs in a thin stream while stirring the soup (to create those pretty egg ribbons), and add in your cooked chicken (or tofu) and sesame oil and green onions at the end…

    …and serve it up nice and warm, topped with extra green onions for garnish.

    The whole thing usually comes together for me in just about 20-25 minutes, making it the perfect meal to warm you up quickly on a chilly day. I love serving it with my homemade fried rice recipe, or any kind of stir-fry that sounds good. And it always, always hits the spot.

    Stay warm this week, everyone!

    Easy Hot and Sour Soup Recipe
    Photo: Easy Hot and Sour Soup Recipe

    Check it out the Easy Hot and Sour Soup Recipe here!!

    Easy Hot and Sour Soup

    Prep Time 5 minutes
    Cook Time 25 minutes
    Total Time 30 minutes
    Servings 8
    Author Bushrah | Recipestable

    Ingredients

    • 2 cups boiled chicken cut into small chunks
    • 8 cups chicken stock
    • 1 chicken cube
    • 1/2 cup chopped carrots
    • 1/2 cup corn
    • 1/2 cup shredded cabbage
    • 1/4 cup green bell pepper
    • 1 tablespoon soy sauce
    • 1/2 cup Chilli sauce
    • 2 tablespoon White vinegar
    • 2 teaspoon sesame oil
    • 2/3 teaspoon black pepper
    • 1 teaspoon white pepper
    • 1 tablespoon cornflour
    • 1 egg white
    • Salt according to taste

    Instructions

    Method

    • Heat oil in a large pot or saucepan.
    • Add carrots, bell peppers, corn and chicken. Saute for few minutes or until crisp-tender.
    • Add chicken cube and stock and cook on medium to high heat .
    • Bring to a boil then add cabbage.
    • Add seasoning that is chili sauce, vinegar, soy sauce, black pepper and salt to taste.
    • Add egg white and then add corn starch paste slowly to monitor consistency.
    • Don’t overcook it as it will become thin if you keep on cooking.
    • Top with spring onions.Easy Hot and Sour Soup is ready to serve. ENJOY!!

    Notes

    Serving Suggestions:
    Serve hot with bread-sticks.
     

    I have also posted Chicken Corn Soup Recipe which is another easiest & tastiest version of making soup. Do check it out as well.


    Put your own spin on it. And lemme know how it turns out. Post a photo on Facebook (Recipestable) or  on Twitter so I can see how lovely yours turn out.


    Happy Cooking!!

    If you like this post, Please Subscribe to my blog and let me know your feedback by commenting below.. I have lots more recipes to share with you.

  • Healthy Weeknight Meal: Chicken Corn Soup Recipe (Boost Your Immunity!)

    Chicken Corn Soup

    Sometimes its just a bowl of simple chicken corn soup that we need to lift our mood, spirit and feel blessed. It’s a very quick and easy soup perfect for a Sunday night dinner.

    This Chicken Corn Soup is made entirely with fresh corn and chicken stock, seasoned with chinese seasoning and flecked with egg. Give it a try, a warming Winter treat!!

     Chicken Corn Soup Recipe
    Photo: Chicken Corn Soup Recipe

    Check it out the  Chicken Corn Soup Recipe here!!

    [divider]

    [one_fourth]Prep Time:5 minutes[/one_fourth] [one_fourth]Cook Time:30 minutes[/one_fourth] [one_fourth]Servings:8 [/one_fourth] [one_fourth_last]Difficulty Level: Easy[/one_fourth_last]

    [divider]

    [tabs type=”horizontal”] [tabs_head] [tab_title]Ingredients[/tab_title] [tab_title]Nutrition[/tab_title] [/tabs_head] [tab]

    • 2 cups boiled chicken, shredded
    • 1/2 cup boiled corn, roughly chopped
    • 8 cups chicken stock
    • 2 large eggs, lightly beaten
    • 1 teaspoon salt or to taste
    • 1 teaspoon black pepper
    • 2 tablespoon vinegar
    • 2 teaspoon chilli sauce
    • 1-1/2 teaspoon soy sauce
    • 1 tablespoon cornflour( depends how much you want to soup thickness.)

    [/tab] [tab]Yield: 8 servings

    Amount Per Serving: ( 1 serving = 1 cup)

    • Calories:271 kcal
    • Carbohydrates:14.2 g
    • Cholesterol:120 mg
    • Fat: 12.4 g
    • Fiber: 1.1 g
    • Protein: 24.7 g
    • Sodium: 122 mg

    Percent Daily Values are based on a 2,000 calorie diet.

    [/tab] [/tabs]

    Directions:
    [tabs type=”horizontal”] [tabs_head] [tab_title]Step by Step Method[/tab_title] [tab_title]Serving Suggestions[/tab_title][/tabs_head] [tab]

    Step 1

    Pour chicken stock in a large pot or saucepan.

    Step 2

    Bring to a boil, add shredded chicken and boiled corn.

    Step 3

    Cover and simmer for 5 minuets than add the seasonings.

    Step 4

    Dissolve 1 tablespoon cornflour in 1/4 cup of water.

    Step 5

    Slowly add this mixture in the boiling stock .
    Note: Be careful, when you add the corn flour mixture .

    Step 6

    If you want light soup add little and if you want thick soup than add almost all the corn flour .

    Step 7

    Continuously mix it with spatula now add soya sauce and vinegar.

    Step 8

    Mix well .

    Step 9

    Finally, add the beaten eggs and mix it for 2 minutes.

    Step 10

    Turn the heat off and stir in chili sauce.

    Step 11

    Ladle into soup bowls. Chicken Corn Soup is ready to serve . ENJOY!!

    [/tab] [tab]

    • Serve with breadsticks.

    [/tab] [/tabs]
    If you like Chicken Corn Soup Recipe and make it then let me know your feedback by commenting below.And if you know more innovative ways in which we can utilize this mouth watering Chicken Corn Soup , do share with us and we would be glad to give it a try.

  • Make Restaurant-Style Boneless Chilli Chicken (It’s Easier Than You Think!)

    Boneless Chilli Chicken

    Boneless chicken are marinated in soya sauce, egg, cornflour, chili sauce and pepper, then deep fried and then seasoned again in sauces.

    It tastes hot, sweet and sour. A very simple dish to cook, but has lot of unhealthy stuff in the restaurant style dry chilli chicken, like ajinomotto, food color and lot of oil since they are deep fried.

    To make this Boneless chilli chicken, I have not used ajinimotto (chinese salt), no food color, yet tastes good. The quintessential Chinese chicken can now be savoured in the comfort of your homes with these few simple steps.Give it a try!!

    Boneless Chilli Chicken Recipe
    Photo: Boneless Chilli Chicken Recipe

    Check it out the Boneless Chilli Chicken Recipe here!!

    Boneless Chilli Chicken Recipe

    Prep Time 10 minutes
    Cook Time 30 minutes
    Total Time 1 hour
    Servings 4
    Author Bushrah | Recipestable

    Ingredients

    • 500 gm boneless chicken cut into cubes
    • 2 egg lightly beaten
    • 1/2 cup corn flour
    • 1 teaspoon garlic paste
    • 1 teaspoon ginger paste
    • 1 teaspoon pepper
    • salt to taste
    • Oil for deep frying

    For Sauce

    • 1 onions thinly sliced
    • 2 green chillies thinly sliced
    • 2 tablespoon vinegar
    • 1 tablespoon soy sauce
    • 1 tablespoon chilli sauce
    • 1/2 teaspoon red chili flakes
    • a pinch of salt or to taste

    For Garnishing

    • green chillies slit
    • ginger slices
    • green onion thinly sliced

    Instructions

    Method

    • Place chicken in a large bowl.
    • Add egg, cornflour, garlic and ginger paste, pepper and salt. Mix well to coat evenly.
    • Cover and marinate for 30 minutes ot blend flavors.
    • Heat oil in a deep pan oevr medium heat.
    • Deep-fry the chicken pieces over high heat to begin with and then lower the heat till chicken is cooked through.
    • Remove from the oil and drain on absorbent paper.
    • Heat 2 tablespoon oil in a wok or pan.
    • Add onions and stir-fry over high heat for 4-5 minutes or until they are translucent.
    • Add the green chillies and stir a few times.
    • Then add salt, soy sauce, vinegar, and chilli sauce.
    • Add fried chicken.
    • Stir to coat evenly. Cook for 2 minutes or until sauce is thickened.
    • Dish it out. Garnished with the green chillies and green onion. Delicious Boneless Chilli Chicken is ready to serve. ENJOY!!

    Notes

    Serving Suggestions:
    Serve with Steamed Rice or Fried Rice
    I have also posted Desi Chili Chicken Recipe  which is another easiest & tastiest version of making Chili Chicken. Do check it out as well.


    Put your own spin on it. And lemme know how it turns out. Post a photo on Facebook (Recipestable) or  on Twitter so I can see how lovely yours turn out.


    Happy Cooking!!

    If you like this post, Please Subscribe to my blog and let me know your feedback by commenting below.. I have lots more recipes to share with you.


  • Cheesy Spinach Bake Recipe

    Cheesy Spinach Bake

    Cheesy and delicious Spinach Casserole. Looks terrible but taste absolutely awesome!!

    Cheesy Spinach Bake Recipe
    Photo: Cheesy Spinach Bake Recipe

    Check it out the Cheesy Spinach Bake Recipe here!!

    [divider]

    [one_fourth]Prep Time:10 minutes[/one_fourth] [one_fourth]Cook Time:25 minutes[/one_fourth] [one_fourth]Servings: 6[/one_fourth] [one_fourth_last]Difficulty Level: Easy[/one_fourth_last]

    [divider]

    [tabs type=”horizontal”] [tabs_head] [tab_title]Ingredients[/tab_title] [tab_title]Nutrition[/tab_title] [/tabs_head] [tab]

    • 2 packages (10 oz each) frozen chopped spinach, thawed and drained
    • 1 can (10-3/4 ounces) condensed cream of potato soup, undiluted
    • 2 cups shredded Monterrey Jack cheese
    • 1 cup sour cream
    • 1/2 cup grated Parmesan cheese

    [/tab] [tab]Yield: 6 servings

    Nutritional information is not yet available. [/tab] [/tabs]

    Directions:
    [tabs type=”horizontal”] [tabs_head] [tab_title]Step by Step Method[/tab_title] [tab_title]Serving Suggestions[/tab_title][/tabs_head] [tab]

    Step 1

    Place spinach in a large bowl.

    Step 2

    Stir in potato soup, sour cream.

    Step 3

    Transfer into a greased 11×7-inch. baking dish.

    Step 4

    Sprinkle with Parmesan and Monterrey Jack cheese.

    Step 5

    Bake, uncovered, at 325 degree F, for 30 minutes or until cheese is melted and bubbly. Cheesy Spinach Bake is ready to serve. Enjoy!!

    [/tab] [tab]

    • Serve warm with crusty bread.

    [/tab] [/tabs]
    If you like Cheesy Spinach Bake Recipe and make it then let me know your feedback by commenting below.And if you know more innovative ways in which we can utilize this mouth watering Cheesy Spinach Bake, do share with us and we would be glad to give it a try.

  • Makki Ki Roti Recipe

    Makki Ki Roti

    A traditional Pakistani and Indian bread, which served straight off the griddle topped with a dollop of fresh homemade butter. Makki ki Roti is mostly eaten in winters with sarsoon saag, palak, qulfa and etc. Give it a try!!

    Makki Ki Roti Recipe
    Photo: Makki Ki Roti Recipe

    Check it out the Makki Ki Roti Recipe here!!

    [divider]

    [one_fourth]Prep Time:20 minutes[/one_fourth] [one_fourth]Cook Time:15 minutes[/one_fourth] [one_fourth]Servings: 5[/one_fourth] [one_fourth_last]Difficulty Level:Medium [/one_fourth_last]

    [divider]

    [tabs type=”horizontal”] [tabs_head] [tab_title]Ingredients[/tab_title] [tab_title]Nutrition[/tab_title] [/tabs_head] [tab]

    • 2 cups Maize flour
    • 1 fistful Plain flour
    • 1 tsp Oil
    • Salt to taste
    • Water to knead

    [/tab] [tab]Yield: 5 servings

    Nutritional information is not yet available. [/tab] [/tabs]

    Directions:
    [tabs type=”horizontal”] [tabs_head] [tab_title]Step by Step Method[/tab_title] [tab_title]Serving Suggestions[/tab_title][/tabs_head] [tab]

    Step 1

    Mix maize flour, oil and salt.

    Step 2

    Knead in a soft pliable dough, adding very little water at a time.

    Step 3

    When the dough is very smooth and soft, bread a lump.

    Step 4

    Shape into a ball, flatten and pat with palm, to make a thin roti.

    Step 5

    Use dry plain flour to help. Or roll with a rolling pin.

    Step 6

    Take care to dust with flour and lift and turn to avoid sticking.

    Step 7

    Place on a heavy iron or earthen griddle and roast till crisp.

    Step 8

    Repeat on both sides. Repeat for all rotis.

    Step 9

    Cover and line with napkins to keep warm.

    Step 10

    Drizzle with ghee or butter if desired. Makki Ki Roti is ready to serve.

    [/tab] [tab]

    • Serve hot with Sarson ka saag and slice of onion and lime.

    [/tab] [/tabs]
    If you like Makki Ki Roti Recipe and make it then let me know your feedback by commenting below.And if you know more innovative ways in which we can utilize this mouth watering Makki Ki Roti, do share with us and we would be glad to give it a try.

  • Easy Chili Garlic Fish Recipe: Perfect for Weeknight Dinners (Ready in 30 Minutes!)

    Chili Garlic Fish

    Garlicky and spicy, Chili Fried Fish has to be one of my all time favourites. Ready in less than 40 minutes, this hot, garlic stir fried fish is perfect for a week-night meal.
    The aromas released while cooking this dish will have everyone licking their lips in anticipation. Must try this Chili Garlic Fish recipe, you’ll love it.

    Chili Garlic Fish Recipe
    Photo: Chili Garlic Fish Recipe

    Check it out the Chili Garlic Fish Recipe here!!

    [divider]

    [one_fourth]Prep Time:30 minutes[/one_fourth] [one_fourth]Cook Time:30 minutes[/one_fourth] [one_fourth]Servings:4[/one_fourth] [one_fourth_last]Difficulty Level: Easy[/one_fourth_last]

    [divider]

    [tabs type=”horizontal”] [tabs_head] [tab_title]Ingredients[/tab_title] [tab_title]Nutrition[/tab_title] [/tabs_head] [tab]

    For Frying Fish

    • 1 kg boneless fish fillets, cut into cubes
    • 2 eggs
    • 4 tablespoon cornflour
    • 1 teaspoon soy sauce
    • 1 teaspoon ginger garlic paste
    • 1/2 teaspoon red chili sauce
    • a pinch of cayenne pepper
    • salt to taste
    • oil for deep frying

    For Sauce:

    • 1 cup fish stock
    • 4 garlic cloves, chopped
    • 1 green onion, thinly sliced
    • 1 green bell pepper, thinly sliced
    • 1 red bell pepper, thinly sliced
    • 2 tablespoon vegetable oil
    • 2 tablespoon red chili paste
    • 3 tablespoon tomato ketchup
    • 1 tablespoon soy sauce
    • 1 tablespoon cornflour ( dissolved in little water)
    • 1 teaspoon red chili sauce
    • Salt to taste

    [/tab] [tab]Yield: 4 servings

    Nutritional information is not yet available. [/tab] [/tabs]

    Directions:
    [tabs type=”horizontal”] [tabs_head] [tab_title]Step by Step Method[/tab_title] [tab_title]Serving Suggestions[/tab_title][/tabs_head] [tab]

    Step 1

    Wash fish and pat dry.

    Step 2

    Cut into cubes and place in a large bowl.

    Step 3

    Add eggs, soy sauce, chili sauce, ginger garlic paste, cornflour, cayene pepper and salt to taste. Mix until well combined.

    Step 4

    Leave it for 30 minutes to blend flavors.

    Step 5

    Now heat oil in a deep pan oevr medium heat. Fry fish pieces, a few at a time, for 3-4 minutes or until crispy and golden brown.

    Step 6

    Remove from the oil and absorbant on kitchen paper.

    Step 7

    Keep warm and repeat this procedure with remaining fish.

    Step 8

    Meanwhile, heat 2 tablespoon vegetable oil in a wok or pan. Saute garlic for 30 seconds.

    Step 9

    Then add red bell pepper, green bell pepper. Stir-fry for 2 minutes or until crisp-tender.

    Step 10

    Stir in the tomato ketchup, red chili paste, soy sauce and red chili sauce.

    Step 11

    Season with salt and pepper to taste.

    Step 12

    Add fish stock. Bring to a boil.

    Step 13

    Cook for 4 minutes then stir in the cornflour paste.

    Step 14

    Add fried fish pieces. Cook and stir for 2 minutes or until sauce is thickened.

    Step 15

    Top with green onion. Deliciuos Chili Gralic Fish is ready to serve.

    [/tab] [tab]

    • Serve with Steamed Rice.

    [/tab] [/tabs]
    If you like Chili Gralic Fish recipe and make it then let me know your feedback by commenting below.And if you know more innovative ways in which we can utilize this mouth watering Chili Gralic Fish, do share with us and we would be glad to give it a try.

  • Moist & Delicious: The BEST Carrot Cake Recipe Ever (Easy & Perfect!)

    Carrot Cake

    A simple, moist, yummy carrot cake with delicious cream cheese frosting. This moist carrot cake is welcome at birthdays, weddings, reunions and all special occasions. A Perfect delight!!

    Carrot Cake Recipe
    Photo: Carrot Cake Recipe

    Check it out the Carrot Cake Recipe here!!

    [divider]

    [one_fourth]Prep Time:30 minutes + cooling[/one_fourth] [one_fourth]Cook Time:50 minutes[/one_fourth] [one_fourth]Servings: 8[/one_fourth] [one_fourth_last]Difficulty Level: Medium[/one_fourth_last]

    [divider]

    [tabs type=”horizontal”] [tabs_head] [tab_title]Ingredients[/tab_title] [tab_title]Nutrition[/tab_title] [/tabs_head] [tab]

    • 3 cups grated carrots
    • 1 cup chopped walnuts
    • 4 eggs
    • 2 cups all-purpose flour
    • 2 cups white sugar
    • 1-1/4 cups vegetable oil
    • 2 tsp vanilla extract
    • 2 tsp baking soda
    • 2 tsp baking powder
    • 2 tsp cinnamon powder
    • 1/2 tsp salt

    For Glaze:

    • 4 cups confectioners’ sugar
    • 1 cup cream cheese, softened
    • 1/2 cup butter, softened
    • 1 teaspoon vanilla extract
    • 1 cup chopped walnuts

    [/tab] [tab] Yield: 1 – 9×13 inch cake

    Amount Per Serving

    • Calories: 575 kcal
    • Carbohydrates: 63.7 g
    • Cholesterol: 74 mg
    • Fat: 34.8 g
    • Fiber: 2.2 g
    • Protein: 5.1 g
    • Sodium: 347 mg

    Percent Daily Values are based on a 2,000 calorie diet.

    [/tab] [/tabs]

    Directions:
    [tabs type=”horizontal”] [tabs_head] [tab_title]Step by Step Method[/tab_title] [tab_title]Serving Suggestions[/tab_title][/tabs_head] [tab]

    Step 1

    Preheat oven to 175 degrees C.

    Step 2

    Grease and flour a 9×13 inch baking pan. Set aside.

    Step 3

    Beat eggs with oil, white sugar and vanilla essence in a large bowl.

    Step 4

    In another bowl, combine together the flour, baking soda, baking powder, salt and cinnamon.

    Step 5

    Stir in the carrots.

    Step 6

    Fold in Walnuts.

    Step 7

    Pour into the prepared pan.

    Step 8

    Bake, in the preheated oven, for 40 minutes or until a toothpick inserted into the center of the cake comes out clean.

    Step 9

    Allow to cool for 10 minutes then turn out onto a wire rack.

    Step 10

    Let it cool completely.

    Step 11

    To Make Frosting:

    In a medium bowl, mix together the butter, cream cheese, confectioners’ sugar and vanilla essence.

    Step 12

    Beat until the mixture is smooth and creamy.

    Step 13

    Stir in chopped Walnuts.

    Step 14

    Frost over the cooled cake. Delicious Carrot Cake is ready to serve. ENJOY!!

    [/tab] [tab]

    • Serve with Tea or coffee.

    [/tab] [/tabs]

    If you like Carrot Cake Recipe and make it then let me know your feedback by commenting below.And if you know more innovative ways in which we can utilize this sweet and mouth watering Carrot Cake, do share with us and we would be glad to give it a try.

  • Boost Your Immunity with This Simple Lemongrass Tea Recipe

    Lemongrass Tea

    Warm your body-and-soul with this simple, fragrant and comforting beverage. Give this Lemongrass Tea Recipe a try, you’ll love the aromatic flavor of it.Perfect for cold winter days!!

    Lemongrass Tea Recipe
    Photo: Lemongrass Tea Recipe

    Check it out the Lemongrass Tea Recipe here!!

    [divider]

    [one_fourth]Prep Time:5 minutes[/one_fourth] [one_fourth]Cook Time:20 minutes[/one_fourth] [one_fourth]Servings:6 [/one_fourth] [one_fourth_last]Difficulty Level: Easy[/one_fourth_last]

    [divider]

    [tabs type=”horizontal”] [tabs_head] [tab_title]Ingredients[/tab_title] [tab_title]Nutrition[/tab_title] [/tabs_head] [tab]

    • 1/2 cup dried or fresh lemongrass, chopped
    • 1 tablespoon fresh lemon juice
    • honey as desired

    [/tab] [tab]Yield: 6 servings

    Amount Per Serving ( 1 serving = 1 cup)

    • Calories: 16.2
    • Fat: 0.0 g
    • Cholesterol: 0.0 mg
    • Sodium: 7.5 mg
    • Total Carbohydrate: 4.2 g
    • Dietary Fiber: 0.0
    • Sugars: 4.1 g
    • Protein: 0.0 g

    . [/tab] [/tabs]

    Directions:
    [tabs type=”horizontal”] [tabs_head] [tab_title]Step by Step Method[/tab_title] [tab_title]Serving Suggestions[/tab_title][/tabs_head] [tab]

    Step 1

    Take a large pan, combine the lemon grass with 8 cups of fresh water.

    Step 2

    Bring to a boil.

    Step 3

    Reduce the heat and let it simmer for 15-20 minutes or until it reduces to about 6 cups.

    Step 4

    Remove from the flame. Stir in the lemon juice and honey.

    Step 5

    Cover and allow it to infuse for few minutes.

    Step 6

    Strain and pour into teacups. Lemongrass Tea is ready to serve, ENJOY!!

    [/tab] [tab]

    • Serve hot.

    [/tab] [/tabs]
    If you like Lemongrass Tea recipe and make it then let me know your feedback by commenting below.And if you know more innovative ways in which we can utilize this mouth watering Lemongrass Tea, do share with us and we would be glad to give it a try.

  • Boost Your Immunity: Kashmiri Green Tea Recipe with Health Benefits

    Kashmiri Green Tea

    Kashmiri tea is very good for health.It is an aromatic and warming tea blend that combines organic green tea with flavourful cardamom and a hint of pistachios and almonds. This tasty kashmiri tea is ready in just 30 minutes.

    Kashmiri Green Tea is very popular winter’s beverage. Its milky and nutty taste texture is as much famous that people often include this in their winter’s wedding or party menu.

    This Kashmiri Green Tea is worth making especially in these Arctic conditions, you’ll just be warmed up for hours to come. You may even find that you crave it in any weather! Must try This Kashmiri Green Tea Recipe, you’ll love it.

    Check it out the Kashmiri Green Tea Recipe here!!

    [divider]

    [one_fourth]Prep Time:10 minutes[/one_fourth] [one_fourth]Cook Time:30 minutes[/one_fourth] [one_fourth]Servings: 4[/one_fourth] [one_fourth_last]Difficulty Level: Easy [/one_fourth_last]

    [divider]

    [tabs type=”horizontal”] [tabs_head] [tab_title]Ingredients[/tab_title] [tab_title]Nutrition[/tab_title] [/tabs_head] [tab]

    • 6 cups water
    • 2 cups milk
    • 2 tbsp green tea
    • 1/2 tsp salt
    • 1/4 tsp baking soda
    • 4 tbsp fresh cream
    • 2 tbsp sugar(optional)
    • 2-3 green cardamom (choti Ilaichi)
    • 1/2 cup chopped almond and pistachio

    [/tab] [tab]Yield: 4 servings

    Nutritional information is not yet available. [/tab] [/tabs]

    Directions:
    [tabs type=”horizontal”] [tabs_head] [tab_title]Step by Step Method[/tab_title] [tab_title]Serving Suggestions[/tab_title][/tabs_head] [tab]

    Step 1

    In a large sauce pan,boil water with the green tea till half.

    Step 2

    Add two more cups of water till half again.

    Step 3

    Add baking soda,green cardamom and salt in it.

    Step 4

    Add 2 cups milk and bring to boil.

    Step 5

    Cook green tea for 10 to 15 minutes.

    Step 6

    Then add chopped almond and pistachio.

    Step 7

    Pour green tea into serving cups, add cream and sugar(if desired) in it. Green Tea is ready to serve

    [/tab] [tab]

    [/tab] [/tabs]
    If you like Kashmiri Green Tea Recipe and make it then let me know your feedback by commenting below.And if you know more innovative ways in which we can utilize this mouth watering Kashmiri Green Tea , do share with us and we would be glad to give it a try.

  • Easy Chili Chicken Legs Recipe: Restaurant-Style Flavor at Home

    Chili Chicken Legs

    A tasty version of Chicken drumsticks with a bit of sweetness and spiciness. Easy and delicious Asian style chicken drumsticks. Sweet chili sauce adds an Asian flavour. Must try this Chili Chicken Legs Recipe, you’ll love it.

    Chili Chicken Legs Recipe
    Photo: Chili Chicken Legs Recipe

    Check it out the Chili Chicken Legs Recipe here !!

    [divider]

    [one_fourth]Prep Time:10 minutes[/one_fourth] [one_fourth]Cook Time:20 minutes[/one_fourth] [one_fourth]Servings: 5[/one_fourth] [one_fourth_last]Difficulty Level:Easy [/one_fourth_last]

    [divider]

    [tabs type=”horizontal”] [tabs_head] [tab_title]Ingredients[/tab_title] [tab_title]Nutrition[/tab_title] [/tabs_head] [tab]

    • 12 chicken drumsticks, skin removed
    • 5 tbsp sweet chili sauce
    • 3 tbsp soy sauce
    • 2 tbsp honey
    • salt and pepper to taste

    [/tab] [tab]Yield: 5 servings

    Amount Per Serving: ( 1 serving = 1 each)

    • Calories: 142 kcal
    • Carbohydrates: 5.9 g
    • Cholesterol: 62 mg
    • Fat: 4.1 g
    • Fiber: 0.2 g
    • Protein: 19.6 g
    • Sodium: 353 mg

    [/tab] [/tabs]

    Directions:
    [tabs type=”horizontal”] [tabs_head] [tab_title]Step by Step Method[/tab_title] [tab_title]Serving Suggestions[/tab_title][/tabs_head] [tab]

    Step 1

    Take a small bowl, combine together the honey, chili sauce, soy sauce, salt and pepper.

    Step 2

    Keep aside 1/2 of the marinade for basting.

    Step 3

    Place chicken drumsticks in a resealable plastic bag.

    Step 4

    Pour remaining marinade over the chicken drumsticks.

    Step 5

    Shake well to coat evenly.

    Step 6

    Cover and refrigerate at least 1 hour.

    Step 7

    Preheat an outdoor grill for medium-high heat.

    Step 8

    Lightly grease the grill grate with oil.

    Step 9

    Arrange drumsticks on the preheated grill.

    Step 10

    Cook on each side for 10 minutes or until all juices run clear, basting and turning occasionally.

    Note:Baste frequently with the reserved sauce during the last 5 minutes.

    Step 11

    Remove from the grill and transfer into a serving dish. Delicious Chili Chicken Legs are ready to serve. Enjoy !!

    [/tab] [tab]

    • Serve with green salad and your favorite dipping sauce.

    [/tab] [/tabs]
    If you like Chili Chicken Legs Recipe and make it then let me know your feedback by commenting below.And if you know more innovative ways in which we can utilize this mouth watering Chili Chicken Legs, do share with us and we would be glad to give it a try.