Tag: desi food

  • Seekh Kebab Pizza Bites Recipe (A Flavorful Desi Twist)

    Seekh Kebab Pizza Bites Recipe (A Flavorful Desi Twist)

    Craving pizza but your taste buds is calling for some desi twist?

    Satisfy your cravings with these Seekh Kebab Pizza Bites that are ready in 30 minutes or less and featuring everyone’s favorite flavor combo: Pizza, Seekh Kebab and  cheesy goodness—are sure to be the talk of the party.

    A Flavorful Desi Twist - Seekh Kebab Pizza Bites Recipe
    A Flavorful Desi Twist – Seekh Kebab Pizza Bites Recipe

    You all know I love pizza, and I couldn’t go too long without experimenting different pizza toppings. (For you newbies, they happen to be one of my favorite finger food!) These days pizzas come with many desi variations like butter chicken, spicy tikka or seekh kebabs.

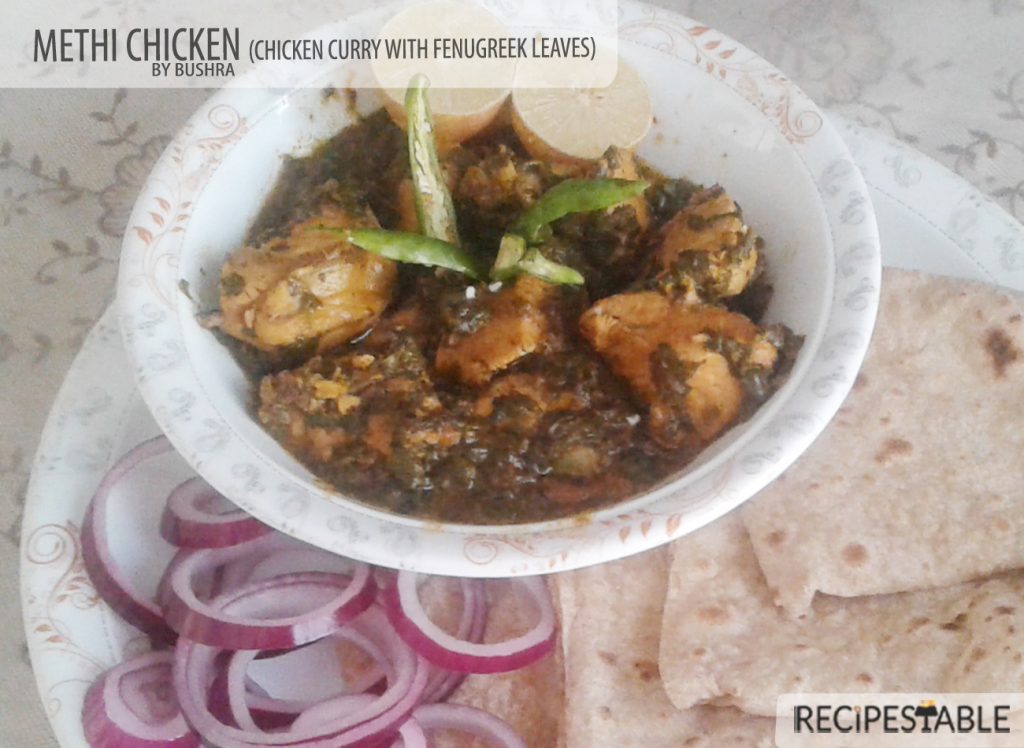
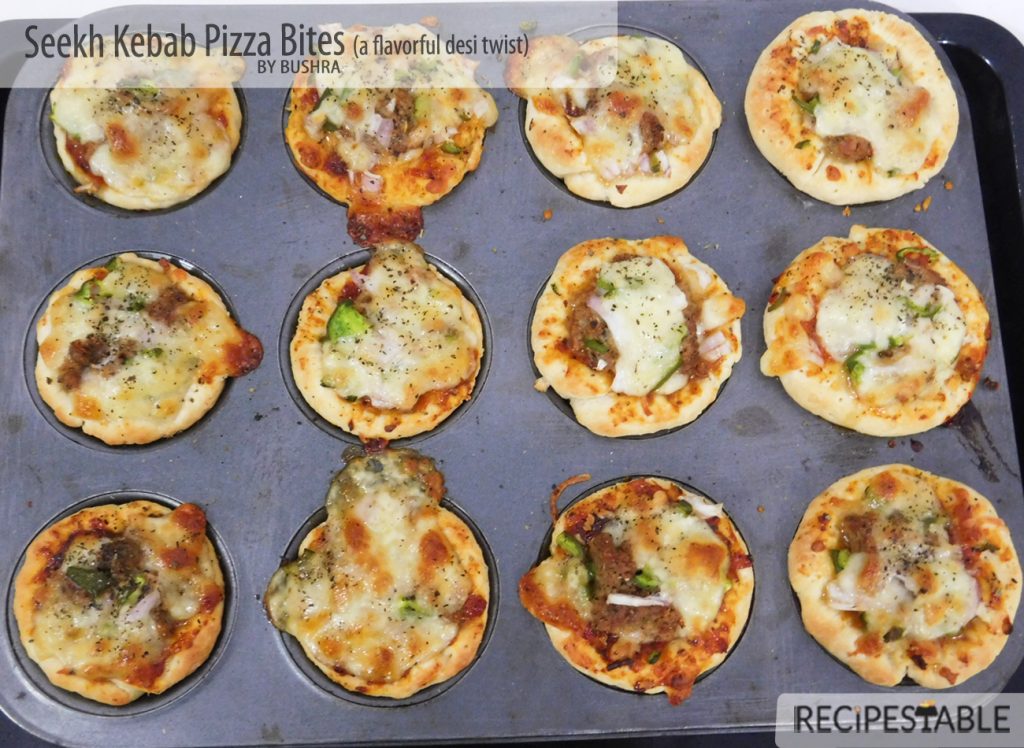
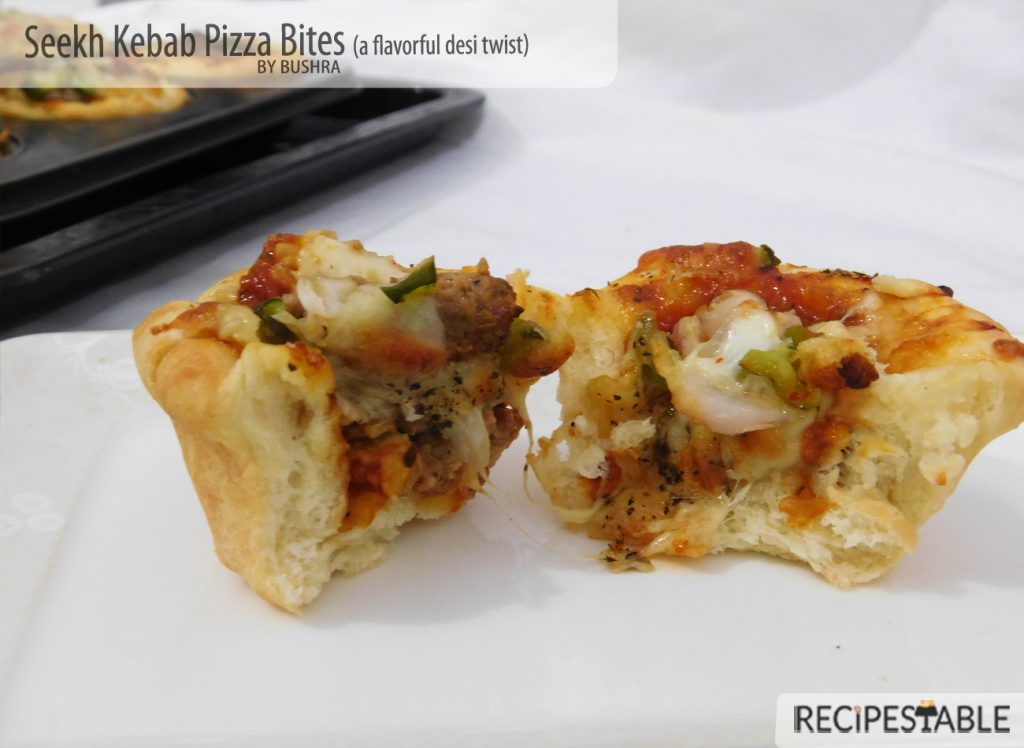
    Seekh Kebab Pizza Bites (A Flavorful Desi Twist)

    So, Today why not take the classic Italian and make them unabashedly Pakistani ?

    Creativity, especially when it comes to food has absolutely no limits. There are some flavor combinations that are so brilliant —like seekh kebabs, pizza sauce, and cheese. All three of these offer undeniable flavor on their own, but when paired together, the result is nothing less than perfect. So, I changed the shape of pizza and turned it everyone’s favorite pizza ingredients into these cute little “Seekh Kebab Pizza Bites”!

    The smokiness of seekh kebabs, the sharp flavor of cheddar, the cheesy goodness of Mozzarella and the zest of pizza sauce combine like they were always meant to be together. All this ohso yummy !

    Seekh Kebab Pizza Bites Recipe
    Seekh Kebab Pizza Bites Recipe

    Does your family love pizza as much as mine does?

    Then this weekend, try something new : “Seekh Kebab pizza Bites”! These adorable little pizza bites are yours to enjoy. And let me tell ya – they will easily disappear quickly!

    Seekh Kebab Pizza Bites Recipe
    These Seekh Kebab Pizza Bites make a fun and delicious way to serve everyone’s favorite pizza! 

    Ingredients in Seekh Kebab Pizza Bites?

    To make these seekh kebab pizza bites, you’ll need pizza dough, pizza sauce, leftover seekh kebabs, onion, green bell pepper, Cheddar & Mozzarella cheese and Italian seasoning.

    Seekh Kebab Pizza Bites Recipe
    Seekh Kebab Pizza Bites Recipe

    How to make the Seekh Kebab Pizza Bites

    First I line up the muffin pan with homemade pizza dough and cut it into round circles (No need to be extremely accurate with the measurements).  I just wanted the pizza bites to be about the same size. Then I top it with the pizza sauce. I always keep a jar of homemade pizza sauce in my pantry to make these kinds of easy pizzas at a moment’s notice. Next is the cheese then the leftover seekh kebabs with onion and peppers then sprinkle herb seasoning and bake at 180 degree C for 10-15 minutes!

    These couldn’t be more simple.

    Seekh Kebab Pizza Bites Recipe
    Seekh Kebab Pizza Bites Recipe

    Once they have cooked, I remove them from the oven and allow them to cool enough so that they can be safely eaten, about 5 minutes and serve.

    Voila!!!

    Make-Ahead Seekh Kebab Pizza Bites Recipe

    They also make a great make-ahead meal or snack!

    Seekh Kebab Pizza Bites Recipe
    Seekh Kebab Pizza Bites Recipe

    How to Freeze Seekh Kebab Pizza Bites

    Once they have cooled completely, place them onto a sheet pan and allow them to flash freeze for about 30 minutes. Then, package them in freezer-safe zip top bags or containers for up to 2 weeks. To serve from frozen, just thaw overnight in the refrigerator and then reheat in the oven for about 10 minutes until heated throughout.

    Extra Bounce Tip:

    The fun thing is that they are completely customizable. And if you have kids around, or want to get friends involved in customizing their own, these are a great idea for a make-your-own-appetizer set up. Everyone will love tossing in their favorite toppings.

    Seekh Kebab Pizza Bites Recipe
    Seekh Kebab Pizza Bites Recipe

    Definitely a fun twist on serving pizza.  And in my opinion, much cuter — which is of course the bigger issue. enjoy 🙂

    Bismillah let’s get started.
    Check it out Seekh Kebab Pizza Bites Recipe and printable version here!!

    Want more Pizza Inspiration? 

    Here are some other pizza recipes on my blog:

    Put your own spin on it. And lemme know how it turns out and do take a few seconds to rate it! I would love to see your recreations so tag me on instagram @recipestable or Facebook (Recipestable) or on Twitter so I can see how lovely yours turn out.

  • Crunchy Pickled Kachumber Salad Recipe

    Crunchy Pickled Kachumber Salad Recipe

    Looking for something more adventurous than your usual Kachumber salad? Try this tasty Crunchy Pickled Kachumber Salad, a crunchy, squeaky pickle salad that would be amazing alongside a super fatty main dish, like this Chicken Biryani. But don’t worry, it’s not one briny mouthful, there are a lot of different textures going on between the crisp onions, crunchy pickles, red cabbage and juicy carrots.

    Crunchy Pickled Kachumber Salad Recipe
    Photo: Crunchy Pickled Kachumber Salad Recipe

    I like to experiment with creating no-cook dishes that can be easily thrown together at the last minute. I especially enjoy playing with the salads I’ve learned and putting a new spin on them, using whatever ingredients I have on hand to create something entirely new.

    This salad happened during one of my kitchen experiments. Things I really love in spring: 

    1. Super crisp, crunchy salads
    2. Juicy Colorful Veggies

    So clearly it make sense to combine these two faves into one, right?

    Crunchy Pickled Kachumber Salad

    I started with a simple family recipe for a Kachumbar salad. But for a change, I used the homemade pickled Cucumber, onion and baby carrots, vinegar, salt for this recipe. then tweaked the dressing and added some stuff I found in the fridge—red radishes and half a red cabbage. The result is a delightfully flavorful salad—cold, crunchy, pickled and easy to throw together at a moment’s notice. I call it my Crunchy Pickled Kachumber Salad.

    Crunchy Pickled Kachumber Salad Recipe
    Phot: Crunchy Pickled Kachumber Salad Recipe

    Some Useful Tips

    • If you like pickle vegetables, you’re going to love this salad. You can use store bought pickles or make your own by following my recipe.
    • Usually, we tend to favor pickles that are bright with acid and low on sugar; anything labeled “half-sour” usually fits the bill. If using sweeter pickles, add a bit more vinegar and black salt. And honestly, you can use whatever pickles you want in this recipe.
    • Organic cucumbers are smaller and thinner than non organic cucumbers.  They are smaller and slightly sweeter than the non-organic variety, and they have less seeds. Organic cucumbers are great for snacking. They have a wonderful mineral flavor to them. Unfortunately some grocery stores only carry Organic cucumbers seasonally, and some don’t carry them at all.
    • If you can’t find them, substitute Non-organic cucumbers—those are the long thin ones wrapped tightly in plastic. Avoid using regular fat cucumbers, as they are coated with wax and prone to bitterness.

    This is my favourite salad to serve with my Restaurant Style Lahori Mutton Karahi recipe. It just works so well with Tawa fish and the sweetness of the Apricot Chutney. I highly recommend serving this up with some extra Cucumber on the side. 

    Bismillah let’s get started. 

    Check it out Hot and Sour Noodles Recipe and printable version here!!

    Want more Salad Inspiration? 

    Here are some other salad recipes on my blog:

    Put your own spin on it. And lemme know how it turns out and do take a few seconds to rate it! I would love to see your recreations so tag me on instagram @recipestable or Facebook (Recipestable) or on Twitter so I can see how lovely yours turn out.

  • Restaurant Style Tawa Fish Recipe

    Restaurant Style Tawa Fish Recipe

    This Restaurant Style Tawa Fish is a thing of beauty, with its crispy golden crust and spicy, juicy flesh inside. It’s a super quick and can be ready in less than 20 minutes and tastes just like the restaurant’s you would think it’s  take-out. Recreate your favorite Tawa Fish cheaper and better at home!

    Restaurant Style Tawa Fish

    One of the things I find so much fun about food blogging as a living is putting myself up to the challenge of recreating restaurant favorites at home. Although often involving a series of trial and error, it’s very rewarding to come up with a homemade version that’s pretty close to, if not better, than the original.

    Restaurant Style Tawa Fish

    The way I cook this Tawa Fish is a little unorthodox – but it’s a highly effective, no fail method! A blast of heat in a griddle pan and a basting of mustard oil and fish own juices does wonders for plain fish.

    This Restaurant Style Tawa Fish is made with a basic combination of rice flour and desi seasonings. Don’t be fooled by the simplicity of this dish. The fish fries up crispy and delicious. The cooking time is so short that the smell — which, if your fish is fresh and not funky, should not be overpowering — will dissipate quickly. And in the meantime, you have an easy dinner of spicy fish with a toothsome crust, anointed with rice flour and spices, mustard oil , perfumed with fresh Lemon wedges, paired with apricot chutney and naan.

    Restaurant Style Tawa Fish

    Rohu and Catla (Thela) Fish are two excellent choices for Tawa Fish, but baam, cod, or any other mild white fish should work fine. You can use any fish but my preference is rohu, skin on or off, as long as it is not too thick. Be careful not to overcook thin fillets.
    If the fish starts browning too fast, reduce the heat and add a splash of mustard oil to prevent scorching, or squeeze in the juice of half a lemon.

    How to cook Perfect Tawa Fish every time!

    1. Use a heavy duty Griddle (Tawa) – it DOES NOT need to be a non stick griddle or pan! Contrary to popular belief, it’s not just about using a non stick pan. A thin, cheap non stick pan will cause the fish to be in closer and harsher contact with the stove, causing the fish to brown unevenly in the few minutes it’s on the stove. Some crispy patches, some not so crispy ones.
    Use a heavy duty Griddle (Tawa), like a cast iron pan or a good quality, heavy non stick frying pan. I love my Griddle Pan, it heats better, and more evenly, which really helps to get an even, golden, crispy crust.

    2. Heat the pan first before adding the oil – I have NEVER had problems with fish sticking to the pan since I adopted this technique. It’s just an easy way to ensure the oil is hot enough but not too hot (a common mistake people make).
    To do this, just heat a dry pan, and as soon as you see small wisps of smoke, add oil, swirl to coat base, then immediately add the fish.

    3. If it sticks a bit, do not move until it naturally releases – Most fish fillets will initially stick to the pan as they start to cook (unless you’re using so much oil you’re basically shallow frying them). But it naturally releases once the surface is cooked and golden.
    So give it a nudge, and if it doesn’t want to move, then it means that it’s not ready. So just leave it and try again in another 15 seconds or so!

    4. Pat fish dry – Dry fish = crispier surface. Especially important for thawed frozen fish.

    5. Keep Basting with a little oil and its own juices –  it will gives nice juicy flavor.

    Packed generously with a crunchy coating but there is so much more to it than what meets the eye! The flavor beneath the crunchy golden layer is delicious because of the magical spice that hits you with the first bite!! This is one fish that everyone is sure to love. Using this Restaurant Style Tawa Fish recipe, you’ll get perfectly flavored tawa fish.

    Restaurant Style Tawa Fish Recipe
    Restaurant Style Tawa Fish

    That’s one last picture before you go. So that you can get a close, hard look at this Restaurant Style Tawa Fish and get tempted. Oh so so tempted.

    Restaurant Style Tawa Fish
    Restaurant Style Tawa Fish Recipe

    Sauces or Chutney For Tawa Fish

    With well seasoned crispy golden texture outside and spicy juicy flesh inside, I don’t need anything more than a squeeze of fresh lemon. But I am a sauce person, so I never turn down a sauce even for fish! Here are my few favorite Sauces for Tawa Fish:

    • Apricot Chutney (Khubani Ki Chutney) for Tawa Fish – this is an absolute ripper. Totally restaurant worthy, few ingredients, the secret is to soak apricots before preparing the chutney.
    • Mint Tamarind Chutney for fish – a shop stopper kind of chutney with its tangy Minty flavor – made with fresh mint leaves and tamarind pulp.
    • Imli ki Chutney – traditionally thought of for fried fish but equally good with the Tawa Fish.
    • Data Chutney / Khajoor ki Chutney – This smooth chutney, which balances the tartness of vinegar with the sweetness of dates, is a delicious accompaniment to the Tawa Fish & Naan.
    • Brown Chutney – for Fish Mellow down the spice of fish by adding a little brown chutney.
    • Lemon Chutney  for Fish. Lip-smacking chutney to add more zesty flavor to Tawa Fish. It’s finger licking good!

    This Restaurant Style Tawa Fish recipe is ‘sea’riously worth trying , it’s cheaper to make at home and tastes so much better!

    If I may, ahem, say so myself, I’ve had quite a few successes with copycatting recipes. Here are a few of my favorites if you’d like to check them out:

    English Style Fish & Chips Recipe
    Fish Tikka Boti Recipe
    Tangy Pan Fried Fish Recipe
    Fish Steak Recipe
    Crumb Fried Fish Recipe
    Sweet and Sour Fish Recipe


    In the mood for more Pakistani food? Forget takeout and make your very own “combo plate” with Restaurant Style Lahori Mutton Karahi, Mutton Nihari Spicy Mutton Pulao , Angara Qeema.

    Put your own spin on it. And lemme know how it turns out and do take a few seconds to rate it! I would love to see your recreations so tag me on instagram @recipestable or Facebook (Recipestable) or on Twitter so I can see how lovely yours turn out.

  • Fat Free Chicken Karahi Recipe

    Fat Free Chicken Karahi Recipe

    Starting a healthier diet can be easier than you think. But what happens when you start to get bored with the healthy foods you are eating?  Chicken Karahi in a hurry is a winner for everyone in our house. We all get to enjoy some delicious comfort food and I don’t have to spend long in the kitchen to make it. Hurrah! 


    Today I’am going to share a Clean eating Version of Chicken Karahi. It is very delicious and easy to make. A lighter and healthier version of the Pakistani Chicken Karahi, this tomato-based curry is packed with extra fragrant spices and creamy yogurt. Yummilicious treat that will have you wanting to savor every last bite! 
    Clean Eating Chicken Karahi Recipe
    Clean Eating Chicken Karahi
     If you are following a weight loss plan then take your taste buds on an exotic ride with this Fat Free chicken karahi recipe. This delicious Clean Eating Chicken Karahi recipe will keep you satisfied and still help you lose weight. This recipe is low fat, low sodium, and a good source of protein. 

    I have also posted Salmon Fish Fry recipe  which is another easiest & tastiest Clean Eating version of making Fried Fish. Do check it out as well.


    Put your own spin on it. And lemme know how it turns out. Post a photo on Facebook (Recipestable) or on Twitter so I can see how lovely yours turn out.

    Happy Clean Eating!!


  • Chapli Kebab Pizza Recipe (An Italian-Pakistani Twist)

    Chapli Kebab Pizza Recipe (An Italian-Pakistani Twist)

    Give pizza night a new twist by making spicy Chapli Kebab Pizza (Heavenly Double TREAT)!!

    Monday nights are for creativity. Or maybe, you’re like me and just have leftover Chapli Kebab’s wasting away in your fridge. Pinterest gave me the inspiration I needed to take dinner from a boring pizza night to an Italian-Pakistani Twist.

    This Chapli Kebab Pizza is my Pakistanized pizza makeover…..you could say that this is an Pakistani-Italian delight….hey, fusion food is the latest fad.  A delicious and easy to make pizza with crispy, juicy chapli kebab’s and  melty mozzarella cheese!  It is sure to be a hit! 

    Chapli Kebab Pizza (Desi Pizza)

    Photo: Chapli Kebab Pizza

    Chapli Kebab Pizza

    This pizza is so easy to make with left over Chapli Kebab’s with the cheesy topping….nobody could resist. I added dried Italian herbs to the pizza base and that gave a subtle Italian flavor with the Pakistani flavored topping. And just followed my heart to a logical conclusion. I took the shortcut and used the Chili Garlic sauce in place of pizza sauce and lessen cheese to keep it healthy and low fat( you can add more cheese). Well… I needn’t explain what the result was. The recipe finding its place in this blog itself says it all….. Right???

    chapli-kebab-pizza3

    So why go to pizza hut…when you can make healthy homemade ones?? This pizza was a huge hit with my family try it…you will love me more, honestly 🙂 

    Chapli Kebab Pizza recipe

    Photo: Chapli Kebab Pizza

    Bismillah, Let’s get started!

    Check it out the Chapli Kebab Pizza recipe and printable version below.

     Recipe Note’s:

    I am a firm believer that every oven is different and you should check on your food periodically to make sure it is cooking properly.


    Put your own spin on it. And lemme know how it turns out by sharing a picture  on Instagram, Facebook (Recipestable) or Twitter with this hashtag #Recipestable so I can see how lovely yours turn out.


    Happy Baking!!

    If you like this post, Please Subscribe to my blog and let me know your feedback by commenting below.. I have lots more recipes to share with you.

  • How to: Make Karela Gosht (Meat Curry with Bitter Gourd)

    How to: Make Karela Gosht (Meat Curry with Bitter Gourd)

    Bitter Gourd (Karela)

    Bitter gourd, aka Karela In Urdu, is relished for its benefits and despised for its bitter taste – not many people like this veggie, but I die for it.

    Benefits of Bitter Gourd (Karela)

    Here are some Benefits of Mr. Bitter Gourd (Aka karela)

    Bitter gourds have many nutritional and health benefits and one of them is they are good for diabetes. It is an excellent source of vitamins B1, B2, and B3, C, magnesium, folate, zinc, phosphorus, manganese, and has high dietary fiber. It is rich in iron, contains twice the beta-carotene of broccoli, twice the calcium of spinach, and twice the potassium of a banana.

    As my Chronic illness  forces me to transform eating habits, I’ m always on the hunt for natural antioxidants ingredients and Bitter Gourd (Karela) is one of them. I try to eat bitter gourd at least twice in a month because of its antioxidant benefits. It is very good for you, specially if you are diabetic. This reduces your blood sugar level a lot than you can imagine..So try to include it in your everyday diet.

    Bitter Gourd aka 'Karela'
    Bitter Gourd aka ‘Karela’

    The people who have never had bitter gourd, I still know what you all must be thinking.

    Doesn’t it taste bitter??

    How can one eat it??

    Actually it is very much edible and likable.  Truth is that there are numerous ways in which Bitter gourd is prepared in Pakistan. It can be stuffed with tasty spice mix, it tastes delicious when deep fried with mince stuffing( Bharwan Karela ), it can be used to make a dry curry and my mommy makes amazing curry of bitter gourd (Karela Gosht) which doesn’t taste bitter at all. It just depends how it is prepared. So at times it depends on which ingredients and technique you use and also on individual preferences.

    Karela Gosht (Meat with Bitter Gourd)

    Karela Gosht (Bitter gourd cooked with meat) is a traditional Pakistani dish. Yet, there are many Pakistani’s who flee from the very name of Karela. 😛 

    Today, I am presenting one of the tried recipes that gained appreciation among random people. Signature style of using minimum ingredients to make a mouth-watering dish is again used. I am using mutton meat in this recipe, but if you like you can use beef or chicken too. 

    How to make Karela Gosht
    Photo: ‘Karela Gosht'{Bitter Gourd Cooked with Meat and Saute Onion}

    In my home, everyone loves bitter gourd and its diverse dishes. It tastes savory, tangy, wonderfully spicy and slightly bitter at the same time. Karela Gosht is my all time favourite. As I mention above,  I make them quite often and each time they turn out great.(Alhumdulillah)!

    How to make Karela Gosht
    Photo: Karela Gosht with Chapati

    It tastes great with roti / hot chapati or with tandoori roti along with zeera raita. 

    How to make Karela Gosht
    Photo: Karela Gosht

    How to make Karela Gosht

    Learn how to make easy and simple Karela Gosht by following the step by step instructions as shown in  pictures. The recipe is simple and very easy to follow. You would successfully cook it in first attempt. (InshaAllah)

    Bismillah Let’s Begin!

    Ingredients you will need:

    • 1 kg bitter gourd/ karela (peeled, cleaned and sliced)
    • 1 teaspoon salt, for sprinkling
    • 750 gm mutton or lamb meat
    • 1/2 cup cooking oil
    • 4 medium onion, thinly sliced, (divided into two parts)
    • 3 medium tomatoes, thinly sliced
    • 1 inch piece of ginger, thinly sliced
    • 1 garlic bulb, peeled & minced
    • 4 green chilies
    • 2 teaspoon red chili powder
    • 1 teaspoon cumin powder
    • 1 teaspoon coriander powder
    • 1/2 teaspoon turmeric powder
    • 1 teaspoon garam masala powder (all spice powder)
    • salt to taste
    • 4 cups water for meat tenderness
    Step 1:

    First wash bitter gourds thoroughly in cold running water. Now Scrape the outer peel of the bitter melon with a sharp peeler or paring knife to remove a thin layer of peel.

    karela gosht step 1
    Peel or Scrape skin of bitter gourd (Karela)

    Step: 2

    Cut the bitter gourd in half length-wise. Slit from one side to remove seeds and fibrous core using a teaspoon or a paring knife.  

    karela gosht recipe step 2
    Cut the bitter gourd and remove the seeds.

    Step 3:

    Sprinkle 1 teaspoon salt over the peeled bitter gourds, toss together to mix evenly and keep it in sunlight for an hour, it will help to reduce its bitterness.

    karela gosht recipe step3
    Sprinkle Salt and keep it in sunlight

    Step 4: 

    After one hour, You would see salt and sunlight is doing its magic and bitter gourd has started perspirating. Now rinse thoroughly with tap water and keep aside for 10 minutes in a strainer to dry access water.

    karela gosht recipe step 4
    Rinse thoroughly with tap water

    Step 5: 

    Now take the bitter gourd and squeeze it in your hands, the juices will come out and try to remove as much bitter juice out of it as possible. Squeeze and  Squeeze…. don’t give up!!!

    karela gosht recipe step 5
    Squeeze and Squeeze…. don’t give up!!!

    Step 6:

    Cut the bitter gourd into cubes, thin slices, rings or lengthwise. (any desired shape or sizes).

    karela gosht recipe step 6
    Cut into your desired shape

    Step 7: 

    Heat some oil and fry the bitter gourd (in batches) on medium heat for few minutes or until golden brown. Remove from the oil, drain and set aside.

    karela gosht recipe step 7
    Fry Bitter Gourd

    Step 8: 

    Heat 1/2 cup oil in a large pot over medium heat. Saute onion until transculant. Add garlic and ginger and cook for 30 seconds or  the garlic aroma to hit its peak.

    karela gosht recipe step 8
    Saute Onions and Ginger & Garlic

    Step 9: 

    When onion starts getting golden add meat and cook on high flame until meat change its color and turned brown, continuously stir.

    karela gosht recipe step 9
    Brown the meat

    Step 10:

    Now add chopped tomatoes and spices (turmeric, red chili, coriander, etc).  Stir and cook on low flame until tomatoes soften.

    karela gosht recipe step 10
    Add Tomatoes and Seasoning

    Step 11: 

    Add 4 cups of water. Heat to boiling, covered with a lid and simmer for 1 hour on low flame or until meat become tender and juicy. 

    karela gosht recipe step 11
    Cook Covered on low flame

    Step 12: 

    When meat gets cooked properly at this stage increase the flame and cook on high flame for 5 to 7 minutes or until oil comes on top and meat is tender fully. Now add leftover 2 onions and fried bitter gourd. Stir and cook on medium flame for 10-15 minutes or until onion turned caramelized and oil  separates.

    karela gosht step12
    Add fried bitter gourd and onions

    Step 13 

    Sprinkle garam masala and add green chillies and adjust seasoning to taste.. Its ready to serve. Take it out in a serving dish. Serve hot with Homemade Chapati or Roti.

    karela gosht step13
    Serve with garm garm (hot) chapati… ENJOY!

    Tip to First timers: Tasting is important before the final dish is served so that you can adjust the flavour. ENJOY 🙂 

    Check it out the Karela Gosht (Meat with Bitter Gourd) recipe and printable version below.

    Do try the recipe, and let me know how you find bitter gourd. Also there are many varieties and I will keep posting new recipes of bitter gourd in future. Till then see ya all!!!


    Put your own spin on it. And lemme know how it turns out. Post a photo on Facebook (Recipestable) or  on Twitter so I can see how lovely yours turn out.


    Happy Cooking!!

    If you like this post, Please Subscribe to my blog and let me know your feedback by commenting below.. I have lots more recipes to share with you.

  • Mutton Nihari Recipe

    Mutton Nihari Recipe

    Aslam-o-Alakaum My Lovelies !!

     In the Name of Allah, Most Gracious, Most Merciful

    Mutton Nihari 

    Nihari is one of most favorite and traditional dishes of every Muslim home. Be it mutton, chicken or beef nihari, it can be relished with any kind of meat. Traditionally nihari made with the bone marrow meat. It’s a deliciously smooth flour based stew with slow cooked mutton and a myriad of spices.  Mutton Nihari takes a long time to cook but is easy to put together.

    mutton-nihari

    There are lot of ready made Nihari spices available in the market. But I would not Never Never recommend. As they are full of artificial colors and preservative agents. Not a healthy approach. 🙁 You can make the Nihari powder at home by following my Nihari Masala Mix and store it in airtight container for many days.

    This is a must try recipe from my Mommy.  We normally make Nihari with small pieces of mutton as we prefer it over the bone-in mutton.

     Mutton Nihari Recipe
    Photo: Mutton Nihari

    Note:

    Preferably it must be cook on low flame, but those of you who would rather prefer a faster process can cook it in a pressure cooker though the Nihari taste wont be the same as cooked on a low flame.

    So about this Mutton Nihari recipe. As you can see, there’s no layer of fat floating on top of the nihari, As many of you know, when we go out to eat it, we want the brain, marrow and floating oil on top, not a very healthy option. My mommy tried to make it just a little healthy by adding as little butter as possible without compromising on the flavor. Less fat and believe me, just as good. Or if you do like a little oil on top, when you are ready it dish it out, leave it covered on very low heat for about 5-7 minutes. Voila, the ‘little’ amount of oil will rise to the top! 

    Mutton Nihari with ginger and fried onion
    Mutton Nihari with ginger and fried onion

    Traditionally Nihari  served with ginger, fried onion, green chilies and the hottest crisp khameeri roti or naan.

    mutton nihari recipe
    Nihari goes great with ginger, green chilies, fried onion, lemon and Khamiri Roti.

    Let’s get started!

    Mutton  Nihari with Step by Step Picture

    Step 1

    Check it out the Mutton Nihari recipe and printable version below!!

    Mutton Nihari Recipe

    Nihari is one of most favorite and traditional dishes of every Muslim home. Be it mutton, chicken or beef nihari, it can be relished with any kind of meat. Traditionally nihari made with the bone marrow meat. It’s a deliciously smooth flour based stew with slow cooked mutton and a myriad of spices. This Mutton Nihari recipe takes a long time to cook but is easy to put together.
    Prep Time 15 minutes
    Cook Time 4 hours 5 minutes
    Total Time 4 hours 20 minutes
    Servings 6
    Author Bushra Waheed

    Ingredients

    • 1-1/2 kg mutton shank portion, cut into 8 pieces
    • 1/4 cup clarified butter or desi ghee
    • 3 medium onions thinly sliced
    • 1 tablspeoon ginger paste
    • 1 tablespoon garlic paste
    • 2 teaspoon coriander powder
    • 1/2 teaspoon turmeric powder
    • salt to taste
    • 4 tablebspoon wheat flour
    • 4 tablespoon nihari masala Mix

    Nihari Masala Mix

    • 1 tablespoon cumin seeds
    • 2 teaspoon fennel seeds
    • 1 teaspoon soonth dry ginger
    • 1/4 teaspoon nutmeg powder
    • 5-6 green cardamoms
    • 2 black cardamoms
    • 5 cloves
    • 1 bay leaf
    • 1 inch cinnamon stick
    • 10 black peppercorns

    For Garnishing

    • 1/2 cup crispy fried onion
    • 1 inch ginger cut into this strips
    • 1 lime cut into wedges
    • 2 green chilies thinly sliced
    • few fresh coriander leaves chopped
    • Juice of 1 lime

    Instructions

    Niahri Masala Mix Method

    • To make your own Nihari masala from scratch, dry roast all the whole spices for the masala and grind them to a fine powder.

    Mutton Nihari Method

    • Melt butter or ghee (you can use oil as well but ghee makes it tastier) in a heavy bottom pot.
    • saute onion slices and fry till they start to turn brown(about4-5 minutes).
    • Now add mutton pieces, ginger paste and garlic paste.
    • Stir and cook for 5-8 minutes or until meat is no longer pink and all juices run clear.
    • Now add coriander powder, turmeric powder and salt.
    • Sauté for 5 minutes.
    • Add the nihari masala and 8 cups of water.
    • Stir well.
    • Cover the pot and cook on very low flame for about 4 hours until the meat is tender.
    • Keep checking in between. The way to know that the meat is cooked is when it breaks easily with a wooden spoon.
    • Remove the lid and increase the flame.
    • Dissolve wheat flour in half cup of water such that there are no lumps.
    • Slowly pour wheat mixture into the gravy.
    • Stir to mix well.
    • Let it simmer for another 15 minutes or until the gravy is thickened.
    • Drizzle some lime juice over it.
    • Garnish with fried onion, ginger slices, green chilies and fresh coriander leaves.
    • Delicious Mutton Nihari is ready to serve. Enjoy!!

    Notes

    Serving Suggestions:
    Serve with Khameeri Roti or Naan. At time of serving, add chop fresh coriander, green chilies, Julienne cut ginger and fry onions.. and also lemon…. these things will improve the taste of nihari.


    Put your own spin on it. And lemme know how it turns out. Post a photo on Facebook (Recipestable) or  on Twitter so I can see how lovely yours turn out.

    Happy Cooking!!

    If you like this Mutton Nihari recipe, Please Subscribe to my blog. I have lots more recipes to share with you. And If you make it then let me know your feedback by commenting below.

  • Lamb or Mutton Korma Recipe (with Step-by-Step Pictorial Instructions)

    Lamb or Mutton Korma Recipe (with Step-by-Step Pictorial Instructions)

    Lamb Mutton Korma recipe with step by step pictures
    Lamb or Mutton Korma

    Lamb Mutton Korma recipe
    Lamb or Mutton Korma

    Lamb Mutton Korma recipe
    Lamb Mutton Korma

    Mutton Korma Ingredients:

    • 1 kg mutton (rinse and drained)
    • 3 onions, thinly sliced
    • 1 cup oil
    • 1cup plain yogurt
    • 1 tbsp ginger paste
    • 1 tbsp garlic paste
    • 1 tsp cayenne pepper
    • 1 tsp coriander powder
    • 1/4 tsp turmeric powder
    • 1/2 tsp  black pepper
    • 1 tsp cumin seeds, roasted
    • 4-5 green cardamom pods
    • 1 cinnamon stick (about 1-inch)
    • 2 tbsp kewra water
    • 3 bay leaves
    • 4 cloves
    • salt to taste

    For Garnishing:

    • 1/4 cup blanched almond
    • 2 tbsp brown onion
    • 1 tbsp julienne ginger

    How to make Mutton Korma:

    Heat oil or ghee in a pan , add sliced onions and fry on high heat for 8-10 minutes or until the onions turn transparent.

    Stir frequently then reduce heat to low and continue to fry until the onion are light golden.

    Remove from the oil and drain.

    Spread the fried onions on absorbent paper.

    Allow it to cool and when crispy ,

    crush it coarsely with a rolling pin

    .

    In the same oil add ginger-garlic paste and fry for few seconds.

    Pin it For Later:

    Lamb or Mutton Korma
    Lamb or Mutton Korma~ Pin it For Later

  • Recipe: Masala Steam Chicken

    Recipe: Masala Steam Chicken

    Masala Steam Chicken

    A very tasty masala steam chicken recipe   is given to you that is certainly a tasty way to enjoy chicken, as spices such as cumin, garam masala, tamarind are used to flavour and give a tentalising taste.

    Masala Steam Chicken recipe
    Photo: Masala Steam Chicken Recipe

    Check it out the Masala Steam Chicken Recipe here!!


    [one_fourth]Prep Time: 10 minutes[/one_fourth] [one_fourth]Cook Time:30 minutes[/one_fourth] [one_fourth]Servings: 4[/one_fourth] [one_fourth_last]Difficulty Level: Easy [/one_fourth_last]

    [tabs type=”horizontal”] [tabs_head] [tab_title]Ingredients[/tab_title] [tab_title]Nutrition[/tab_title] [/tabs_head] [tab]

    • 500 gm chicken, cut into small size pieces
    • 1 tsp ginger paste
    • 1 tsp garlic paste
    • 1 egg, lightly beaten
    • 3 tbsp plain flour
    • 2 tbsp red chili powder
    • 1 tbsp cumin seeds
    • 1 tbsp hot spice powder
    • 1/2 tsp turmeric powder
    • 1/2 cup tamarind paste
    • salt to taste
    • Oil for frying

    [/tab] [tab]Yield: 4 servings

    Nutritional information is not yet available. [/tab] [/tabs]

    Directions:
    [tabs type=”horizontal”] [tabs_head] [tab_title]Step by Step Method[/tab_title] [tab_title]Serving Suggestions[/tab_title][/tabs_head] [tab]

    1. Place chicken in a large bowl.
    2. Add ginger garlic paste, tamarind paste, red chili powder, turmeric powder, cumin, hot spices powder and salt.
    3. Mix well.
    4. Now coat chicken pieces with flour.
    5. Then dip in beaten egg.
    6. Heat oil in a deep pan over medium heat.
    7. Fry chicken for 10-12 minutes or until golden brown.
    8. Remove from the oil.
    9. Now steam chicken for 10-15 minutes or until tender.
    10. Masala Steam Chicken is ready to serve.

    [/tab] [tab]

    • Serve with Coleslaw salad and french fries.

    [/tab] [/tabs]

    If you like Masala Steam Chicken Recipe and make it then let me know your feedback by commenting below.

  • Chicken Keema Naan Recipe (with Step by Step Pictures)

    Chicken Keema Naan Recipe (with Step by Step Pictures)

     Chicken Keema Naan

    Delicious Naan stuffed with spicy chicken mince stuffing. Chicken Keema naan makes a meal in itself, served with a raita of choice and pickles. Check it out the Chicken Keema Naan recipe here!!

    Chicken Keema Naan recipe
    Photo: Chicken Keema Naan

     Chicken Keema Naan recipe
    Photo: Chicken Keema Naan

    Chicken Keema Naan recipe
    Chicken Keema Naan

    Chicken Keema Naan recipe
    Chicken Keema Naan

    [divider]

    [one_fourth]Prep Time: 40 minutes + rising[/one_fourth] [one_fourth]Cook Time: 25 minutes[/one_fourth] [one_fourth]Servings:8[/one_fourth] [one_fourth_last]Difficulty Level: Medium[/one_fourth_last]

    [divider]

    [tabs type=”horizontal”] [tabs_head] [tab_title]Ingredients[/tab_title] [tab_title]Nutrition[/tab_title] [/tabs_head] [tab]

    For Dough:

    • 1 sachet yeast, rapid rise
    • 4 cups self rising flour
    • 3/4 cup warm water
    • 2 tablespoon oil
    • 2 tablespoon yogurt
    • 1 teaspoon sugar
    • water for kneading

    For Keema Filling:

    • 1 kg chicken mince (keema)
    • 1 small onion, finely chopped
    • 3 green chilies, finely chopped
    • 2 tablespoon chopped fresh coriander
    • 2 tablespoon chopped mint leaves
    • 1 teaspoon ginger garlic paste
    • 1 teaspoon red chili powder
    • 1 teaspoon cumin powder
    • 1 teaspoon whole coriander, crushed
    • 1 teaspoon garam masala powder
    • 1 teaspoon crushed red chili
    • 1 teaspoon pomegranate seeds (anardana)
    • salt to taste

    [/tab] [tab]Yield:8 servings

    Nutritional information is not yet available. [/tab] [/tabs]

    Directions:
    [tabs type=”horizontal”] [tabs_head] [tab_title]Step by Step Method[/tab_title] [tab_title]Serving Suggestions[/tab_title][/tabs_head] [tab]

    Step 1

    To Make the Dough: Add yeast and sugar in warm water and let it rise for 10 minutes.

    Step 2

    Make a well in flour and add yeast mixture, yogurt and oil. Mix well. Knead a soft dough you can use extra warm water if needed.

    Step 3

    Cover with kitchen towel in warm place. Let the dough rise for about 35 minutes.

    Step 4

    Punch the dough and take out air. Let it sit again for 30 minutes.

    Step 5

    Make small balls out of the dough and cover them with awet cloth.

    Step 6

    Place chicken keema in a large bowl. Now put all the filling ingredients in keema. Mix well and set aside.

    Step 7

    Heat a griddle on medium heat.

    Step 8

    Turn the oven to broiler setting and put the rack on top most part.

    Step 9

    Roll the ball into about 3-inch circle.

    Step 10

    Take Keema mixture and fill in the circle and make ball again like you make for kachori.

    Step 11

    Roll out into a size of naan you want.

    Step 12

    Make depressions with the tip of fingers or with soft baby spoon handle.

    Step 13

    Put the naan on tawa on low to medium heat and spray Pam on it. Let it cook for 10 minutes or you see the keema is changing the color to pink or light brown.

    Step 14

    Transfer naan into the oven. Let it broil for 10 minutes or until it turns to your desired color.

    Step 15

    Remove from the oven. Chicken Keema Naan is ready to serve. ENJOY!!

    [/tab] [tab]

    • Serve with yogurt or zeera raita.

    [/tab] [/tabs]

    If you like Chicken Keema Naan recipe and make it then let me know your feedback by commenting below.

    Pin It For Later

    Chicken Keema Naan
    Pin it For Later

  • Methi Chicken Recipe – A Tasty Tweak to your regular Chicken Curry

    Methi Chicken Recipe – A Tasty Tweak to your regular Chicken Curry

    Methi Chicken (Chicken Curry with Fenugreek Leaves)

    Methi Chicken is a lip smacking chicken recipe which is cooked under pressure(dum) along with yogurt, fresh methi and spices. This Methi Chicken recipe is easy to cook and great in taste, as well as looks and texture.

    Methi Chicken Recipe
    Methi Chicken Recipe (Chicken Curry with Fenugreek Leaves)

    This Methi Chicken is one of my go-to recipes when I want to cook a simple, wholesome non-vegetarian meal for my family. The basic recipe for this dish is my Mother’s so I know it is good as I grew up eating it. The fresh Methi (fenugreek) leaves add a lovely, earthy flavor to this dish. You can also use dried fenugreek if you don’t have access to fresh leaves and you should be able to find both fairly easily in any grocery.

    Methi Chicken Recipe (Chicken Curry with Fenugreek Leaves)
    Methi Chicken Recipe (Chicken Curry with Fenugreek Leaves)

    Goes great with plain rice, salad and Raita. If you thicken the gravy, it tastes just as good with hot, freshly made Chapatis.

    Methi Chicken Recipe (Chicken Curry with Fenugreek Leaves)

    Check it out the Methi Chicken recipe here!!

    [tabs type=”horizontal”] [tabs_head] [tab_title]Ingredients[/tab_title] [tab_title]Nutrition[/tab_title] [/tabs_head] [tab]

    • 1-1/2 kg chicken cut into karahi pieces

    For the marinade:

    • 1 tsp each, ginger and garlic paste
    • 2 tsp yogurt
    • 1 tsp red chilli powder
    • ½ tsp cumin powder
    • Salt to taste

    For the Gravy:

    • 2 cardamoms
    • 1 cinnamon stick
    • 3 green chillies, chopped
    • 1/2 tsp black cumin seeds
    • 2 cups chopped fenugreek leaves
    • 1 lemon juice
    • 2 onions, finely chopped
    • 2 tomatoes, finely chopped

    [/tab] [tab]Yield: 8 servings

    Nutritional information is not yet available. [/tab] [/tabs]

    Directions:

    [tabs type=”horizontal”] [tabs_head] [tab_title]Step by Step Method[/tab_title] [tab_title]Serving Suggestions[/tab_title][/tabs_head] [tab]

    Step 1

    Mix all the ingredients and marinate the chicken for 30 minutes.

    Grill in a pre-heated oven till golden brown.

    Step 3

    For the gravy, roast cardamom, cinnamon, black cumin seeds and chopped onions till golden brown.

    Step 4

    Add fenugreek leaves and saute for four minutes.

    Step 5

    Add tomatoes and chicken and cook till the aroma of the fenugreek leaves comes out.

    Step 6

    Put lemon juice, garnish with ginger julienne. Methi Chicken is ready to serve.

    [/tab] [tab]

    • Serve with chapati or white rice.

    [/tab] [/tabs]

    If you like Methi Chicken recipe and make it then let me know your feedback by commenting below.

  • Recipe: Chicken Bharta

    Recipe: Chicken Bharta

    Chicken Bharta

    Here is one more delicious Chicken recipe for you – Chicken Bharta is a filling recipe that can go great with roti and paratha. It can be a vegetarian dish, like baingan bharta (egg plant grilled and mashed), or non-veg like chicken bharta. You can also serve some raita with it for more delicate taste. Check it out the Chicken Bharta recipe here!!

    Chicken Bharta recipe
    Photo: Chicken Bharta Recipe

    [divider]

    [one_fourth]Prep Time: 10 minutes[/one_fourth] [one_fourth]Cook Time: 25 minutes [/one_fourth] [one_fourth]Servings: 3 [/one_fourth] [one_fourth_last]Difficulty Level: Easy[/one_fourth_last]

    [divider]

    [tabs type=”horizontal”] [tabs_head] [tab_title]Ingredients[/tab_title] [tab_title]Nutrition[/tab_title] [/tabs_head] [tab]

    • 500 gm chicken
    • 2 medium onions, finely chopped
    • 1- 1/2 cups tomato puree
    • 4 black cardamom
    • 4 green cardamom
    • 4 bay leaf
    • 3 cloves
    • 5 teaspoon sesame oil
    • 3 teaspoon ginger garlic paste
    • 3 teaspoon cashew paste
    • 2 teaspoon yogurt
    • 2 teaspoon fresh cream
    • 1 teaspoon butter
    • 1 teaspoon red chili powder
    • 1 teaspoon coriander powder
    • 1 teaspoon cumin powder
    • 1 teaspoon kasuri methi, crushed
    • 1/2 teaspoon turmeric powder
    • 1 teaspoon garam masala powder
    • salt to taste

    [/tab] [tab]Yield: 3 servings

    Nutritional information is not yet available. [/tab] [/tabs]

    Directions:
    [tabs type=”horizontal”] [tabs_head] [tab_title]Step by Step Method[/tab_title] [tab_title]Serving Suggestions[/tab_title][/tabs_head] [tab]

    Step 1

    Add all the spices cloves, cardamom, and bay leaf along with the chicken while boiling.

    Step 2

    Separate Chicken from bones. Add oil in a pan and fry the chopped onions until brown.

    Step 3

    Make a smooth paste of ginger garlic paste, red chilli powder,
    Coriander powder, and cumin powder with water.

    Step 4

    Now add this paste in the deep pan. Stir well. Add tomato puree, salt and then the separated boneless chicken into it.

    Step 5

    Mix well then add cashew paste and curd.

    Step 6

    Add kasuri methi into water and pour it in the mixture.

    Step 7

    Mix all properly and add butter, garam masala powder into it. Garnish it with fresh cream. Chicken Bharta is ready to serve.

    [/tab] [tab]

    • Serve with naan or paratha and raita.

    [/tab] [/tabs]

    If you like Chicken Bharta recipe and make it then let me know your feedback by commenting below.

  • Recipe: Keema Matar (Minced Lamb with Green Peas)

    Minced Lamb cooked with green peas(matar) and spices. This is my favourite dish with brown rice. This Minced Lamb with Peas recipe is easy to make and can be made either on the stove or a pressure cooker. If you are in a rush you can throw everything in the pressure cooker and it’s done in just 10 minutes. 

    Easy to cook and delicious Keema Matar recipe. It’s a simple recipe of keema matar to light your dining table.  Other meats such as mutton, chicken or turkey can also be used in this recipe. Try this keema matar recipe and You’ll be surprised how easy it is to make.

    [one_third] Prep Time: 10 minutes[/one_third] [one_third]Cook Time: 1 hour 10 minutes[/one_third] [one_third_last] Servings: 6[/one_third_last]

    [review]

    [tabs type=”horizontal”] [tabs_head] [tab_title]Ingredients[/tab_title] [tab_title]Nutrition[/tab_title] [/tabs_head] [tab]

    • 1 kg mutton mince(keema)
    • 2 cups water
    • 1 cup green peas, boiled
    • 1/4 cup cooking oil or ghee
    • 3 red onions, finely chopped
    • 3 large tomatoes, finely chopped
    • 2 green chillies, finely chopped
    • 1 tablespoon ginger garlic paste
    • 2 teaspoon red chili powder
    • 1 teaspoon coriander powder
    • 1 teaspoon cumin powder
    • 1 teaspoon garam masala powder
    • 1/2 teaspoon turmeric powder
    • salt to taste

    [/tab] [tab]Yield: 6 servings

    Nutritional information is not yet available. [/tab] [/tabs]

    Directions:
    [tabs type=”horizontal”] [tabs_head] [tab_title]Step by Step Method[/tab_title] [tab_title]Serving Suggestions[/tab_title][/tabs_head] [tab]

    Step 1

    Clean, wash and drain the mutton mince thoroughly. Wash the peas, drain.

    Step 2

    Heat oil in a heavy bottom skillet over medium heat. Saute onion in the oil. Add garlic and stir-fry for a minute.

    Step 3

    Add mutton keema, ginger, tomatoes, green chilies, coriander powder, cumin powder and red chili powder. Cook and stir for 5-8 minutes.

    Note:breaking up any lumps if formed.

    Step 4

    Add water. Bring to a boil. Cover and simmer for 40 minutes or until mince is tender.

    Step 5

    Add peas, salt, and the 1 cup water. Mix well.

    Step 6

    Cover and simmer for 10-15 minutes or until peas are cooked well. Adjust seasoning.

    Step 7

    Take it out in a serving dish. Sprinkle garam masala over it. Garnish with green chilies and ginger slices. Delicious Keema Matar is ready to serve.

    [/tab] [tab]

    Serve with roti or paratha.

    [/tab] [/tabs]

  • Recipe: Hammer Chili Chicken

     Hammer Chili Chicken 

    You will enjoy making this hammer chili chicken. The presentation of this dish is simply lovely. You can serve it on top of rice, with baked potatoes, french fried, salads or sauces of choice or however you feel like. Must try this Hammer Chili Chicken recipe!

    Prep Time: 30 minutes

    Cook Time: 15 minutes

    Servings: 4

    Ingredients

    • 1/2 kg boneless chicken breasts
    • 1/4 cup vegetable oil
    • 1 tbsp ginger paste
    • 1 tbsp garlic paste
    • 2 tbsp papaya paste
    • 2 tbsp lemon juice
    • 2 tbsp green chili paste
    • salt to taste


    Directions:

    1. Wash chicken and drain.
    2. Then hammer chicken breasts with wooden hammer.
    3. Now put green chili paste, ginger garlic paste, papaya paste and salt on it.
    4. Marinate for 20 minutes.
    5. Heat oil in a grill pan over medium heat.
    6. Put coated chicken pieces in hot oil.
    7. Stir fry for few minutes then let it simmer for 5-8 minutes or until chicken is tender.
    8. Take it out in a dish.
    9. Pour lemons juice on it.
    10. Delicious Hammer Chili Chicken is ready now.


    • Serve with  Fried Rice.


  • Spice Up Your Life: Desi-Style Chili Chicken Recipe You Crave!

    Pakistani Or Desi Style Chili Chicken

    This is a really easy & quick recipe. And guys, I am already warning people with no tolerance to spicy food. Beware. This can be the most spiciest food ever. You can always lessen the amount of red chilli paste in eat but in my views you’ll ruin the whole point of this dish. Its one of my all time favorites. I always make this dish with Bhagaar walay chawal( stir fried rice) & spicy green chutney & serve it wit sliced lettuce & cucumbers. For a perfect taste do not add all ingredients at once. The timing in when you add what to a dish while cooking makes a big difference in its taste. Enjoy till you start sweating 🙂

    Prep Time: 5 minutes

    Cook Time:30 minutes

     Servings: 5

    Ingredients

    For Desi Chili Chicken:

    • 1 kg chicken, cut into 16 pieces
    • 1/2 cup oil
    • 2 onions, cut into cubes
    • 2 capsicum, cut into cubes
    • 4 tbsp ketchup
    • 2 tbsp chili sauce
    • 1 tbsp ginger garlic paste
    • 1-1/2 tsp red chili powder
    • 1 tsp salt

    For Tomato Sauce:

    • 1/4 cup oil
    • 4 green chilies
    • 1 onion, thinly sliced
    • 1 can whole tomatoes

    Yield: 5 servings

    Directions:

    To Make Tomato Sauce:

    1.  Heat 1/4 cup oil in a pan.
    2. Add chopped green chilies and sliced onion.
    3. Fry for 2-3minutes or until transparent.
    4. Now add whole tomatoes.
    5. Cover and cook on low flame for 10 minutes.
    6. Remove from the heathen blend until smooth.

    To Make Desi Chili Chicken:

    1. Cook chicken with ginger garlic paste, chili powder and salt for 20 minutes or until all water dries up.
    2. Heat oil in a deep wok over medium heat.
    3. Add capsicum and onion’s cubes.
    4. Saute for 2 minutes then add prepared tomato sauce and cooked chicken.
    5. Stir well.
    6. Also add tomato ketchup and red chili sauce.
    7. Cook on low flame for 10 minutes or until chicken is tender.
    8. Desi Chili Chicken is ready to serve. ENJOY!!


    • Serve with boiled rice.


  • Recipe: Tawa Chicken Bharta

    Recipe: Tawa Chicken Bharta

    Tawa Chicken Bharta

    [one_third] Prep Time: 5 minutes[/one_third] [one_third]Cook Time: 30 minutes[/one_third] [one_third_last] Servings: 6[/one_third_last]

    [tabs type=”horizontal”] [tabs_head] [tab_title]Ingredients[/tab_title] [tab_title]Nutrition[/tab_title] [/tabs_head] [tab]

    • 4 boneless chicken breasts, cut into strips
    • 1/2 cup Oil
    • 2 onions, thinly sliced
    • 1 green bell pepper, thinly sliced
    • 1 tomato, remove seeds & cut into cubes
    • 2 tbsp tomato paste
    • 2 tbsp tomato ketchup
    • 2 green chilies, thinly sliced
    • 1 tsp cumin seeds, roasted & ground
    • 1 tsp coriander powder
    • 1/2 tsp dry mango powder
    • 1/2 tsp white pepper
    • 1 tsp red chili powder
    • 1 tsp salt

    [/tab] [tab]Yield: 6 servings

    Nutritional information is not yet available. [/tab] [/tabs]

    Directions:
    [tabs type=”horizontal”] [tabs_head] [tab_title]Step by Step Method[/tab_title] [tab_title]Serving Suggestions[/tab_title][/tabs_head] [tab]

    1. Heat oil on a griddle or tawa.
    2. Fry onions for 5-6 minutes or until light golden.
    3. Now add chicken strips and cook for 5 minutes or until no longer pink.
    4. Then add red chili powder, salt, coriander powder, cumin, white pepper, dry mango powder, tomato paste and ketchup.
    5. Stir frequently.
    6. Cook for 15-20 minutes or until chicken is tender.
    7. Then add green bell pepper, tomato cubes and green chilies.
    8. Stir fry for 2 minutes.
    9. Then remove from the heat.
    10. Take it out in a serving dish.
    11. Garnish with coriander leaves.
    12. Tawa Chicken Bharta is ready to serve.

    [/tab] [tab]

    • Serve with naan or paratha.

    [/tab] [/tabs]